
Free Crochet Orange Fruit Amigurumi Pattern With Details
Brighten your crochet projects with this Free Crochet Orange Fruit Amigurumi Pattern, designed to help you easily create cute, realistic, and vibrant orange fruits.
Small handmade items that bring a bit of happiness always brighten up your day, and crocheted fruit amigurumis fit that perfectly. The Free Crochet Orange Fruit Amigurumi pattern lets you create a cute, round orange that feels lively and full of personality. This project is a wonderful way to make something cheerful and simple, whether for yourself or as a thoughtful gift.
How To Crochet Orange Fruit Amigurumi Pattern
This amigurumi orange has a soft texture thanks to the yarn used, which gives it a slightly bumpy feel similar to a real orange peel but in a cozy, playful form. The shape is nicely rounded and plump, with little stitched details that add character without overcomplicating the design. One charming feature is a small green leaf on top, adding a fresh touch and a pop of color. You can adjust the size by working with different yarn thicknesses and hooks—making a tiny, palm-sized orange or a bigger version that’s great as a decoration.

Made mostly with single crochet stitches worked in continuous rounds, this project is straightforward and suitable for beginners. Keeping an even stitch tension helps keep the round shape smooth and consistent. The idea behind creating this amigurumi orange comes from the simple joy of turning everyday fruits into soft, playful toys. The yarn’s slight texture helps highlight the stitches, giving shape and depth to each part.
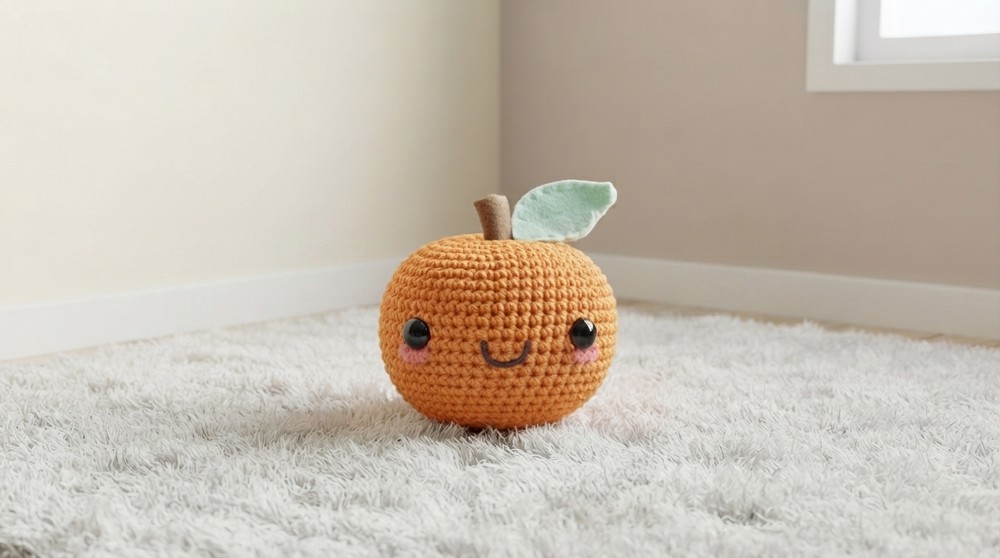
This crochet orange is perfect as a sweet homemade gift for friends who enjoy fruit-themed items or as a colorful addition to your home decor. It’s also fun to try making other fruits alongside it, giving you a small collection full of color and charm. If you like quick and happy projects, this Free Crochet Orange Fruit Amigurumi pattern is a nice choice to try.

Crochet Cute Orange Amigurumi Pattern
In this pattern, you will learn how to crochet an adorable orange amigurumi. The pattern covers creating the base shape of the orange through simple crochet stitches, followed by shaping it into a rounded form by manipulating stitch placement and rounds. Additionally, you’ll learn to crochet a textured leaf to complete the look. This is a beginner-friendly project with helpful tips for shaping and finishing your orange to perfection.
Quick Overview of Pattern
- Begin with foundation chains and create a tight small circle.
- Work several rounds of single crochet knots in the same stitch to form the base.
- Increase the circle size gradually by adding stitches and rounds.
- Use the technique of skipping stitches in later rounds to shape the orange into a bowl and then a sphere.
- Stuff the orange to give fullness and plumpness.
- Optional step: Pull yarn through the center to create an orange-like indentation.
- Crochet a leaf with looped stitches for texture and dimension.
- Assemble the orange by adding a stem (using felt or yarn), leaf, and facial details if desired.
Notes
- This pattern uses continuous rounds of single crochet knots worked repeatedly in the same stitch to build shape.
- Skipping stitches strategically helps create the curved shape of the orange instead of a flat disc.
- The leaf crochet involves increasing and decreasing loops worked in layers to form a natural leaf shape.
- Stuffing density affects the final plumpness; more stuffing gives a fuller sphere.
- Optional fuzzy or facial details can be added with craft eyes, blush, and paper/felt mouths.
- The stem can be improvised with felt if yarn is unavailable.
Skill Level
Beginner to Intermediate. Requires knowledge of chain stitch, single crochet, increasing stitches in one spot, skipping stitches, and basic shaping techniques.
Materials
- Orange yarn (cotton or acrylic)
- Green yarn for leaf
- Crochet hook (size suited to yarn, about 3 mm recommended)
- Stuffing (fiberfill)
- Yarn needle for sewing and weaving in ends
- Optional: Brown felt and hot glue for stem
- Optional: Craft animal eyes or embroidery thread for face
- Optional: Blush or makeup for adding cheeks
Measurements / Sizing (Optional)
- Finished orange approximately 3 to 4 inches in diameter (adjustable by yarn thickness and stuffing).
- Leaf about 1.5 inches long, formed by layered loops.
Gauge / Stitch Pattern
- Gauge not critical; approximate gauge is 14 sc x 18 rows = 4 inches square with DK weight yarn and 3 mm hook.
- Primary stitch: single crochet ‘knots’ worked multiple times into single stitches for shaping.
Stitch Abbreviations
- ch = chain
- sc = single crochet
- sl st = slip stitch
Special Techniques
- Multiple single crochets in one stitch: Used extensively to enlarge the circle and shape bowl form.
- Skipping knots: Skip stitches during rounds by pulling yarn through multiple loops to decrease circumference and form sphere.
- Yarn-pulling through center for shape: Optional step to create ‘donut’ indentation to mimic orange texture.
- Looped stitches for leaf: Creating leaves by crocheting multiple loops in one stitch successively to form dimensional shape.
The Crochet Pattern!
Base Circle and First Rounds
- Step 1: Make a slip knot and form 1 chain (this will be your first stitch).
- Step 2: Insert hook into the first chain; yarn over and pull yarn through to create 1 loop (two loops will be on hook).
- Step 3: Yarn over and pull through both loops on hook to complete first single crochet knot.
- Step 4: Repeat Step 3 into the exact same stitch 5 more times for a total of 6 single crochet knots in same chain — this is your tiny circular base (Round 1).
- Step 5: To close ring, insert hook into first stitch of round (3 loops on hook), yarn over and pull through all 3 loops.

Increasing Size: Second Round
- Step 6: Chain 1 to start the new round (makes circle taller).
- Step 7: Place 2 single crochet knots in each stitch around from the previous round — first make 1 sc in first stitch, then make a second sc in the same stitch before moving on.
- You are making 2 sc in every existing knot to expand circle outward.
- This doubles number of stitches and expands diameter of the orange base.
Third and Subsequent Rounds
- Step 8: For the third round, you will work 2 knots into each stitch from previous round, similar to Round 2 — continuing to increase circle size.
- Step 9: For subsequent rounds, you continue increasing the circle size by placing 2 sc in each stitch but start spacing these increases.
- For example, in Round 3, 2 sc per knot; in Round 4, increase every other knot; in Round 5, increase every 4th or 5th knot.
- This controlled spacing causes the ring to curve upward, forming the bowl shape characteristic of an orange.
Shape Reduction: Skipping Knots and Decreasing
- Step 10: Once maximum size is reached (approximately Round 5), begin decreasing size by skipping stitches.
- To skip a knot: insert hook into stitch but instead of pulling yarn through both loops, pull yarn through the next stitch’s loop forming 3 loops on hook.
- Yarn over and pull through all loops, effectively skipping a knot and tightening the circumference.
- Skip only one knot per round for smoother decrease and visual appeal.
- Repeat decreasing with skipping knots for approximately four rounds or until the ball shape is complete and closing.

Stuffing
- Step 11: Before completely closing, stuff your orange firmly with fiberfill to ensure plumpness.
- Adjust stuffing to your desired firmness — more stuffing results in a larger, fuller sphere.

Finishing Round
- Step 12: Crochet until no stitches remain.
- Fasten off by knotting the yarn securely.
- Weave in ends inside orange body for a neat finish.
Optional Step: Creating Indentation for Orange Shape
- Step 13: Thread a piece of yarn onto a blunt yarn needle or darning needle.
- Insert the needle through one side of the orange, pulling yarn through all layers to the opposite side.
- Pull yarn tightly to form an indentation, making the orange look more realistic with a donut-like shape.
- Secure yarn with a knot and tuck inside orange to hide.
Crochet Leaf
- Step 14: Using green yarn, create a chain about 8–10 stitches long; this forms length of leaf.
- Step 15: At the tip, single crochet to form a knot, increasing loops stepwise:
- 1 loop in first stitch,
- 2 loops in next,
- 3 loops in next,
- 4 loops in widest part,
- Then gradually decrease loops by reversing pattern (3, 2, 1) to form leaf shape.
- Step 16: Crochet symmetrical second half attached to first by working loops in descending order, shaping a natural leaf.
- Step 17: Fasten off, weave ends securely.

Assembly & Finished Size
- Round orange approximately 3–4 inches diameter, plump and soft.
- Leaf approximately 1.5 inches long, textured and dimensional.
- Optional stem made by rolling felt square (brown) and gluing it onto orange.
- Attach leaf and stem securely with hot glue or sewn yarn.
- Attach Eyes
- Optionally attach craft animal eyes and add facial blush or paper mouth for character.
- Finished orange suitable as decorative plush or desk ornament.

Conclusion
This easy-to-follow crochet pattern results in a charming and realistic little orange amigurumi perfect for decoration, gifting, or adding to a fruit-themed collection. The bowl and sphere shaping techniques demonstrated help create dynamic and lifelike forms using simple increases and decreases. The leaf adds a natural touch, and optional facial details bring personality to your piece. With patience and practice, you can create many more fruits and foods using similar principles.