
Cute Free Crochet Teddy Bear Amigurumi Pattern for Home Decor
Snuggle up with charm using this Free Crochet Teddy Bear Amigurumi Pattern, perfect for gifts, decor, and soft, huggable companions.
From the moment you hold a handmade teddy bear, its warmth and personality are undeniable. The Free Crochet Teddy Bear Amigurumi Pattern allows you to bring this timeless charm into your own hands. With its soft, huggable shape and meticulously designed details, this pattern ensures each bear has a distinct and endearing character, perfect for gifting or displaying.
Free Crochet Teddy Bear Amigurumi Pattern for Cuddly Fun

Perfect for Gifts and Decor
This teddy bear isn’t just adorable, it’s versatile. Following this Free Crochet Teddy Bear Amigurumi Pattern, you can make a comforting companion for a child, a thoughtful keepsake for a loved one, or a decorative accent for your home. Its compact size and soft texture make it ideal for cuddling, while its polished stitches and proportional features give it a visually appealing presence on any shelf or nursery.

Crochet Teddy Bear Keychain Pattern Step-by-Step
Materials Required
- Yarn:
- Main Color: Approximately 23g of yarn in your chosen color (e.g., brown or beige). Use a yarn thickness of about 3–4mm. If your yarn is thinner (e.g., 2mm), you can double strand it to achieve the desired thickness.
- Accents: A small amount of pearl or white yarn for the face detail.
- Nose Embroidery: A small amount of brown or black yarn for sewing the nose.
- Hook: 3.0mm crochet hook.
- Eyes: Small movable eyes or 5-6mm black beads for the teddy bear's eyes (optional: glue to attach).
- Stuffing: Synthetic fiberfill or soft polyfill.
- Tapestry/Yarn Needle: For sewing and embroidery.
- Optional Keychain Ring/Pin: For converting into a keychain.
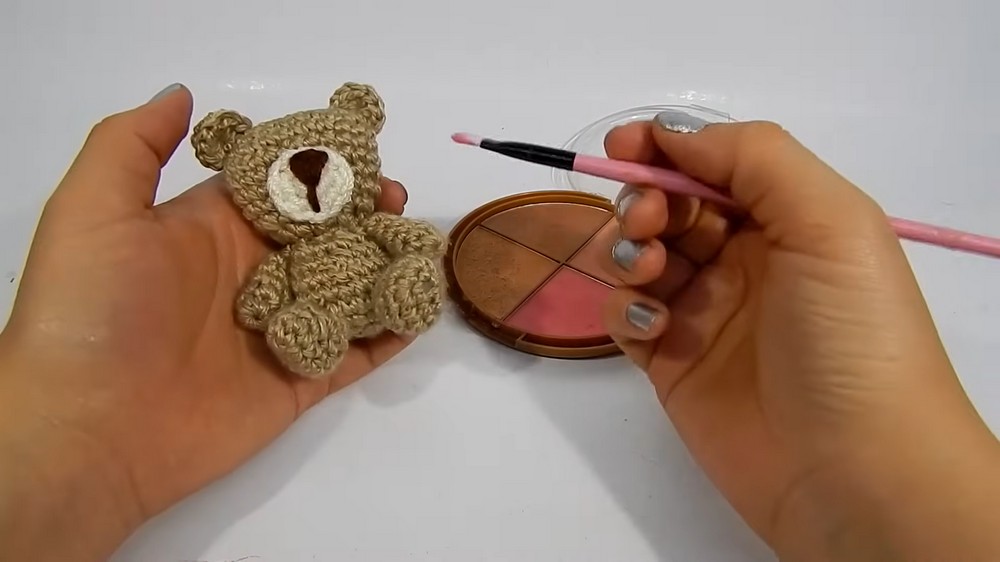
- Blush/Eyeshadow: For adding blush to the cheeks (optional).
Gauge
Gauge is approximate for this project and will depend on your tension. As a guide:
- 6 single crochet stitches = 2 cm.
Finished Size
When completed, the teddy bear measures approximately 6–8 cm (2.5–3 inches) tall, ideal for a mini keychain or small decoration.
Special Techniques Used
- Magic Ring: Used to start pieces worked in the round.
- Half Double Crochet (hdc): Insert hook, yarn over, pull through, yarn over, and pull through all 3 loops.
- Single Crochet (sc): Insert hook, yarn over, pull through, yarn over, and pull through both loops.
- Increase (inc): Crochet 2 stitches into 1 stitch to expand the work.
- Decrease (dec): Combine 2 stitches into 1 to decrease and shape the work. Use invisible decreases for a neater result.
- Color Changes: Transitioning to a different color for detailing.
Pattern Instructions
Body (Main Color)
- Round 1: Start with a magic ring. Ch 1, work 6 sc into the ring. Tighten the loop to close. (6 stitches)
- Round 2: Work 2 sc in each stitch around (inc). (12 stitches)
- Round 3: Alternate 1 sc, 1 inc (sc in the first stitch, 2 sc in the next). (18 stitches)
- Round 4: Alternate 2 sc, 1 inc. (24 stitches)
- Round 5: Work 1 sc in each stitch around for the entire row. (24 stitches)
- Round 6: Alternate 3 sc, 1 dec (sc in three stitches, sc decrease over the next two stitches). (18 stitches)
- Round 7: Alternate 2 sc, 1 dec around. (12 stitches)
- Round 8: Alternate 1 sc, 1 dec around. (6 stitches)


Stuff the body firmly with synthetic stuffing before finishing the row.
Fasten off, leaving a long tail for sewing the body to the head.
Head (Main Color)
- Round 1: Start with a magic ring. Ch 1, work 6 sc into the ring. Tighten to close. (6 stitches)
- Round 2: Work 2 sc in each stitch around (inc). (12 stitches)
- Round 3: Alternate 1 sc, 1 inc. (18 stitches)
- Round 4: Alternate 2 sc, 1 inc. (24 stitches)
- Rounds 5-7: Work 1 sc in each stitch around for three rows (no increases). (24 stitches for each row)
- Round 8: Alternate 2 sc, 1 dec. (18 stitches)
- Round 9: Alternate 1 sc, 1 dec. (12 stitches)
- Round 10: Dec in every stitch around. (6 stitches)

Stuff the head firmly before closing the top opening.
Fasten off, leaving a long tail for sewing.

Arms (Make 2)
- Round 1: Start with a magic ring. Ch 1, work 7 sc into the ring. Tighten to close. (7 stitches)
- Rounds 2-6: Work 1 sc in each stitch around. (7 stitches per row)
Lightly stuff only the lower half of the arms to keep them slightly flexible. Flatten the top portion of the arms and stitch them closed. Leave a long tail for sewing.
Legs (Make 2)
- Round 1: Start with a magic ring. Ch 1, work 6 sc into the ring. Tighten to close. (6 stitches)
- Round 2: Work 2 sc in each stitch around (inc). (12 stitches)
- Round 3: Work 1 sc in each stitch around. (12 stitches)
- Round 4: Alternate 1 sc, 1 dec. (8 stitches)
- Round 5: Work 1 sc in each stitch around. (8 stitches)
Stuff the legs lightly. Fasten off, leaving a tail for sewing.
Ears (Make 2)
- Magic Ring: Start with a magic ring, leaving a long yarn tail.
- Round 1: Ch 1, work 7 hdc stitches into the ring. (7 stitches)
- Tighten the magic ring and fasten off, leaving a long tail for sewing.
Snout (Pearl/White Yarn)
- Round 1: Start with a magic ring. Work 6 sc into the ring. (6 stitches)
- Round 2: Work 2 sc in each stitch around (inc). (12 stitches)
Fasten off. Use brown/black yarn and a tapestry needle to embroider a small triangle nose onto the center of the snout.
Assembly Instructions
- Attach the Body to the Head:
- Use the tail from the body piece to sew the head securely to the body. Ensure they are well-aligned and centered.
- Attach Arms and Legs:
- Flatten the tops of the arms and legs, then sew them to the sides of the body (arms at the top near the neck, legs at the bottom).
- Ears:
- Position the ears on either side of the top of the head. Sew them securely.
- Snout:
- Sew the snout onto the center of the head slightly above the midline.
- Eyes:
- Attach movable eyes above the snout or sew black beads securely into place.
- Optional Keychain:
- Stitch or glue a keychain ring to the top of the head.
Finishing Touches
- Add blush to the cheeks using a fluffy brush and a small amount of pink blush or eyeshadow.
- Double-knot any loose threads, weave them into the body, and trim excess.
Customization Ideas
- Color Variations: Experiment with different teddy bear colors, such as pastel hues for baby gifts or bright colors for playful decorations.
- Accessories: Add bows, mini-scarves, or embroidered details based on the occasion (e.g., blue or pink ribbons for baby showers).
- Keychain Placement: Attach a ring or clip for different display uses (keychain, bag charm, or ornament).
Care Instructions
- Avoid excessive pulling or machine washing, as it may distort the shape or loosen stitched parts.
- For minor cleaning, spot-clean with a damp cloth.
Conclusion
This mini crochet teddy bear is perfect as a keychain, gift, or small decorative companion. With carefully sewn details and a touch of personality, it becomes a heartfelt and memorable handmade piece. Whether for personal use or as a lovely giveaway for events like baby showers, the charm of this crochet project will always stand out.