
Free Crochet Bunny Rabbits Pattern for Stylish Home Decor
Bring playful charm to your space with the Free Crochet Bunny Rabbits Pattern, perfect for gifts, décor, or huggable little companions
Brimming with cozy charm and playful character, these little rabbit pals bring a burst of joy wherever they’re placed. The Free Crochet Bunny Rabbits Pattern offers a delightful way to crochet soft, huggable figures that double as décor or gifts. With its adorable long‑ears, gentle features, and slightly rounded body, this pattern stands out for both its cuteness and versatility.
Playful Crochet Bunny Rabbits Pattern for Cozy Corners

The beauty of this pattern lies in its soft textures and the gentle personality of the finished bunnies, making them instantly endearing. Benefits include its suitability for beginners exploring amigurumi techniques and its quick completion time, so you can have one ready in just a few hours. These charming creations offer both a rewarding making experience and a delightful result you’ll be proud to display or gift.
In terms of design details, the pattern includes a rounded head, elongated ears, a compact body, tiny limbs, and a fluffy tail. These bunnies can brighten up a nursery shelf, hang from a bag as a keychain, or serve as an Easter table centerpiece.
Crochet Amigurumi Bunny Pattern
Skill Level
Intermediate
While this project incorporates basic amigurumi stitches, you’ll need to follow precise shaping techniques and assemble multiple parts.
Finished Size
Approx. 11 cm tall when completed.
Materials
- Yarn:
- Main color: Pearl Gray or Rat Gray (medium-weight yarn) for the body.
- White yarn: Small amount for the eyes.
- Pink yarn: For the nose.
- Coffee-colored yarn: For additional face accents.
- Optional color for the bow (e.g., dark coffee or a complementary shade).
- Hook Size:
- 2.5 mm crochet hook for the body, head, arms, and tail.
- 3.5 mm crochet hook for the ears.
- Safety Eyes: 8 mm safety eyes (or 7 mm if you prefer smaller eyes).
- Stuffing: Fiberfill or another soft filling material.
- Accessories:
- Scissors.
- Yarn Needle: For assembly and sewing.
- Optional: Stitch markers for keeping track of rounds.
Key Abbreviations (US Terminology)
- mr: Magic Ring
- ch: Chain
- sc: Single Crochet
- sl st: Slip Stitch
- inc: Increase (2 sc in the same stitch)
- dec: Invisible Decrease (crochet 2 sc stitches together)
Step-by-Step Instructions
Part 1: Head
Step 1: Magic Ring Foundation
- Create a magic ring.
- Work 6 sc into the ring. [6 sts]

Step 2: Increases
- Round 2: Work 2 sc in each stitch around to increase. [12 sts]
- Round 3: Alternate 1 sc, 1 inc. [18 sts]
- Round 4: Alternate 2 sc, 1 inc. [24 sts]
- Round 5: Alternate 3 sc, 1 inc. [30 sts]
Step 3: Defining Shape
- Rounds 6–10: Work 1 sc in each stitch around (maintain 30 sts).
Step 4: Decreases
- Round 11: Alternate 3 sc, 1 dec. [24 sts]
- Round 12: Alternate 2 sc, 1 dec. [18 sts]
- Round 13: Alternate 1 sc, 1 dec. [12 sts]

Step 5: Adding Eyes and Stuffing
- Insert safety eyes between Rounds 4 and 5, spaced by 5 stitches apart. Secure eyes with safety backs.
- Stuff the head firmly with filling material.

Finishing the Head
- Close the remaining gap by joining with a sl st.
- Leave a short tail to finish.
Part 2: Body
Step 1: Magic Ring and Increases
- Create a magic ring.
- Work 6 sc into the ring. [6 sts]
- Round 2: Work 2 sc in each stitch around. [12 sts]
Step 2: Build Shape
- Rounds 3–8: Work 1 sc in each stitch around (maintain 12 sts).
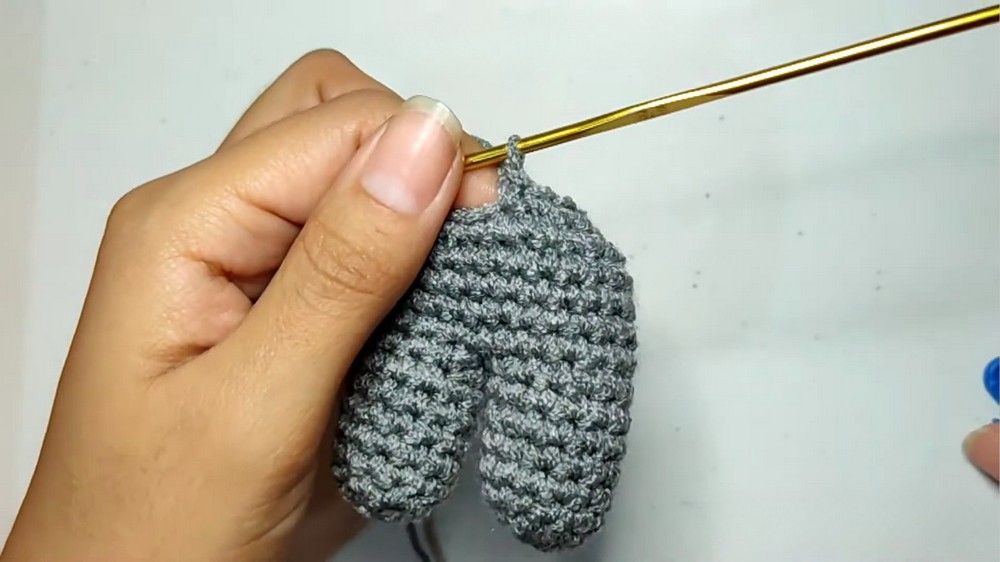
Step 3: Joining Legs
- Begin with two completed legs (instructions for legs are below).
- Attach both legs together using extra sc stitches, ensuring you have 24 total sts combined from both legs.
Step 4: Body Reductions
- Round 9: Decrease: Alternate 2 sc, 1 dec. [18 sts]
- Round 10: Decrease: Alternate 1 sc, 1 dec. [12 sts]
- Round 11: Work 1 sc in each stitch around.
Body Closure
- Stuff the body.
- Leave a long tail for sewing the head to the body.
Part 3: Legs
Step 1: Magic Ring Foundation
- Create a magic ring.
- Work 6 sc into the ring. [6 sts]
Step 2: Increasing
- Round 2: Work 2 sc in each stitch around. [12 sts]
Step 3: Leg Length
- Rounds 3–8: Work 1 sc in each stitch around (maintain 12 sts).
Finishing the Legs
- Close one leg completely and leave a short thread.
- For the second leg, do not cut your yarn; instead, join the two legs directly to form the base of the body.
Part 4: Arms
Step 1: Magic Ring Foundation
- Create a magic ring.
- Work 6 sc into it. [6 sts]
Step 2: Increases
- Round 2: Alternate 1 sc, 1 inc. [9 sts]
Step 3: Arm Length
- Rounds 3–9: Work 1 sc in each stitch around (maintain 9 sts).
Finishing the Arms
- Close each arm with a sl st, leave a tail for sewing, and lightly stuff.
Part 5: Ears
Step 1: Magic Ring Foundation
- Use the 3.5 mm hook for the ears.
- Create a magic ring and work 6 sc into it. [6 sts]
Step 2: Build Shape
- Round 2: Work 2 sc in each stitch around. [12 sts]
- Rounds 3–15: Work 1 sc in each stitch around (maintain 12 sts).
Step 3: Closing the Ear
- Round 16: Work 6 dec around. [6 sts]
- Close with a sl st, cut yarn, and leave a long tail for sewing.
Part 6: Tail
Step 1: Magic Ring Foundation
- Create a magic ring.
- Work 6 sc into the ring. [6 sts]
Step 2: Tail Shaping
- Round 2: Alternate 1 sc, 1 inc. [9 sts]
- Rounds 3–4: Work 1 sc in each stitch.
Step 3: Closing
- Make 4 dec in the final round to close. Leave a short tail and lightly stuff the tail.

Part 7: Bow (Optional)
Steps
- Create a magic ring.
- Work 3 ch, followed by 2 dc into the ring, 2 ch, and a sl st into the ring. Repeat this pattern to create the second loop of the bow.
- Pull the ring tight to form the bow shape. Secure by wrapping yarn around the center.

Assembly Instructions
- Pin and sew all parts together:
- Attach the head to the body.
- Place the arms symmetrically.
- Attach the tail to the back.
- Position ears evenly on the head.
- Add facial embroidery:
- Use pink yarn for a small triangle-shaped nose.
- Embroider coffee-colored eyebrows or accents as desired.
- Securely sew the bow to the bunny's body or one ear.
Finishing the Pattern
Final Words
Congratulations on completing your Amigurumi Bunny! This adorable creation works perfectly as a charming gift or keepsake. Personalize it with different yarn colors or embroidery for unique designs.
Tips for Success
- Stuff Moderately: Avoid overstuffing to maintain shape without stretching the stitches.
- Assembly Patience: Pin parts before sewing to achieve symmetry.
- Safety First: Ensure safety eyes are securely attached for durability.