
Adorable Crochet Fish Amigurumi Pattern for Playful Hearts
Splash into cuteness with this Crochet Fish Amigurumi Pattern for playful ocean creation, cozy vibes, and gifts everyone will adore.
This charming fish brings playful color and personality to any space, making it a delightful decoration, a thoughtful gift, or a cute keychain or bag charm that shows off your creativity. Using the Crochet Fish Amigurumi pattern, you can create a friendly-shaped, cheerful fish that’s perfect for children or friends. Many people find the process relaxing and satisfying, a fun way to unwind while creating something meaningful.
Delightful Crochet Fish Amigurumi Pattern for Cozy Decor

Amigurumi Fish Crochet Pattern: Step-by-Step
Finished Size
Approximately 4 to 6 inches (10–15 cm) depending on your yarn, hook size, and tension.
Skill Level
Beginner-friendly with simple increases, decreases, and spiral rounds.
Gauge
- 6 stitches x 8 rows = 1 inch in single crochet using worsted-weight yarn (4mm thickness) and a 4mm crochet hook.
- Gauge is not critical for this project, but ensuring tight stitches will help keep stuffing from showing.
Materials
- Yarn (Worsted Weight, ~4mm thickness)
- White Yarn: For the fish body and face.
- Blue Yarn: For the back section, fins, and tail.
- Hook Size:
- 4mm crochet hook (US G/6)
- Accessories:
- Safety Eyes (6–10mm size): or sew/embroider your own using felt or embroidery floss.
- Stuffing: Polyester fiberfill or similar to fill the fish.
- Tapestry Needle: For sewing parts and weaving in ends.
- Stitch Marker: To track the beginning of rounds (optional, but highly recommended).
- Scissors
- Lap counter (optional for tracking rounds).
Key Techniques & Abbreviations (US Terminology)
| Abbreviation | Meaning |
|---|---|
| MR | Magic Ring |
| ch | Chain |
| sc | Single Crochet |
| inc | Increase (2 sc in the same stitch) |
| dec | Invisible Decrease (sc 2 stitches together) |
| sl st | Slip Stitch |
- Work in Spiral Rounds: This pattern is worked in continuous rounds. Do not join rounds; use a marker to note the first stitch of each round.
Step-by-Step Pattern
Body (Worked in Two Colors: White and Blue)
Begin with white yarn.
- Round 1: Make a MR and crochet 6 sc into the ring. Pull the ring tight. (6 stitches)
- Round 2: Work 1 inc in each stitch around. (12 stitches)
- Round 3: Work 1 sc, 1 inc all the way around. (18 stitches)
- Round 4: Work 2 sc, 1 inc all the way around. (24 stitches)
- Round 5: Work 3 sc, 1 inc all the way around. (30 stitches)
- Round 6: Work 4 sc, 1 inc all the way around. (36 stitches)
- Rounds 7–8: Work 1 sc in each stitch all the way around. (36 stitches per round)


Change to blue yarn.
- Rounds 9–15: Continue working 1 sc in each stitch all the way around. (36 stitches per round)
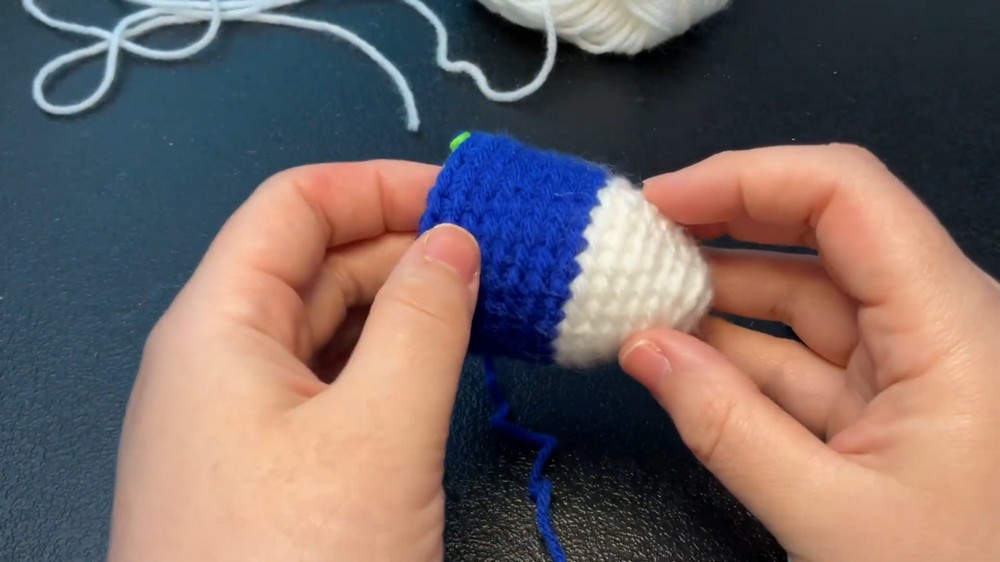
- Tip: Secure the yarn color change by tying the ends of the old and new yarn colors together inside the fish. Trim excess.
Shaping the Fish (Decreasing)
- Round 16: Work 4 sc, 1 dec around. (30 stitches)
- Round 17: Work 3 sc, 1 dec around. (24 stitches)
- Round 18: Work 2 sc, 1 dec around. (18 stitches)
- Round 19: Work 1 sc, 1 dec around. (12 stitches)
- Round 20: Work 1 dec in each stitch. (6 stitches)
- Tip: Start stuffing your fish as you work consecutive decreases. Ensure the fish is firm but not overstuffed.
- Finish: Close the remaining hole with a tapestry needle, weaving the thread through the final stitches. Pull tight to close and weave in the end.
Eyes Placement
- Place the safety eyes on row 6 from the top (white section of the body).
- Insert the eyes 6 stitches apart, ensuring they are centered symmetrically.
- Secure each eye with the safety back.

Optional: Cut small felt circles in black or another color and place them under the safety eyes for added detail.
Cheeks
- Thread a small piece of pink yarn through your tapestry needle.
- Place the cheeks approximately 1 row below the eyes on both sides, using the needle to make 2–3 small loops for round, blushed cheeks.
- Secure the yarn with a knot inside the fish and weave in the ends.
Fins and Tail
Side Fins (Make 2):
- Start with a MR, crochet 6 sc into the ring. (6 stitches for round 1)
- Round 2: Work 1 sc, 1 inc alternating all the way around. (9 stitches)
- Rounds 3–4: Work 1 sc in each stitch around. (9 stitches per round)
- Round 5: Work 1 sc, 1 dec around. (6 stitches)
- Fasten off, leaving a long tail for sewing.

Tail Fins (Make 2; Top and Bottom):
- Follow the same instructions for the side fins (above).
- Attach the fins to the back of the body, one at the top and the other at the bottom, ensuring they are aligned and symmetrical.
Assembly
- Attach Side Fins: Position each side fin at midsection (row 9 or 10 of the blue section). Sew securely to the body.
- Attach Tail Fins: Place one fin on the top and one on the bottom of the backside of your fish. Ensure they are aligned and symmetrical. Sew securely.
- Weave in all loose ends to clean up the fish and trim excess yarn.

Customization Options
- Yarn Colors: Use variegated yarn for a speckled or fading ombre effect.
- Fins: Add embroidery to the fins to create lines for a realistic look.
- Eyes: Experiment with larger, smaller, or custom-embroidered eyes. Make the fish more whimsical with oversized eyes or dramatic lashes.
Special Tips
- Check Filling Consistency: Ensure the body is uniformly stuffed for an even look.
- Secure Attachments: Sew all parts securely, especially if gifting to children.
- Flatten Tentacles: Place the fish on a flat surface and press gently to balance the fins and tail for display.
Final Look and Conclusion
Congratulations! Your amigurumi fish is finished—a charming piece for marine-themed decorations, children's toys, or even keychains. The alternation of colors, cheerful cheeks, and detailed fins make this project both simple yet incredibly rewarding. With these step-by-step instructions, you can create a thoughtful handmade piece.