
Cute Crochet Hello Kitty Tulip Free Pattern for Handmade Gifts
Brighten your space with the Crochet Hello Kitty Tulip featuring a white face, red bow, and green leaves, perfect for gifts, decor, or desk charm.
Do you like cute and colorful decorations? The Crochet Hello Kitty Tulip is a great way to add something happy to your room. This pretty tulip shows Hello Kitty’s white face with her red bow. It has soft pink flower petals and green leaves. Shelen Crochet made this lovely design.
Fun Crochet Hello Kitty Tulip Free Pattern for Plush Toy Collections
This Flower looks sweet and fun. You can put it on your desk, shelf, or give it as a small gift to someone special. Kids and grown-ups both will like the bright colors and friendly look. The bow and petals are made with care, so it looks neat and nice.
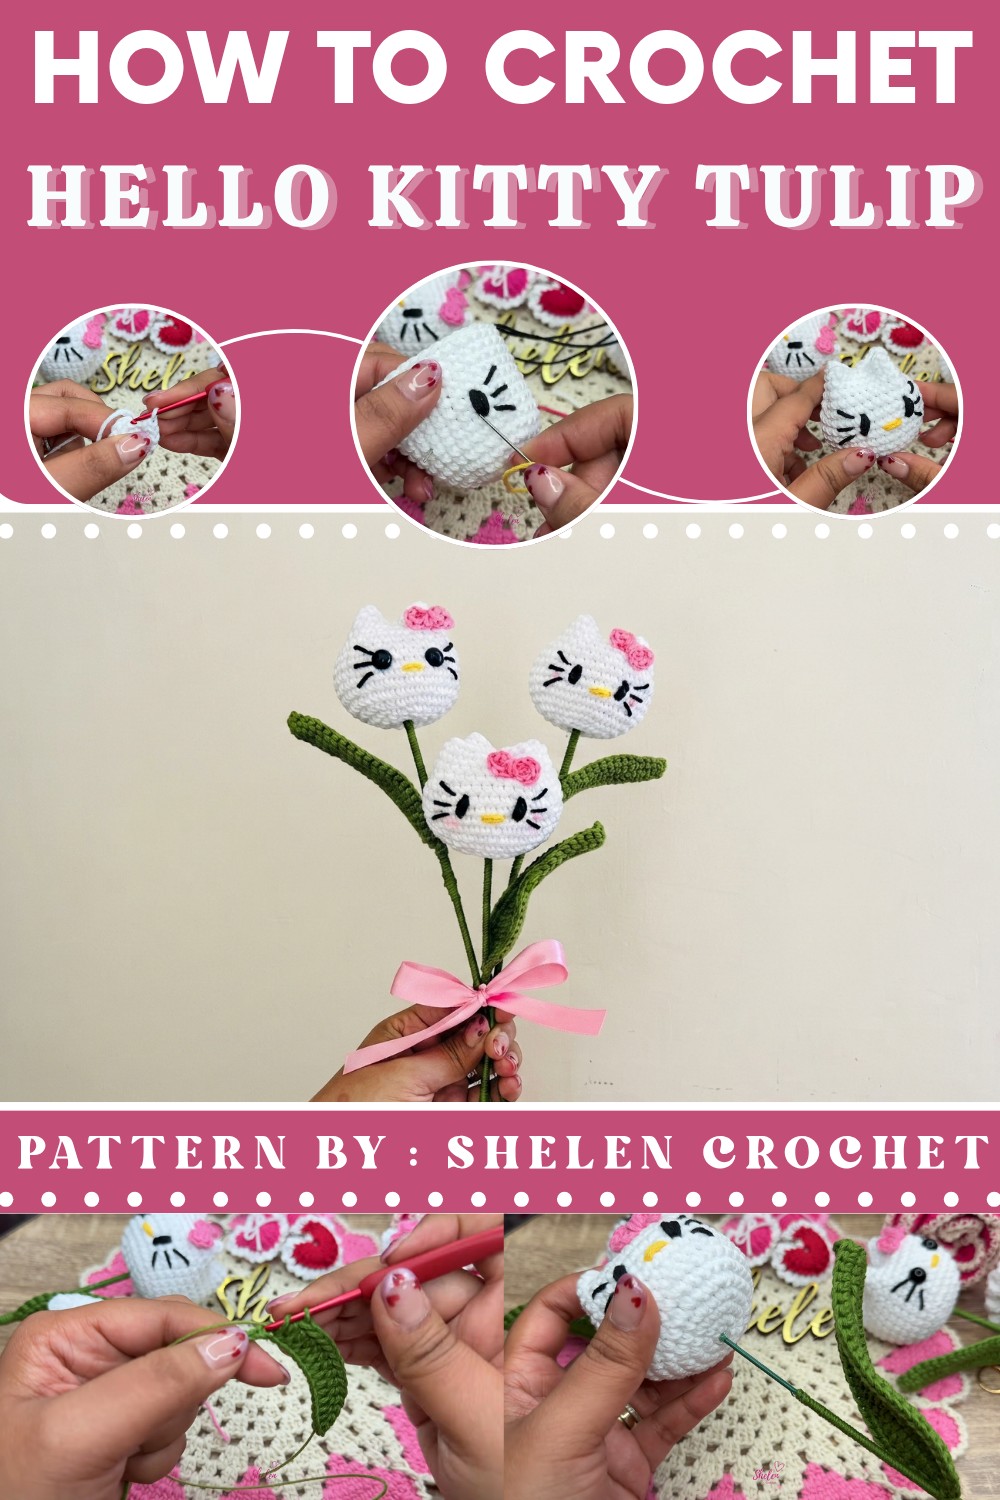
The Crochet Hello Kitty Tulip is a nice way to make your space a little brighter. It doesn’t take up a lot of space but brings a lot of smiles. The tulip mixes the famous Hello Kitty with a beautiful flower shape. This makes it a fun and special decoration.

If you want to have this cute tulip, check out the free pattern from Shelen Crochet. It is easy to follow and helps you add a happy touch to your home or give a fun gift to a friend.
Hello Kitty Tulip Crochet Pattern
How to make these adorable Hello Kitty tulips—perfect as a gift, decoration, or for any fan of cute amigurumi flowers. Follow along step by step to crochet, embroider, and assemble your own Hello Kitty tulip!
Quick Overview of Pattern
- The tulip flower is crocheted in rounds using white cotton.
- Features include a classic Hello Kitty face with embroidered details or safety eyes, and a pink bow.
- Leaf and stem are made using wire and green cotton, with realistic shaping.
- The tulip is filled, closed, and assembled onto a wrapped wire stem.
- Blush can be added for extra cuteness!
Notes
- The pattern uses continuous rounds and slip stitches at the end of each round.
- The flower is worked with false single crochet (X stitch), but regular single crochet can be used.
- Use tightly-wrapped wire for the stem, or substitute with a wooden skewer.
- Safety eyes are optional, and can be replaced with embroidered eyes.
- Make sure to leave long yarn ends when fastening off for sewing and closing steps.
- Embroidery details are added after the flower body is complete.
Skill Level
Beginner to Intermediate
Requires basic crochet skills: magic ring, chain, single crochet, increases, slip stitch, embroidery, and some basic assembly techniques.
Materials
- Cotton yarn size 6 (white, medium pink, grass green, canary yellow, black)
- 2.5 mm crochet hook
- Pillow stuffing/fiberfill
- Wire for the stem, plus thinner wire for the leaf
- Tweezers (for wire shaping)
- Skewer stick (optional if wire not available)
- Safety eyes size 8 mm (optional)
- Yarn/embroidery needle
- Scissors
- Silicone glue (for assembling stem and leaf)
- Blush (optional, for cheeks)
Measurements / Sizing
- Tulip flower: Approx. 4–5 cm height, 5–6 cm width
- Leaf: Approx. 9–10 cm long
- Stem: Approx. 12–15 cm long (adjustable)
Gauge
Not crucial. Just ensure your fabric is tight enough so the stuffing does not show.
Stitch Abbreviations
| Abbreviation | Stitch |
|---|---|
| ch | chain |
| sl st | slip stitch |
| sc | single crochet |
| inc | increase (2 sc in st) |
| dc | double crochet |
| hdc | half double crochet |
| st(s) | stitch(es) |
| rnd | round |
Special Stitches
- False Single Crochet (X stitch): Insert hook, yarn over through, pull up loop, yarn over, insert hook from bottom and pull through both loops (tighter, more defined single crochet)
- Magic Ring: Adjustable loop to create a compact start in round shapes.
The Crochet Pattern
Tulip Flower (Hello Kitty Face)
Rnd 1:
With white, 2.5 mm hook, make a magic ring.
- Ch 1 (for height, does not count as st)
- 6 sc into ring (using X stitch if desired).
- Pull tight, sl st to close round.
Rnd 2:
- Ch 1.
- 6 inc (2 sc in each st around).
- [12 sc total]
- Sl st to join.

Rnd 3:
- Ch 1.
- (1 sc, inc) repeat around.
- [18 sc]
- Sl st to join.
Rnd 4:
- Ch 1.
- Sequence: (1 sc, inc, 1 sc), repeat 6 times total.
- [24 sc]
- Sl st to join.
Rnd 5:
- Ch 1.
- (3 sc, inc), repeat sequence until end of round.
- [30 sc]
- Sl st to join.
Rnd 6:
- Ch 1.
- Sequence: (2 sc, inc, 2 sc), repeat 6 times.
- [36 sc]
- Sl st to join.

Rnd 7:
- Ch 1.
- Sc in each st around.
- [36 sc]
- Sl st to join.
Rnd 8–16:
- Repeat Rnd 7: Sc in each st around (36 sc per round).
- Sl st to join each round.
Finish Flower:
- At end of Rnd 16, sl st to close.
- Ch 1, cut yarn, leaving a long tail for closing.
- Stuff firmly but not so much as to stretch the stitches.
Hello Kitty Face Embroidery or Safety Eyes
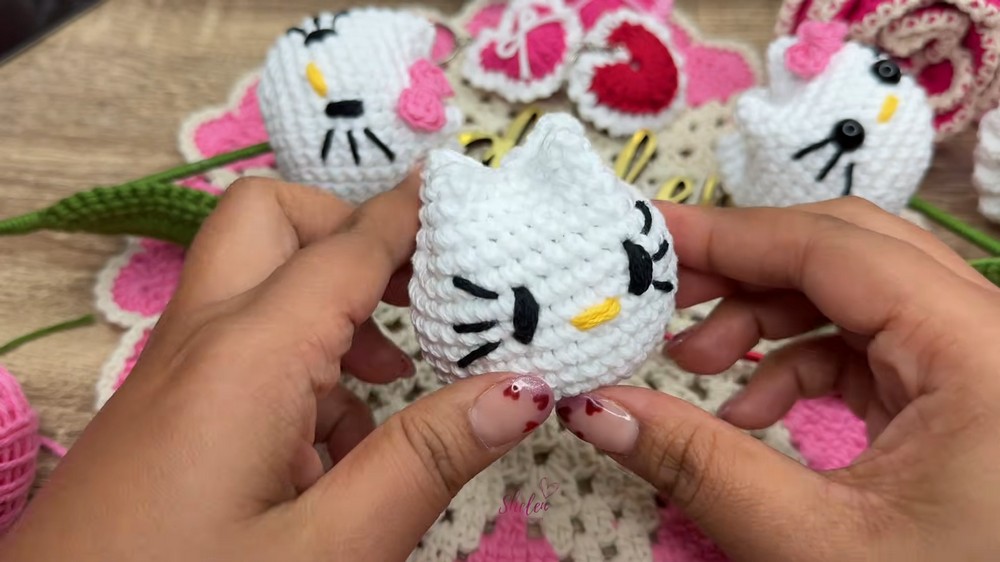
- If using safety eyes: Insert between rounds 9 & 10, with 4 st space between eyes.
- For embroidery (as classic Hello Kitty):
- Use black yarn for eyes: Between rnds 9 & 10, pass thread four times.
- Add eyelashes: Move two stitches to the right/left, stitch upward and downward lashes.
- For the nose: Use yellow yarn, directly below eyes, cover two stitches, pass thread three times for an oval shape.

Bow (Medium Pink)
Bow Half:
- Magic ring.
- Ch 2, 2 dc in MR.
- Ch 2, sl st to ring.
- Ch 2, 2 dc in MR.
- Ch 2, sl st to ring.
- Pull tight.
- Cut leaving a long tail.
Wrap Bow Center:
- Use leftover tail to wrap four times around bow’s center.
- Secure yarn, sew or glue bow onto tulip near the top of the face.
Leaf (Grass Green & Wire)
- Ch 25.
- Insert wire along chain.
Leaf Side 1:
- Sc in first stitch over wire.
- Hdc in next stitch.
- 17 dc over wire.
- 2 hdc.
- 3 sc.
Turn corner: (Bend wire)
- In same stitch, 2 more sc.
- Continue: sc, sc, 2 hdc, 17 dc, hdc, sc.
- Sl st to close.
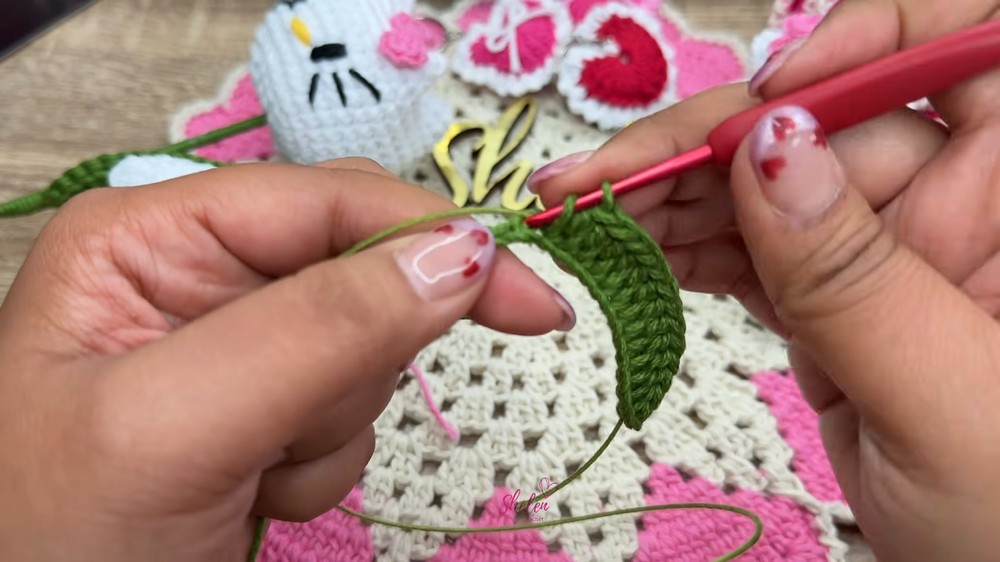
Leaf Side 2:
- Ch 1, sc in each st to center (where you made 3 sc).
- In center: sc, ch 2, sc in same stitch.
- Sc in remaining stitches.
- Sl st, ch 1, fasten off.

Shape leaf by bending wire and pressing gently.
Stem
- Use lined wire or wrap a stick with green thread/glue.
- Leave approx. 3 cm at bottom.
- Attach leaf using silicone glue, wrapping thread tightly around the wire for security.
- Continue wrapping to the end, gluing at intervals.
Assembly & Finished Size
- Stuff tulip flower, close securely.
- Embroider face or insert safety eyes.
- Sew or glue bow at top (above face, right or left side).
- Shape leaf with tweezers, wrap around stem and glue in place.
- Insert stem into tulip base, secure with glue.
- Optional: Apply blush on cheeks for added style!
- Finished tulip is approx. 14–16 cm tall, 5 cm wide at the flower.


Conclusion and Ending Words
This pattern combines basic crochet techniques and a touch of embroidery for a unique keepsake. Feel free to add creative details, blush, or accessories.