
Money Heist Amigurumi Crochet Pattern – Free & Easy
Enjoy this free crochet MONEY HEIST amigurumi pattern to bring the iconic crew to life with fun, creative projects that everyone will love and admire.
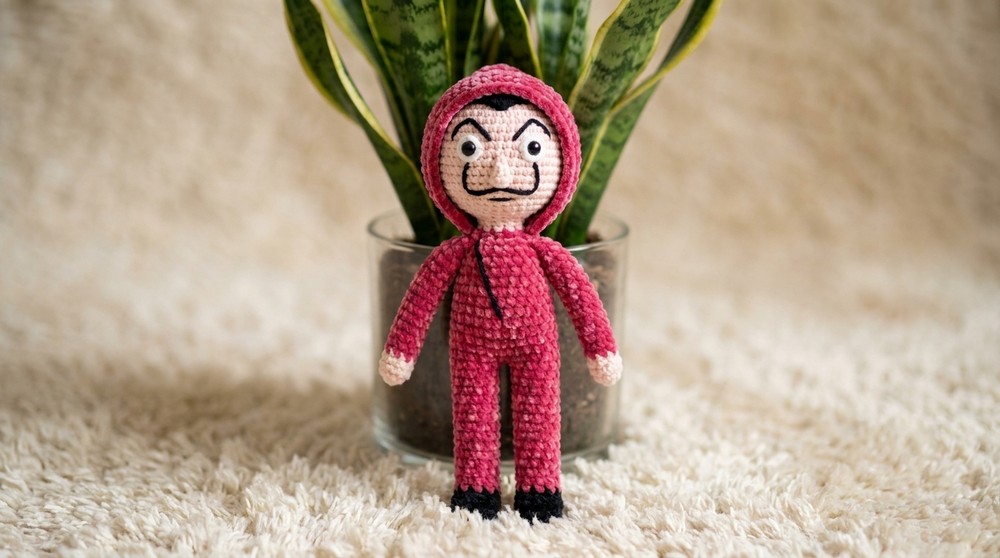
Adding a touch of pop culture to your crochet projects is always exciting, especially when the design captures something so distinctive and fun. The free crochet MONEY HEIST AMIGURUMI pattern creates a charming little doll dressed in the iconic red jumpsuit and wearing the unmistakable Salvador Dalí mask. Worked with tight single crochet stitches, this amigurumi has a firm yet soft texture and a rounded, compact shape that feels great in your hands and looks fantastic on display.
Cute Money Heist Character Crochet Pattern – Free Amigurumi Design
This project is perfect for crocheters who enjoy intermediate-level amigurumi and want something both stylish and playful. Typically, the doll measures about 6 to 8 inches tall, but it’s easy to customize the size by changing your yarn weight or hook size. The construction uses continuous rounds and careful color changes to bring out the costume’s details, so keeping stitch markers handy and maintaining consistent tension really helps keep everything neat.

The design grew from a love of the show's bold visuals and a desire to turn that into something you can hold and gift. Smooth, worsted weight cotton yarn works wonderfully here because it highlights the crisp stitch texture and adds durability for a lasting piece. These amigurumis make thoughtful gifts for fans, fun party favors, or unique decorations. Plus, they’re a great canvas for your creativity—try adding embroidered accents or tiny accessories to make yours one-of-a-kind.

Amigurumi Crochet Money Heist Doll Pattern
This pattern guides you in making a classic amigurumi Money Heist Doll from the popular series "La Casa de Papel." It’s worked in the round using mostly single crochet stitches, with step-by-step instructions for the body, limbs, hood, hair, and assembly. Great for beginners and Money Heist fans, this project produces a chibi-style doll approximately 5-6 inches tall, complete with a removable hood and side-parted hair.
Pattern Notes
- The doll is worked in continuous spirals (no joining at rounds’ ends). Use a stitch marker to mark the first stitch of each round.
- Color changes occur at the end of a round, pulling the new yarn through the last stitch of the old color.
- Insert stuffing as you work, especially after finishing each major section (head, body, limbs).
- The pattern uses the invisible decrease for shaping.
- When making the hairline and hood, customize the shape as desired.
Skill Level
Beginner to Advanced Beginner
Familiarity with single crochet in the round, color changes, increasing, and decreasing.
Materials
- Worsted weight (or similar) acrylic or cotton yarn in red, black, and skin tone (beige/cream). Small amount of white for cuffs.
- 3 mm crochet hook
- Toy stuffing (polyfill)
- Small safety eyes or black yarn for embroidery
- Scissors and tapestry (yarn) needle
- Stitch markers or safety pins
- Optional: Four pipe cleaners or wire for arms and legs
Measurements / Sizing
The finished doll measures approximately 5–6 inches (12–15 cm) from head to toe, using the recommended materials and hook size.
Gauge
Gauge is not critical for amigurumi, but for consistency:
10 sc and 10 rounds = 5 cm x 5 cm
Stitch Abbreviations
- sc = single crochet
- inc = increase (2 sc in same stitch)
- dec = invisible decrease (single crochet 2 together in front loops)
- sl st = slip stitch
- hdc = half double crochet
- dc = double crochet
- tr = treble crochet
- dtr = double treble crochet
- MR = magic ring
- ch = chain
- FO = fasten off
Special Stitches
- Invisible Decrease: Insert hook into the front loop only of the next two stitches, yarn over, pull through both front loops, yarn over, pull through both remaining loops on hook.
- Increase: Work two single crochet stitches in the same stitch.
The Crochet Pattern – Step By Step
Head
Use skin tone yarn. Work in the round.
- Start with a magic ring; work 6 sc into the ring. (6)
- Increase in each stitch around: 12 sc.
- (Sc in next stitch, inc) repeat 6 times: 18 sc.
- (Sc in next 2, inc) repeat 6 times: 24 sc.
- (Sc in next 3, inc) repeat 6 times: 30 sc.
- (Sc in next 4, inc) repeat 6 times: 36 sc.
7–12. Sc in each stitch around (6 rounds): 36 sc per round. - (Sc in next 5, dec) repeat 6 times: 36 sc.
- (Sc in next 4, dec) repeat 6 times: 30 sc.
- (Sc in next 3, dec) repeat 6 times: 24 sc.
- (Sc in next 2, dec) repeat 6 times: 18 sc.
- (Sc in next 1, dec) repeat 6 times: 12 sc.
18–20. Sc in each stitch around: 12 sc per round.


Stuff the head as you go. Change to red yarn in last stitch of round 20 to begin the body.
Body
- (Red yarn) (Sc, inc) around: 18 sc.
- (Sc in next 2, inc) around: 24 sc.
- (Sc in next 3, inc) around: 30 sc.
- (Sc in next 4, inc) around: 36 sc.
- Identify and mark arm partitions: Fold your work in half, count 8 stitches along each side for arms, place markers. Confirm you have 20 stitches left for the body’s main circumference.
- Work sc in each of the 20 body stitches between arm markers, placing a marker at round’s end. Do this for 7 rounds (body tube). (20 sc each round)
Stuff as you go.

Legs (Make 2)
- Using stitches from leg partition, work sc in each of the 10 marked stitches for the first leg. Continue in spirals for 15 rounds, moving your marker each round. (10 sc per round)
- Change to black yarn, cut red yarn. Sc in each stitch for 3 more rounds (forms boots).
- FO, leave a long tail for sewing. Add wire/pipe cleaner/stuffing as desired.
- Repeat for the second leg.

Arms (Make 2)
- Join red yarn in one marked armhole. Work sc in each of the 8 stitches around.
- Continue in spirals for 12 total rounds (8 sc per round).
- Change to white yarn and sc in each stitch for 2 rounds (cuffs).
- FO, stuff lightly or add pipe cleaner. Sew closed.
- Repeat for opposite arm.
Hair
With black yarn:
- MR, 6 sc.
- Increase in each stitch around: 12 sc.
- (Sc in next stitch, inc) around: 18 sc.
- (Sc in next 2, inc) around: 24 sc.
- (Sc in next 3, inc) around: 30 sc.
- (Sc in next 4, inc) around: 36 sc.
- (Sc in next 5, inc) around: 42 sc.
8–10. Sc in each stitch around for 3 rounds.

To create the hairline, crochet as follows (from video, for shaping the front):
Sl st, sc, hdc, dc, tr, dtr, tr, dc, hdc, sc, sl st (across about 10 stitches at the front edge).
FO, leaving a long tail for sewing. Sew to the head, matching the hairline to the face.
Hood
With red yarn:
- MR, 6 sc into ring.
- 6 increases: 12 sc.
- (Sc in next, inc) around: 18 sc.
- (Sc in next 2, inc) around: 24 sc.
- (Sc in next 3, inc) around: 30 sc.
- (Sc in next 4, inc) around: 36 sc.
- (Sc in next 5, inc) around: 42 sc.
8–17. Sc in each stitch around for 10 rounds: 42 sc per round.
FO, leave a very long tail for sewing. This dome will drape as the hood.
Assembly & Finished Size
- Attach safety eyes or embroider them on the face. Embroider mouth and eyebrows with black yarn.
- Sew the hair cap onto the head, aligning the shaped front.
- Sew the hood to the back and base of the head (not all the way around).
- Attach and sew the arms to each side of the body.
- Embroider a vertical line down the jumpsuit with black yarn for the zipper.
- Weave in all yarn ends.
- Finished doll height is approximately 5–6 inches.
Quick Overview for Beginners
- Crochet the Head: Begin with a magic ring, increase, then decrease after working even rounds.
- Change to Red for Body: Build up the body with increases, then make a tube for the torso.
- Divide for Arms and Legs: Mark partitions; crochet the arms and legs separately, working in the round.
- Add Details: Crochet a black hair cap and a large red hood. Sew them in place.
- Stuff & Assemble: Join all parts, stuff as you go, and sew everything together.
- Embroider Details: Face and zipper.
- Finish: Hide yarn ends, adjust limb positions, and enjoy your mini Money Heist doll!