
How to Crochet Cat Amigurumi Pattern Free for Charm
Whiskers, paws, and personality come alive with this Crochet Cat Amigurumi Pattern, perfect for playful stitching and charming handmade gifts.
The tale of handmade treasures begins with a delightful piece: a crochet cat amigurumi that brings charm and comfort to any space. Perfectly suited for both seasoned artisans and beginners, this adorable creation offers a unique combination of creativity and practicality. Its soft, intricate stitches form a whimsical miniature feline, radiating personality and charm. Each detail, from the expressive whiskers to the carefully shaped body, becomes a personal touch, making it much more than a decorative piece, it’s a reflection of the maker’s imagination.
Easy Free Crochet Cat Amigurumi Pattern Step-by-Step Guide

Not only does this tiny masterpiece shine as a collectible, but it also offers a variety of uses, such as a comforting toy for children, a cute desk ornament, or even a heartfelt gift for an animal lover. The versatility of its small size makes it perfect for brightening up bookshelves, nursery corners, or travel bags, where its charm can lift spirits and invite smiles. The opportunity to customize its colors and features adds to its universal appeal, ensuring that no two pieces are ever truly the same.
The act of making a crochet cat amigurumi is as rewarding as the final product. It’s a calming, therapeutic experience that transforms simple yarn into something personal and meaningful. Whether turned into keychains, displayed as keepsakes, or presented as thoughtful presents, this handmade creation beautifully symbolizes the beauty of simplicity, resulting in both cherished memories and renewed inspiration.
Materials Needed
- Yarn: 3-ply cotton in black (or your preferred color).
- Needles: 3/0 or 2.2 mm crochet needle.
- Eyes: Cute cat eyes.
- Fibers: For stuffing the cat.
- Other tools: Scissors, sewing needle, and any accessories you want to add (e.g., whiskers).
Note: The tutor suggests using a knitting needle style that feels comfortable for you.

Free Crochet Cat Amigurumi Pattern
Finished Size
The finished long-eared cat measures approximately 7 cm (2.75 inches) tall, depending on the yarn tension and hook used.
Materials Needed
- Yarn or Crochet Thread:
- Black yarn: Primary color of your cat.
- Optional colors: Additional yarn can be used for personalized decorative details or whiskers.
- Crochet Hook: Size 3/0 (2.2 mm).
- Fiber Filling: Polyester stuffing to fill the cat's body and ears.
- Eyes: Safety eyes or sewn eyes, which can be purchased. (Recommended source from transcription: แมวเหมียวบ้านรักไหม.)
- Scissors: For cutting yarn.
- Tapestry Needle: For sewing parts, closing gaps, and weaving in ends.
- Optional Decorations: Whiskers or additional facial details.
Gauge
For this amigurumi project, exact gauge is not necessary. However, ensure your stitches are tight enough to avoid gaps in the piece and to hold the fiber filling securely.
Special Techniques
- Magic Ring (MR):
- Form a tight loop with black yarn, insert the hook, yarn over, pull through, and chain 1 to secure the ring. Crochet the specified number of stitches into the ring and pull the tail to tighten.
- Increase (V):
- Work 2 stitches into the same stitch.
- Invisible Decrease (A):
- Insert hook into the front loops of the next two stitches, yarn over, pull through both loops, and complete the stitch as usual.
- Adding Fiber Filling:
- Use your fingers or a stuffing tool to evenly distribute filling in the smaller sections of the cat, such as the ears and head.
Pattern Instructions
Step 1: Cat Body
Rounds 1–5 (Creating Two Pieces):
- Round 1: Begin with a MR and crochet 6 sc in the ring. Pull the tail to tighten. (6 stitches)
- Round 2: Work 2xV (increase) into the round as follows:
- sc in the first stitch, sc in the second stitch, increase (V) in the third stitch.
- Repeat this sequence around. (12 stitches)
- Round 3: Crochet 8 sc evenly. (Repeat sc in each stitch around for a total of 8 stitches.)
- Round 4: Work 3xV around:
- sc in the first 3 stitches, V (increase) in the fourth stitch.
- Repeat this sequence four times. (16 stitches)
- Round 5: Crochet 10 sc evenly around. (Repeat sc in each stitch for 10 stitches). Fasten off the yarn.

Repeat Steps 1–5 to create the second identical piece. Set aside.
Step 2: Joining and Building the Combined Body
- Round 6:
- Create 2 chains and join the two pieces.
- Begin crocheting 10 sc around the first piece.
- Then work 2 sc into the chain stitches connecting the two pieces.
- Move to the second piece and crochet 10 sc around it.
- Finally, crochet 2 sc into the chain stitches once more. (Total: 24 stitches)
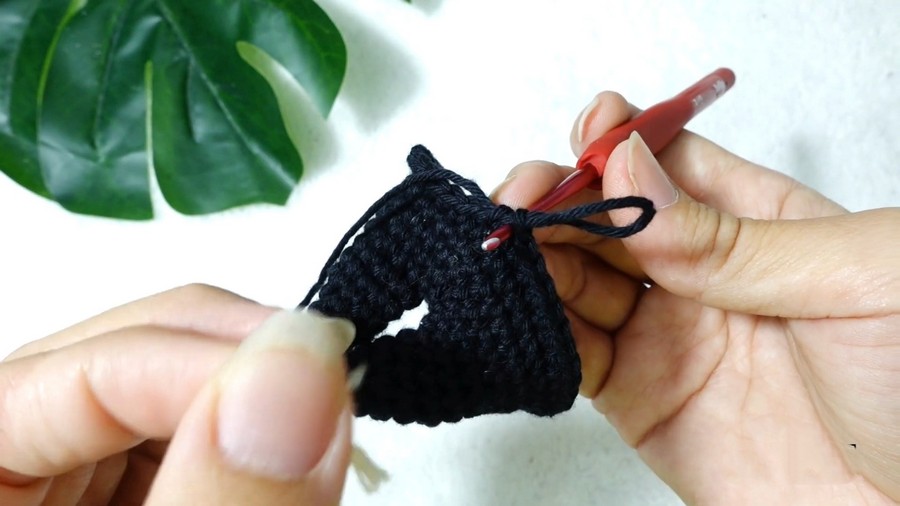
Step 3: Body Expansion
- Round 7: Work 5xV (sc in the first 5 stitches and then V in the next stitch) across the round. (Total: 28 stitches).
- Round 8: Crochet 28 sc evenly around.
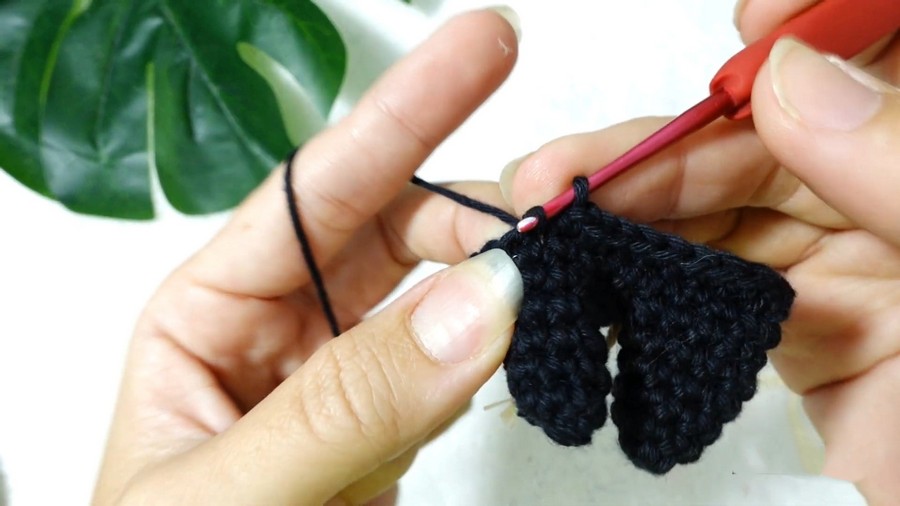
Step 4: Body Shaping
- Rounds 9–10: Work the following sequences:
- Round 9: 6xV (sc in the first 6 stitches and V in the next stitch) four times.
- Round 10: Crochet 32 sc evenly around. Split the stitch sections evenly for smooth shape distribution.
Step 5: Filling and Closing
- Rounds 12–14: Work 40 sc in a smooth continuous round for each of these rounds. This creates the body and ensures balanced expansion.
- Fill the Body:
- As you work these rounds, begin adding fiber stuffing evenly. Ensure the body is firm but not overly tight.
- Round 15: Work 2xA (decrease) for 4 times, then 7xA (decrease) for 4 times. Continue shaping using stitches: sc > A > sc > A in a sequence to achieve the final shaping round.
- Round 16: Use xA, alternating between sc and decrease until you cleanly close the body.

Step 6: Long Ears
- Create Two Ears:
- Using black yarn, work 6 sc in a MR for each ear.
- Expand across the following rows using V, increasing evenly until you achieve the desired ear length. The ears should taper at the end for a natural point.
- Leave a tail for sewing and attach each ear onto the main body securely.
Step 7: Facial Details
- Safety Eyes:
- Insert safety eyes symmetrically between the ears, leaving even spacing. Alternatively, sew the eyes using colorful thread for a softer look.
- For customized designs, use eyes sourced from recommended stores (e.g., แมวเหมียวบ้านรักไหม).
- Nose and Mouth:
- Embroider the nose and mouth using contrasting thread colors (e.g., pink or red).
- Work evenly to keep the features balanced.

Step 8: Whiskers (Optional)
- Using thin thread, embroider whiskers, ensuring alignment along the base of the eyes.
Customization Ideas
- Color Variations: Experiment with light or pastel colors for cats inspired by different breeds, such as Siamese or Persian.
- Expressions: Change the eye position or mouth shape to create playful or sleepy faces.
- Decorative Accessories: Add bows, collars, or hats for themed cats (e.g., holiday designs).
Conclusion
Congratulations! You have now completed your long-eared cat! This charming handmade creation can serve as a keychain, magnet, or decorative piece. The black yarn provides an elegant look, but it also works beautifully with other colors for personalization.
Tips for Success
- Always ensure even tension while crocheting to maintain uniformity.
- Secure all sewn parts tightly, especially for items used frequently, like keychains.
- To avoid visible lines, use invisible decreases (A) and stagger your increases.