
Free Crochet Lavender Bouquet Basket Pattern
Style desks with four floral looks through Free Crochet 4-in-1 Flower Pot Pattern, bringing playful color and charm to cozy corners indoors.
I have always liked keeping mini flowers in my room, but I do not like remembering to give them water every day. That is why this little crochet flower pot caught my eye. The Free Crochet 4-in-1 Flower Pot Pattern is a cute home decoration that brings the look of flowers into your space without the daily care.
The finished pot has a small and lovely shape with several flowers sitting neatly on top. Each flower has its own simple look, giving the piece a fun 4-in-1 style. The crochet yarn gives the flowers and pot a soft, cozy texture. Small petals and gentle shapes make the whole piece look sweet and cheerful. It feels like a tiny flower garden made for a shelf or table.
Crochet Lavender Bouquet Basket: Easy & Free

I can see this little pot sitting on a bedroom table, study desk, bookshelf, or window ledge. It would also look nice beside a lamp, photo frame, or a few favorite books. Since the flowers do not need sunlight or water, they can stay pretty all year. Their small size also makes it easy to move the decoration whenever you want to freshen up your room.
The lovely idea from DIY Yarn Crafts gives this flower pot a warm and simple handmade feel. The four flower styles make it more interesting than a plain pot and give it a playful garden look. It can fit into a bedroom, living room, office, or craft space without taking up much room.
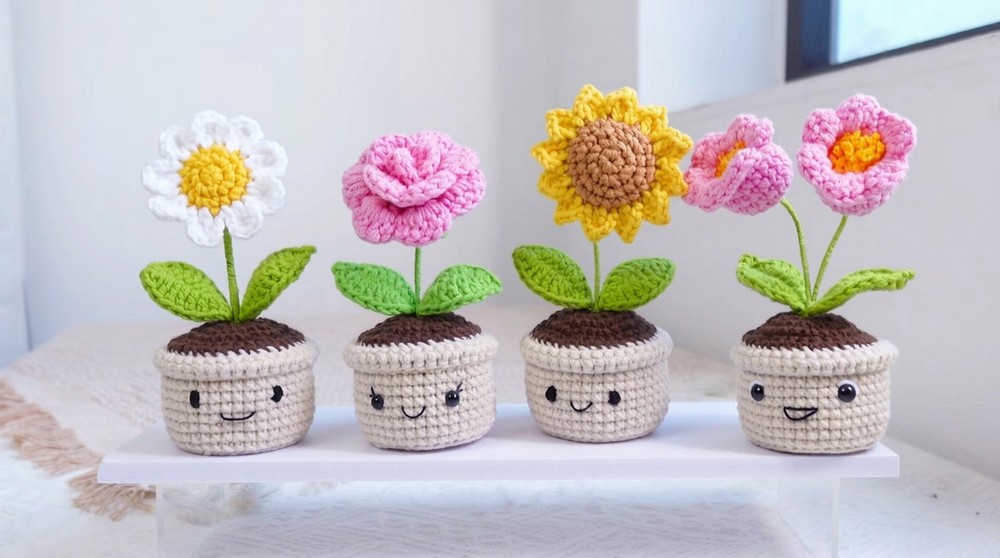
This mini flower pot could also make a sweet gift for someone who loves flowers and cute decorations. It would be nice for a birthday, housewarming, teacher gift, or simple surprise. It can also become part of a small collection of crochet flowers.
The Free Crochet 4-in-1 Flower Pot Pattern is a lovely way to enjoy flower beauty without watering or daily care. Its tiny size, soft texture, and cheerful flowers make it a lasting decoration for any cozy corner.
Crochet Mini Flower Pot with Flowers and Leaves Pattern
This comprehensive crochet pattern covers the creation of a mini flower pot complete with soil, and detailed floral components including leaves, lily of the valley, daisies, roses, and sunflowers. Each part is designed step-by-step to achieve a beautiful and realistic miniature floral arrangement. This pattern carefully combines traditional crochet stitches with wire incorporation and assembly techniques to build a charming decorative piece.
Quick Overview Of Pattern
- Leaves: Worked with wire incorporation and combination of sc, hdc, and dc stitches to mimic realistic leaf shape and curves.
- Lily of the Valley: Created in rounds with precise stitch increases and decreases, finished with layered stitches to form flower texture.
- Daisies: Made by combining two crocheted circles with clustered triple crochet petals.
- Rose: Composed of a chain foundation built into layered V-stitches and a separate sepal base.
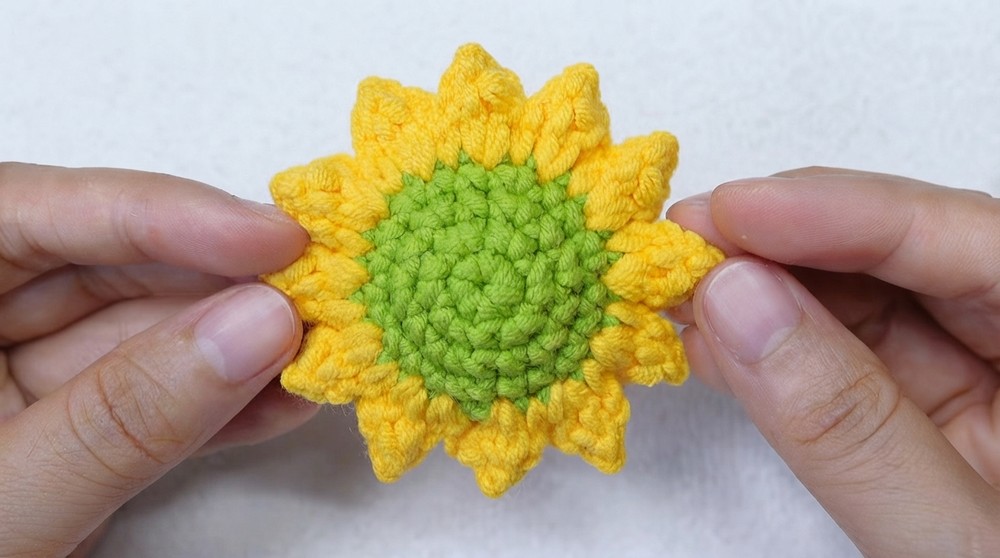
- Sunflower: Base made with circular crochet, petals shaped with double crochet clusters and slip stitch picots.
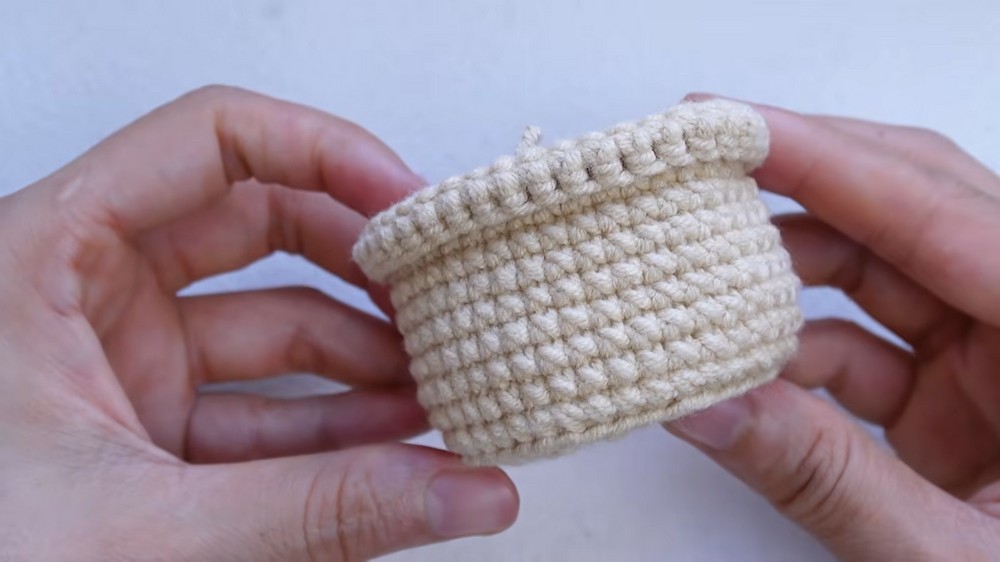
- Mini Flower Pot: Constructed with increasing rounds, working in both front and back loops to sculpt pot shape.
- Soil: Small insert crocheted with a hole for stem placement, sewn securely at the pot’s top.
- Final Assembly: Includes rim reinforcement, stuffing, sewing soil, and finishing touches for a lasting handmade piece.
Notes
- Wire use is critical for shaping leaves and stems; ensure wire gauge and length match the instructions to achieve proper firmness and flexibility.
- The miniature scale accentuates precise stitch counts and tension control.
- Magic ring adjusts tightly to avoid gaps in flower centers and pot bases.
- Working in front or back loops only introduces texture and shaping nuances in the pot.
- Assembly requires hot glue or craft glue alongside sewing with yarn tails for stability.
- Keep yarn tails long where instructed to facilitate sewing and finishing steps cleanly.
Skill Level
This pattern is suited for advanced beginners to intermediate crocheters, comfortable with:
- Magic ring foundation
- Single crochet (sc), half double crochet (hdc), double crochet (dc), triple crochet (tr)
- Increasing and decreasing stitches
- Working in front loop only (FLO) and back loop only (BLO)
- Crab stitch (reverse single crochet)
- Basic wire wrapping and crochet over wire
- Multi-piece assembly with stitching and glue application
Materials
- Yarn colors: green (leaves and stems), purple, yellow, white, brown, and other floral tones as desired
- Crochet hook compatible with yarn weight (approximately 3.5 mm – 4 mm)
- Wire:
- 0.5 mm wire (16 cm) for leaves
- 0.5 - 1 mm wire pieces for flower stems and assembly
- Tapestry needle
- Hot glue gun or craft glue
- Cotton or fiberfill stuffing
- Stiff cardboard circle to reinforce pot bottom
- Scissors
Measurements / Sizing
- Leaf length approx. 10 – 12 cm
- Pot base diameter approx. 6 – 7 cm
- Pot height approx. 6 cm
- Flower dimensions vary: lilies ~3 cm diameter; daisies ~4 cm diameter; roses and sunflower approx. 5 cm
- Total assembled height with stem approx. 20 – 25 cm
Gauge and Stitch Pattern
- Gauge is flexible but tension must remain consistent to preserve miniature dimensions.
- Pot stitch combinations (increases and working loops only) gently shape curvature.
- Flower rounds use precise increases and layered stitches like [sc, hdc, dc] clusters for textural realism.
- Leaves combine flat crochet with wire for structure.
Stitch Abbreviations
- ch = chain
- sc = single crochet
- hdc = half double crochet
- dc = double crochet
- tr = triple crochet
- sl st = slip stitch
- inc = increase (two stitches in one stitch)
- dec = decrease (crocheting two stitches together)
- MR = magic ring
- BLO = back loop only
- FLO = front loop only
- Crab stitch = reverse single crochet
- Wire crochet = crocheting around wire for shaping and stability
Special Stitches
Magic Ring (MR)
Start your round with an adjustable ring to create a tightly closed center without a hole.
Front Loop Only (FLO) & Back Loop Only (BLO)
Crochet into only the front or back loop of each stitch for texture changes and shaping.
Crab Stitch
Crocheting reverse single crochet creates an ornamental, durable edge, ideal for the flower pot rim.
The Crochet Pattern!
1. Leaves
Foundation
- Begin with a slip knot.
- Chain 10.
Incorporating Wire
- Bend a 16 cm piece of 0.5 mm wire and lay it along your chain base to be worked into the stitches for support.
Stitch Sequence (Working along the chain):
- In the 2nd chain from the hook, work 1 single crochet (sc).
- In the next chain, work 1 half double crochet (hdc).
- In the next 5 chains, work 1 double crochet (dc) into each chain.
- In the following chain, work 1 half double crochet (hdc).
- In the last chain, work 1 single crochet (sc), then chain 2, slip stitch (sl st) into the 2nd chain of these two, and 1 single crochet (sc) into the same chain (creating a small loop or tip).
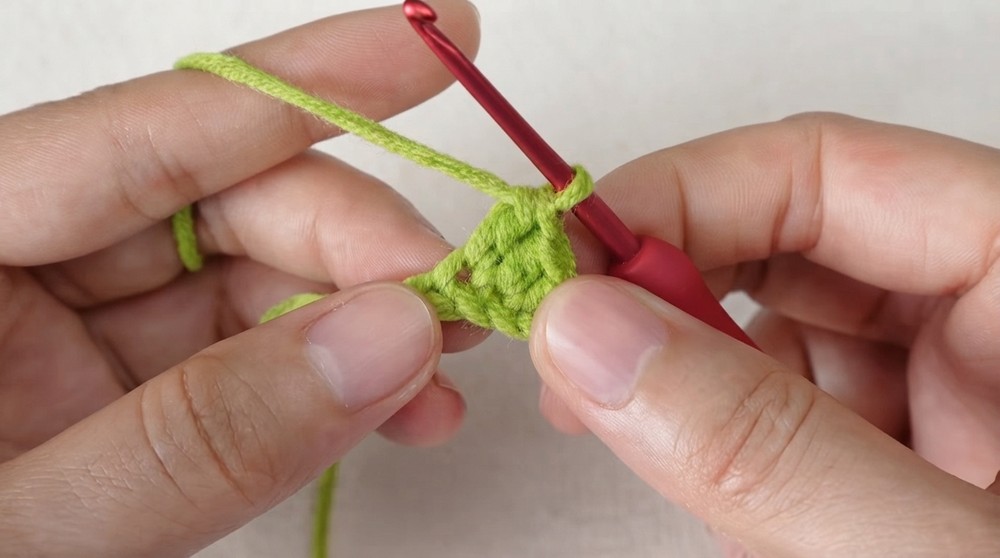
Return Row (Working back along the other side of the chain foundation):
- Work 1 half double crochet (hdc).
- Work 5 double crochets (dc).
- Work 1 half double crochet (hdc).
- Work 1 single crochet (sc).
- Slip stitch (sl st) into the first stitch of the row to finish.
2. Lily of the Valley
Flower Base (Magic Ring & Rounds):
- Create a magic ring (MR).
- Round 1: Work 6 single crochets (sc) into MR.
- Round 2: Make 6 increases (2 sc in each stitch), total 12 stitches.
- Round 3: Repeat 1 sc, 1 inc six times, total 18 stitches.
- Rounds 4–6: Work 18 single crochets (sc) per round.
- Round 7: Repeat 1 sc, 1 decrease (dec) six times, total 12 stitches.
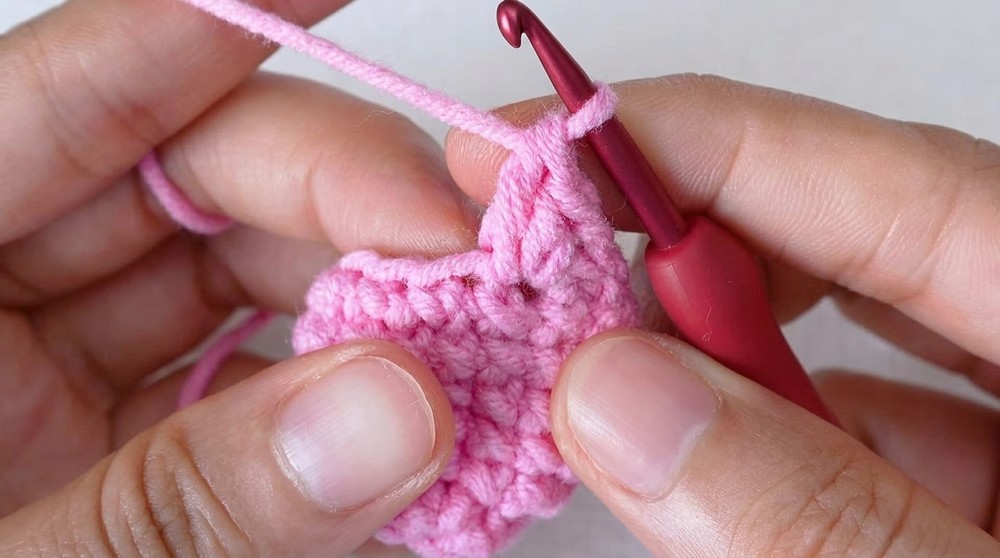
Round 8 (Flower Texture):
- In one stitch, work the sequence: 1 sc, 1 hdc, 1 dc.
- In the next stitch, work: 1 dc, 1 hdc, 1 sc.
- Repeat this 6 times total around.
Assembly
- Attach yellow yarn yarn wrapped stamen to wire.
- Glue the stamen securely into the flower center.
- Wrap the flower stem neatly with green yarn to finish.
3. Daisy
Sepal and Center
- Crochet two circular pieces, one green and one yellow, each using:
- A magic ring,
- Followed by 3 rounds of increasing single crochets (details as per standard circular increase).
Petals
- Join the green and yellow circles by working into both layers simultaneously.
- For each petal, work:
- Chain 3,
- Work 2 triple crochets (tr) in one stitch,
- Chain 3,
- Slip stitch (sl st) in next stitch.
- Repeat around to form petals.
4. Rose
Petals
- Chain 26.
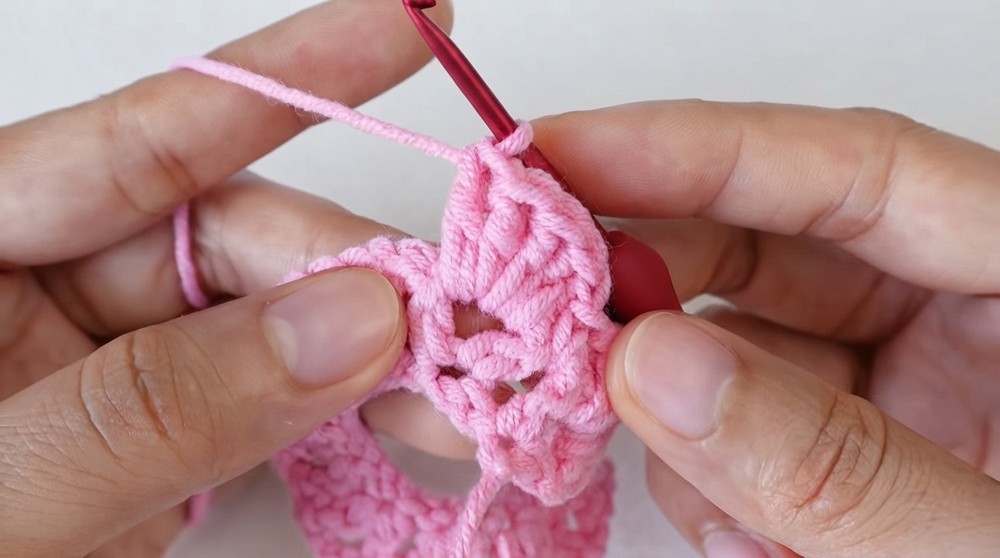
- Work V-stitches across foundation: (1 dc, ch 2, 1 dc) skipping every other chain.
- Row 2: Work 5 double crochets (dc) in each V-stitch chain space followed by 1 single crochet (sc) between V-stitches.
Sepal
- Make a magic ring.
- Round 1: Work 10 double crochets (dc) into MR.
- Construct 5 petal-like shapes by repeating:
- Chain 5, slip stitch, single crochet, 2 double crochets.
5. Sunflower
Base
- Make two circular pieces (green and brown) using a magic ring.
- Work 4 rounds of increasing stitches up to 24 stitches for each circle.
Petals
- Join the two base circles, then for each petal:
- Chain 2,
- Work 1 double crochet (dc),
- Chain 1,
- Slip stitch picot,
- Another dc in same stitch,
- Chain 2,
- Slip stitch to next base stitch.
- Repeat petals around circumference.
6. Mini Flower Pot
Round 1
- Make a magic ring (MR).
- Work 8 single crochets (sc) into the ring.
- Slip stitch to first stitch to join.
Round 2
- Chain 1.
- Make 8 increases (2 sc in each stitch).
- Slip stitch to join.
Round 3
- Chain 1.
- Repeat 1 sc, 1 inc eight times.
- Slip stitch to join.
Round 4
- Chain 1.
- Repeat 2 sc, 1 inc eight times.
- Slip stitch to join.
Round 5
- Chain 1.
- Repeat 3 sc, 1 inc eight times.
- Slip stitch to join.

Round 6
- Chain 1.
- Work 1 sc in each of the 40 stitches in back loops only (BLO).
- Slip stitch to join.
Rounds 7–14
- Chain 1.
- Work 1 sc in each stitch (both loops) for 8 rounds.
- Slip stitch to join after each round.
Round 15
- Chain 1.
- Work 1 sc in front loops only (FLO) in each stitch (40 stitches).
- Slip stitch to join.
Round 16
- Chain 1.
- Work 1 sc in each stitch (both loops).
- Slip stitch to join.
- Chain 1 and cut yarn.
7. Crocheting the Soil
Rounds 1–5
- Repeat rounds 1-5 of the pot pattern, but leave a small hole in the center by tightening the magic ring just enough for the flower stem to pass through.
Finish
- Chain 1, cut yarn leaving a 40 cm tail for sewing.
8. Assembly
Reinforcement
- Place a circle of stiff cardboard cut to the size of the pot bottom inside to reinforce the base.
Stuffing
- Add cotton or fiberfill stuffing gently into the pot to add volume.
Sewing Soil
- Position the soil piece on top of the pot opening.
- Use a darning needle and the long yarn tail to sew the soil piece around the pot opening evenly.
Securing
- Weave the yarn tail securely through the pot stitches and trim excess for a clean finish.
Assembly & Finished Size
- Finished pot measures approximately 6 to 7 cm in diameter and about 6 cm tall.
- Floral arrangements add height up to 20–25 cm, depending on stem length and style.
- The complete piece is lightweight, sturdy, and perfect as a decorative item or gift for flower lovers.

Conclusion
This pattern combines detailed stitch work and structural assembly to create an elegant miniature crochet flower pot filled with realistic crocheted flowers and leaves. From carefully shaped leaves incorporating wire to intricate flower rounds with complex stitch sequences, the project offers a rewarding challenge. Assembly including stuffing, sewing, and gluing provides the finishing touch for a durable and visually captivating piece. This crochet flower pot arrangement will delight both the maker and admirer with its craftsmanship and charm.