
Free Crochet Flamingo Amigurumi Pattern for Shelves & Décor

Perfect as a handmade gift, a nursery toy, or a quirky shelf décor piece, this flamingo combines charm with practicality.
It’s lightweight yet sturdy, so it keeps its shape beautifully, and the no-sew construction makes it beginner-friendly while still producing a polished, seamless finish. You can even customize it with different yarn colors or textures, from pastel pinks to vibrant tropical shades, giving each creation its own personality.
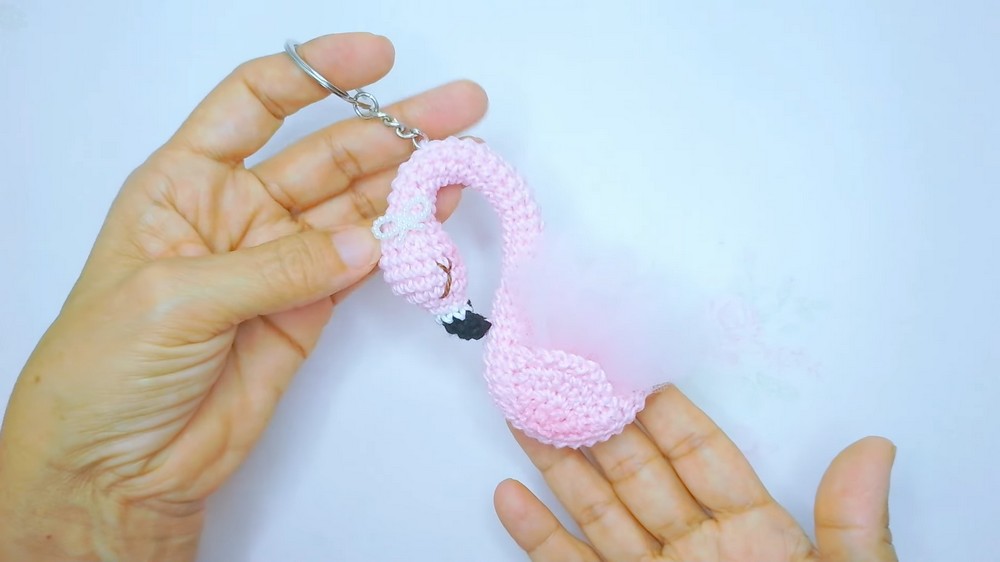
Amigurumi Flamingo Keychain Free Crochet Pattern
Materials
- Yarn: Cotton thread in 3 colors:
- Black (beak)
- White (beak)
- Pink (body, head, wings)
- Tulle: Light pink or a shade that matches the flamingo, cut into approx. 8–10 squares, each about 4x4 in (10x10 cm)
- Hook: 2.5 mm crochet hook
- Stuffing: Synthetic cotton/polyester fiberfill
- Keyring: 1 metal ring for keychain attachment
- Tapestry Needle: For sewing pieces and embroidering features
- Brown Thread: Small amount for embroidering eyes
- Scissors
- Pins or Stitch Markers: Optional, for assembly and tracking rounds
- Small Bow: Optional, for embellishment
- Blush or Pink Chalk: Optional, for adding color to cheeks
Abbreviations
- MR: Magic Ring
- sc: Single crochet
- inc: Increase (2 sc in same stitch)
- dec: Decrease (sc 2 together)
- ch: Chain
- sl st: Slip stitch
- st(s): Stitch(es)
- FO: Fasten off
Special Notes
- Work in continuous rounds (spirals) unless otherwise specified.
- Use a stitch marker to keep track of the first stitch in each round.
- The tulle skirt can be trimmed to preference and shaped after assembly.
- This pattern uses a variety of simple stitches and shaping by increases and decreases.
Pattern Instructions
Head and Beak (Worked from tip of beak)
With black:
- Round 1: MR, 5 sc into ring (5)
- Round 2: 5 sc (5)
- Round 3: (1 sc, inc) repeat to end; finish with 1 sc (total 7 sc). At the last st, change to white.

With white:
4. Round 4: 7 sc (7)
- Change to pink at last st.
With pink:
5. Round 5: 3 sc, inc, 3 sc (8)
- Round 6: (1 sc, inc) repeat 4 times (12)
- Round 7: 4 sc, inc repeat 4 times (16)
- Rounds 8-10: 16 sc

Shaping the Head
- Round 11: (2 sc, dec) repeat 4 times (12)
- Round 12: (1 sc, dec) repeat 4 times (8)
Stuff the head firmly with filling.
Neck and Body
- Rounds 13–62: 8 sc (50 rounds)
- Tip: Stuff the neck gradually as you crochet, keeping it lightly firm but flexible.
At the end of Round 62, FO leaving a long tail for closing and sewing. Close the opening by weaving through the front loops of the 8 sts, pull tight, and secure.
Wings (Make 2)
With pink:
- Row 1: MR, 3 sc in ring; ch 1, turn. (3)
- Row 2: (1 sc, inc, 1 sc) (4)
- Row 3: (1 sc, inc, inc, 1 sc) (6)
- Row 4: (2 sc, inc, inc, 2 sc) (8)
- Row 5: (3 sc, inc, inc, 3 sc) (10)
- FO with a long tail for sewing.
Edge finishing: Ch 1, sc evenly along sides of the wing, working 2 sc at the tip to keep it rounded.
Optional: For the straight edge, ch 2, sl st into next st, repeat for a zigzag finish.

Tulle Tuft
- Cut 8–10 squares of tulle approx. 4"x4" (10x10 cm).
- Fold each square accordion-style, stack, and sew them together at the center to make a fluffy bunch.
- Attach half of the tulle bunch to each side of the body where the skirt should go. Sew securely.

Assembly
- Body Construction:
- After closing the neck/body tube, use the long tail to attach the base to itself, closing it into a neat finish.
- Beak Placement:
- Use the yarn tail to sew the beak securely in place at the tip of the head.
- Attaching Tulle Skirt:
- Attach folded tulle bunches on each side of the body at the correct position for the "wings" to sit over the skirt.
- Sew Wings:
- Place each wing over the tulle on either side, using pins to ensure placement, then whipstitch neatly onto the body.
- Embroider Face:
- Use brown thread and tapestry needle to embroider simple eyes with lashes onto the white part of the head as described.
- Add Keyring:
- Sew or attach keyring to the top of the head or back of the neck. Sew securely with extra passes as needed.
- Finishing Touches:
- Trim tulle to create fluffy, uneven, feathery suggestions.
- Optionally, add a small bow with glue or thread.
- Use blush or colored chalk to gently add color to cheeks, base of beak, or body for character.

Conclusion
Congratulations! You have now crocheted an adorable flamingo keychain with a soft, elegant tulle skirt. This is a fun, giftable project perfect for bags, backpacks, or as a charming display.
Pattern Corrections & Tips
- If your neck bends too easily, stuff with more filling, but avoid overstuffing for flexibility.
- Stitch markers help to keep your place, especially around color changes.
- Trim tulle after attachment for desired skirt effect.
- For seamless color changes, always work the last yarn-over of the previous st with the new color.
Tips
- Embroidering eyes can be tricky. Keep the thread tension even for a neat look.
- Sew wings and tulle firmly, as they’ll be handled if used as a keychain.
- Personalize with bows, beads, or other embellishments if desired.