
Free Crochet Blueberry Tart Pattern for Play Food Fun
Learn to make a cute and squishy crochet blueberry tart with this free pattern, perfect for decoration, gifting, or enjoying the fun of handmade projects.
Are you ready to explore the fun and beauty of crochet? It is a simple, adorable crochet project perfect for everyone, even beginners, to enjoy. This Free Crochet Blueberry Tart Pattern allows you to make a cute squishy tart that looks so realistic, almost good enough to eat. With its soft yarn filling, detailed crust, fluffy cream topping, vibrant blueberries, and tiny green leaves, this crochet tart is both decorative and delightful.
Free Crochet Blueberry Tart Pattern Looks Good Enough to Eat

The blueberry tart design stands out for its unique details. The crust has a textured edge that looks crisp and beautiful. The cream topping is fluffy and realistic with puffy swirls, giving it a whimsical and appetizing touch. Adding blueberries with their star like tops and soft rounded shapes makes the tart look even more lifelike. Finally, the little leaves bring an extra pop of color and natural charm.
This little masterpiece can be used for so many things. You can decorate your space, gift it to loved ones, or even turn it into an accessory. It’s lightweight, soft to the touch, and is perfect for fall or dessert themed decorations.
The free crochet pattern is easy to follow and uses simple materials like four ply yarn and a 2.0 mm crochet hook. It covers techniques like the magic ring, invisible slip stitches, and front post double crochet, helping you learn while crocheting your tart. You can customize the tart by changing yarn colors or adding different toppings. Whether for yourself or others, this adorable handmade tart will bring a smile to anyone’s face. Create yours today and enjoy the joy of crochet art.
Crochet Blueberry Tart Crochet Pattern
Materials Needed
- Yarn: Four ply yarn (in appropriate colors for the tart filling, crust, cream, blueberries, and leaves)
- Tart filling: Light yellow or beige
- Crust: Light brown
- Blueberries: Deep blue
- Leaves: Green
- Crochet hook: 2.0 mm
- Fiberfill or yarn scraps for stuffing the tart
- Strong fast drying fabric glue (optional for attaching pieces)
- Yarn needle for sewing and weaving in ends
- Scissors
Special Techniques
- Magic Ring: A crochet technique to start projects in the round, allowing for adjustable tension in the first round.
- Invisible Slip Stitch: A method to create seamless finishes at the end of rounds.
- Invisible Single Crochet Decrease: A technique used for shaping, which minimizes gaps and provides a neat finish.
Step by Step Pattern
Part 1: Inner Filling of the Tart
- Magic Ring: Begin by making a magic ring.
- Round 1: Chain 3 (does not count as a stitch), work 14 double crochet (DC) into the magic ring. Pull the ring tight and slip stitch to the first DC to join the round. (14 stitches)
- Round 2: Chain 3. Work 2 DC into each stitch around (14 increases). Slip stitch to the first DC to join. (28 stitches)
- Round 3: Chain 2. Work a pattern of 1 half double crochet (HDC), followed by 1 HDC increase in the next stitch. Repeat this sequence 14 times around. (42 stitches)
- Finishing: Use an invisible slip stitch to create a seamless edge. Secure the yarn ends by weaving them into the back of the work. Trim any excess yarn. This piece will serve as the inside filling of the tart.
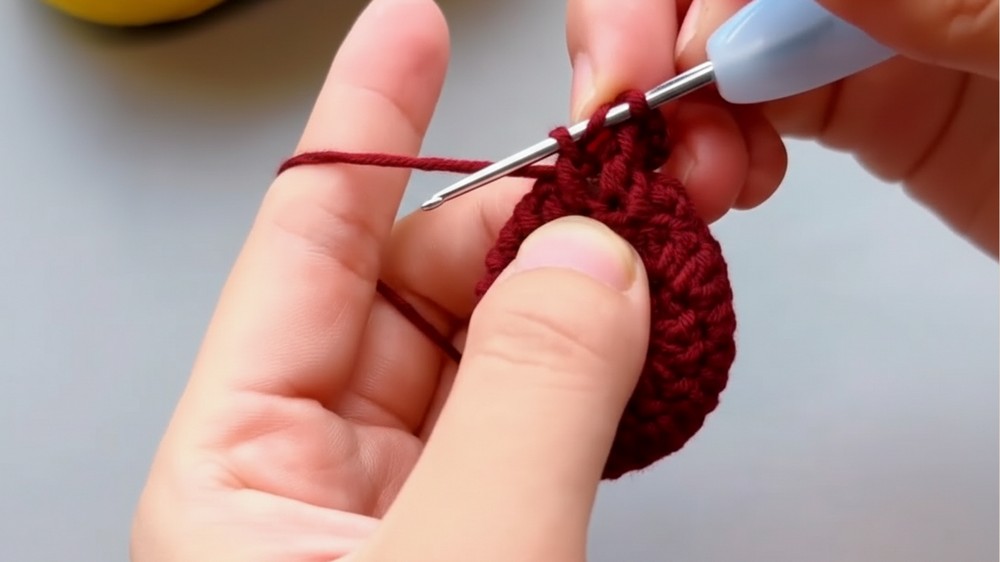
Part 2: Tart Crust
- Follow Rounds 1–2 as described for the tart filling.
- Round 3: Chain 3. Work 1 DC into the back loop only (BLO) of each stitch around. This creates the ridge for the tart crust. Slip stitch to the first DC to join. (28 stitches)
- Round 4: Chain 3. Use front post double crochet (FPDC) to create the tart's textured edge. The pattern is 1 FPDC increase, followed by 1 FPDC. Repeat 14 times around. (42 stitches)

Part 3: Joining the Inner Filling and Crust
- Start Joining: Chain 3. Work 2 FPDC stitches into the next 2 posts.
- Joining Stitches: Insert the hook into the front loop of the next crust stitch and simultaneously insert it into the next inner filling stitch. Work a DC through both layers to join. Repeat this joining DC one more time in the same crust stitch but the next filling stitch.
- Repeat Pattern: Alternate between 2 FPDC stitches in the crust and 2 joining DC stitches to connect the inner filling around. Leave a small opening at the end.
- Stuffing: Use fiberfill or yarn scraps to gently stuff the tart for a plump shape.
- Finishing: Carefully complete the round, and use an invisible join to give a seamless appearance. Weave in ends securely and trim any excess yarn.
Part 4: Cream Topping
- Magic Ring and Round 1: Create a magic ring and chain 1, working 8 single crochet (SC) into the ring. Pull tight and slip stitch to the first SC to join. (8 stitches)
- Round 2: Chain 1, work 2 SC into each stitch around (8 increases). Slip stitch to the first SC to join. (16 stitches)
- Round 3: Chain 1. Work 1 SC, chain 3, skip 1 stitch. Repeat around for a total of 8 chain 3 spaces. Slip stitch to the first SC to finish.
- Cream Puffs:
- Chain 3, yarn over twice, and work 8 unfinished treble crochet (TR) into the first chain 3 space. You should have 9 loops on the hook.
- Yarn over and pull through all loops to create a puff.
- Chain 3, then SC into the next SC stitch.
- Repeat for all 8 chain 3 spaces.
- Finishing: Complete the round and slip stitch to the first SC. Chain 1, fasten off, and weave in ends on the back.

Part 5: Blueberries
- Magic Ring and Round 1: Make a magic ring and chain 1, working 6 SC into the ring. Pull tight and slip stitch to the first SC to join. (6 stitches)
- Round 2: Chain 1, work a pattern of 1 SC, 1 SC increase three times around. Slip stitch to the first stitch. (9 stitches)
- Round 3: Chain 1, work 1 SC, followed by an invisible SC decrease. Repeat 3 times around. (6 stitches)
- Shaping: Thread the yarn tail through the remaining back loops of the last round and pull tight to close the top.
- Blueberry Star Top: To give the characteristic star on the blueberry's top, thread the yarn through the remaining front loops of the six stitches and gently pull to create an indentation. Add the textured top by repeatedly threading through these loops.
- Finishing: Securely hide the yarn end and trim it.
Part 6: Tiny Leaves
- Foundation: Make a slip knot and chain 6.
- Work into the foundation chain:
- In the 2nd chain from the hook, make 1 slip stitch.
- Work 1 SC in the next stitch.
- Make 2 HDC in the next stitch.
- Work 3 SC into the last chain.
- Opposite Side: Crochet along the other side of the foundation chain:
- Work 2 HDC, 1 SC, and finish with a slip stitch.
- Fasten off, weave in ends, and trim excess yarn. Repeat to make a second leaf.

Part 7: Assembling the Tart
- Attach the Cream Topping: Using fabric glue (or by sewing), apply a thin line around the tart's center. Carefully position and secure the cream topping.
- Position the Leaves: Add a small amount of glue to the ends of the leaves and attach them at the base of the cream topping.
- Attach Blueberries: Apply dots of glue at desired points on the cream, gently pressing the blueberries into place. Add 2–3 blueberries for an appealing arrangement. Allow the glue to set securely.

Final Words and Tips
Congratulations, Your cute little blueberry tart is now complete. This project is a fun and satisfying way to practice crochet techniques while creating something charming and unique.
- Storage: Keep your crochet tart in a clean, dry area to maintain its shape and texture.
- Customization: Feel free to switch up colors for different themes. For example, red can create a strawberry tart or brown for a chocolate topping.
- Gift Idea: Package it in a clear box or tie it with a ribbon for an adorable handmade gift.
This delightful project is perfect for beginners and experienced crocheters alike, adding a sweet touch to any collection.