
Cute Free Crochet Mrs Claus Amigurumi Pattern for Table Decorations
Celebrate the holidays with this Free crochet Mrs Claus Amigurumi Pattern, creating festive dolls that bring warmth and spirit to any space.
A cheerful little figure inspired by the holiday season can bring warmth and joy wherever it goes. A free crochet Mrs. Claus amigurumi pattern turns soft yarn and simple stitches into a charming handmade ornament that radiates festive spirit. This hand-crocheted doll adds a cozy, personal touch to home décor a perfect accent for mantels, Christmas trees, or shelf displays.
Fun Free Crochet Mrs Claus Amigurumi Pattern Keeps Kids Entertained

Beyond aesthetics, it makes a heartfelt handmade gift for loved ones, offering a sense of warmth and affection that store‑bought items often lack. In creating and gifting such a piece, you share not just a toy but a small handmade token of care, patience, and creativity.
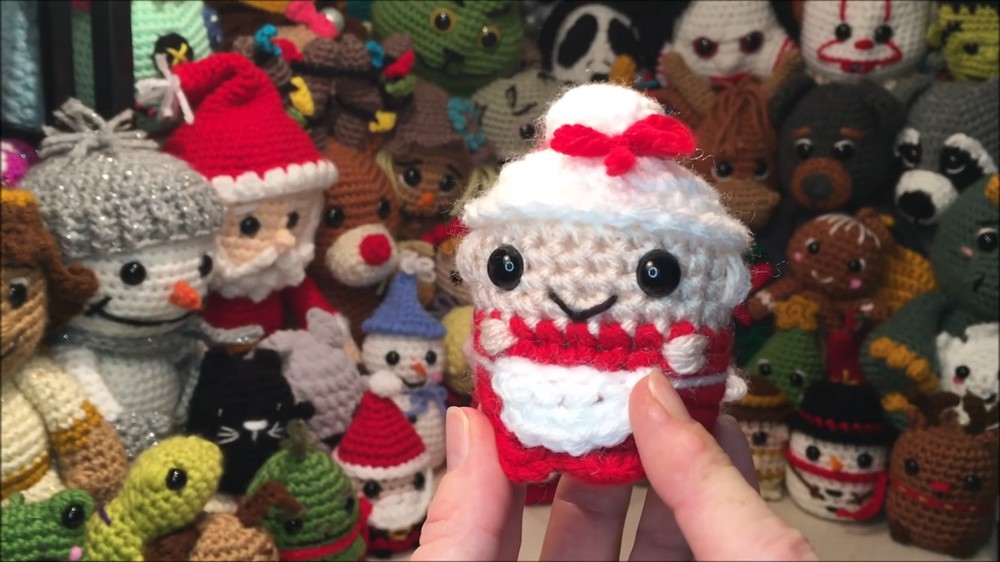
The finished amigurumi can also become a keepsake a little reminder of festive seasons, family gatherings, or special memories. For those who enjoy needlework or are looking for a soothing diy hobby, working on a Mrs. Claus amigurumi offers a relaxing, rewarding pastime and the satisfaction of producing something beautiful with your own hands.
Free Crochet Mini Mrs. Claus Amigurumi Pattern
Materials
- Yarn:
- #4 medium (worsted) weight yarn: Red (dress), White (hair, apron), Flesh/skin tone (face/hands)
- Optional: #6 blanket/chenille yarn for a plush version
- Hook: 4.25 mm for #4 yarn, 5.5 mm for plush yarn
- Safety Eyes: 10 mm for original, 14 mm for plush
- Yarn needle
- Polyester stuffing
- Stitch marker
- Scissors
- Optional: Embroidery thread or separated yarn strands for mouth
- Optional: Extra stuffing for hiding ends inside
Key Abbreviations (US terms)
| Abbreviation | Meaning |
|---|---|
| MR | Magic Ring |
| sc | Single Crochet |
| inc | Increase (2 sc in same stitch) |
| dec | Decrease (sc2tog) |
| ch | Chain |
| sl st | Slip Stitch |
| st(s) | Stitch(es) |
| flo | Front loop only |
| blo | Back loop only |
| pico | (sc, ch 1, sc) in same st |
Special Notes
- Work in continuous rounds unless otherwise stated. Use a stitch marker for the first stitch of each round.
- Stitches are typical amigurumi unless you’re directed to work in front or back loops for shaping.
- The doll is worked from the top (hair/bun) down to the base.
- Use the invisible decrease method for neater decreases.
- Color changes: Always change color at the last yarn-over of the previous stitch for a cleaner transition.
- Safety eyes are added after head and body are made, before final closing.
- Pattern details include embroidery for hands, mouth, hair tie, and apron.
Pattern Instructions
Doll (Main Body)
Head & Hair Bun
With White (hair color):
Round 1: MR, 8 sc in ring. (8)
Round 2: (1sc, inc) repeat around. (12)

Rounds 3–4: 12 sc. (12 per round)
Round 5 (flo): (sc, inc) repeat in front loops only. (18)
(This creates a defined round for the bun edge.)
Round 6: (sc in next 2, inc) repeat around. (24)
Round 7: 24 sc. (24)

Face
Round 8 (flo): Sc in next 11 flo; sl st in next 2 flo; sc in next 11 flo. (24: 11 sc, 2 sl st, 11 sc)
- (You will have a row of unworked back loops left behind for later.)
Tie off White, attach Flesh/skin color to blo (see next round).
Head/Face to Body
Round 9 (blo): With skin color, 24 sc around in the back loops left from Round 8. (24)
Round 10: Sc in next 7, dc3 cluster in next st, sc in next 9, dc3 cluster in next st, sc in next 6. (24)
- dc3 cluster: (Yarn over, insert hook, draw up loop, yarn over, pull through 2) repeat 3 times in same stitch, yarn over and pull through all loops.
Rounds 11–12: 24 sc. (24 per round)
Round 13: Change to Red (dress). 24 sc. (24)
Rounds 14–17: 24 sc (24 per round)

After round 17, pause: Insert safety eyes (between sides of the head, with 4 holes between), and stuff head and upper body carefully (firm, but do not over-stretch stitches).

Dress Skirt & Finishing
Round 18 (flo): (pico, 2 sl st) repeat all around in front loops only.
- pico: (sc, ch 1, sc) in same st.
Round 19 (blo): (sc, dec) repeat around. (16) in back loops only
Round 20: 8 dec (dec in each st around). (8)
Stuff remainder of body, keeping bottom flat, not rounded. If desired, add a bit of stuffing to hide any ends before closing.
Finish off, leaving a long tail. Do NOT close bottom yet (for embroidery access).
Apron
With White:
- Chain 4.
- Row 1: 3 sc across. Turn.
- Row 2: Ch 1, 3 inc (6 sc). Turn.
- Row 3: Ch 1, 6 sc across.
Cut yarn, leaving a long tail on both sides for easy tying. Even up shape with a few stitches by hand if needed.
Attach apron by sewing or tacking just below head, tie or sew ends at the back of the doll. Adjust for symmetry before final fastening.
Arms (Embroidered Hands)
With Skin color yarn:
- Use a long strand. Bring needle up from bottom of skirt to just below each eye (in the red 'dress' portion), wrap 4 times around a vertical stitch for each hand; repeat for both sides.
- Exit out the bottom and tie off ends snuggly and neatly.
Embroidery (Face & Hair Accessories)
- Mouth: Use a separated strand of red yarn or embroidery thread. Embroider a small "smile" one row below eyes, centered between them.
- Hair tie/bun ribbon: Use red yarn. Wrap/twist and cinch tightly around top “bun” to create a bow, as shown. Sew or tie in place.
- Bun parting: Use a bit of white to define bun if desired.

Final Assembly
- Close base: Thread tail through last 8 front loops, pull tight, weave in, and bring through center bottom to hide tail.
- If desired, form a loop with the tail as a hanger.
- Smooth shape and trim any loose yarn ends.
Conclusion
Congratulations! Your Mini Mrs. Claus amigurumi is finished, ready for gifting or holiday decor. This design works well in both worsted and plush yarn for different effects.
Pattern Correction
- If bottom or apron is noticeably lopsided after removal from hook, even out with a few hand stitches before attaching apron.
- For color changes, remember to complete the last yarn-over of previous stitch with new yarn for tidy transitions.
Tips
- When stuffing, keep the head and skirt more firmly stuffed, and the bottom slightly flatter for stability.
- Embroider facial features with fine thread or separated yarn for neater lines.
- Safety eyes are best added before closing and stuffing lower body.
- Use plush/blanket yarn and larger hook for a squishier, plush version; you may want to size up apron and accessories as needed.