
Crochet Christmas Bear Free Pattern Timeless Holiday Plush
Enjoy festive season with this Crochet Christmas Bear Pattern that offers cozy charm, and a cuddly toy for gifts or décor at home today.

Merry Crochet Christmas Bear Pattern Sweet Yuletide Style
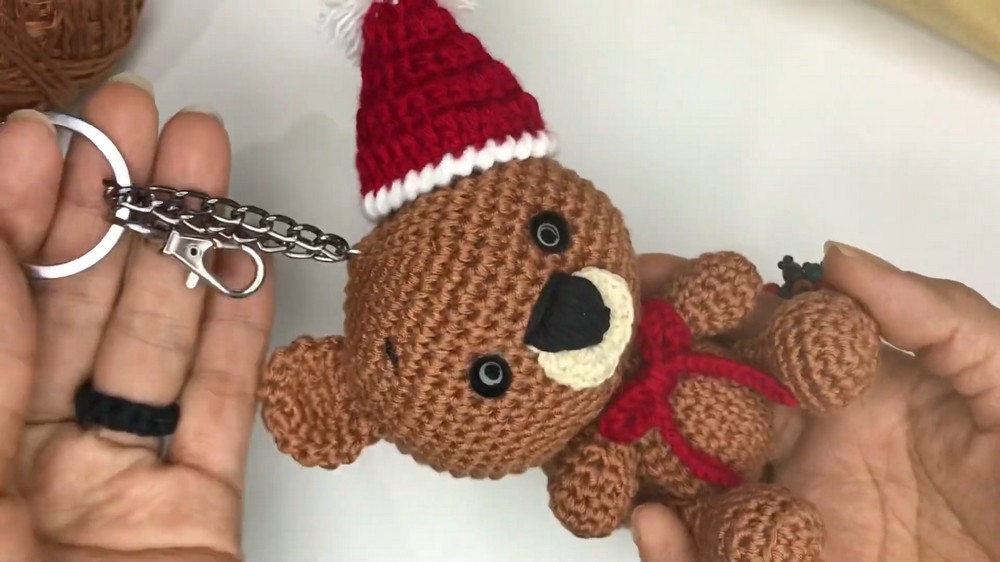
Adding a festive touch to your home decor is delightful with this cuddly forest friend dressed in his holiday best. Crochet Christmas Bear pattern This snuggly toy works wonderfully as a centerpiece for your winter display, a soft companion for children, or a heartfelt gift for a fellow collector. The main specialty of this design is its classic look, featuring a jolly red hat and a matching scarf that instantly spreads holiday cheer. Because it is made from soft yarn, it offers a warm and cozy feel that makes any room seem more inviting during the snowy season.
Crochet Pattern for Christmas Teddy Bear
1. Project Overview
- Finished Size: Approximately 13 cm tall, sitting position.
- Skill Level: Intermediate – familiarity with amigurumi techniques, magic rings, invisible decreases, and sewing required.
- Special Features: Incorporates plastic safety eyes and optional embroidery for expressive detail. Includes accessories like a Christmas hat and decorative bow.
2. Materials
Yarn
- Body: 1 mm thick yarn in brown or another base color.
- Bow and Accessories: Contrasting yarn in festive tones (e.g., red, white, or green for a holiday vibe).
- Optional Details: Thread or finer yarn for embroidery.
Hook
- 2 mm crochet hook – suitable for the thin yarn specified. Work tightly to avoid gaps in stitches.
Eyes and Nose
- Safety eyes: Plastic rounded eyes, size appropriate for the bear (e.g., 6–8 mm depending on aesthetic preference).
- Plastic nose: Use a pre-made nose for simplicity.
Stuffing
- Silicone cotton or polyester fiberfill for shaping the bear firmly.
Additional Supplies
- Tapestry/darning needles for sewing parts and embroidery
- Scissors
- Stitch markers
- Straight pins (to position ears, eyes, limbs during sewing)
- Optional: Buttons or small charms for further customization.
3. Key Techniques
Magic Ring:
- Wrap yarn around your finger to create a loop.
- Insert hook into loop, yarn over and pull through, then chain one to secure.
- Work the required number of stitches into the ring.
- Pull the tail tightly to close the ring.
Invisible Decrease:
- Insert hook into front loop only of the next stitch.
- Insert hook into front loop only of the following stitch.
- Yarn over, pull through both loops.
- Yarn over again, pull through both stitches.
Expressive Details:
Using thread or thinner yarn for facial embroidery enables precision when shaping features like the nose, mouth, and sunken eyes for character.
4. Pattern Instructions
4.1. Head
Rounds 1–8: Shape & Increase
- Start with a magic ring and:
- Round 1: 6 sc into the ring. (6 sts)
- Pull the yarn tail to close.
- Round 2: Inc in each st → 12 sts
- Round 3: (1 sc, inc) around → 18 sts
- Round 4: (2 sc, inc) around → 24 sts
- Round 5: (3 sc, inc) around → 30 sts
- Round 6: (4 sc, inc) around → 36 sts
- Round 7: (5 sc, inc) around → 42 sts
- Continue shaping with gradual increases for a rounded head.
- Round 8: (6 sc, inc) around → 48 sts


Rounds 9–16: Stabilize Shape
Rounds 9–16:
Work 48 sc per round stitch by stitch around to maintain shape. Stuff as you go, ensuring firm yet flexible stuffing. Even distribution is key.
Round 17–23: Decrease & Close
- Round 17: (7 sc, dec) around → 48 sts
- Round 18: (6 sc, dec) around → 42 sts
- Round 19: (5 sc, dec) around → 36 sts
- Round 20: (4 sc, dec) around → 30 sts
- Round 21: (3 sc, dec) around → 24 sts
- Round 22: (2 sc, dec) around → 18 sts
- Round 23: (1 sc, dec) around → 12 sts
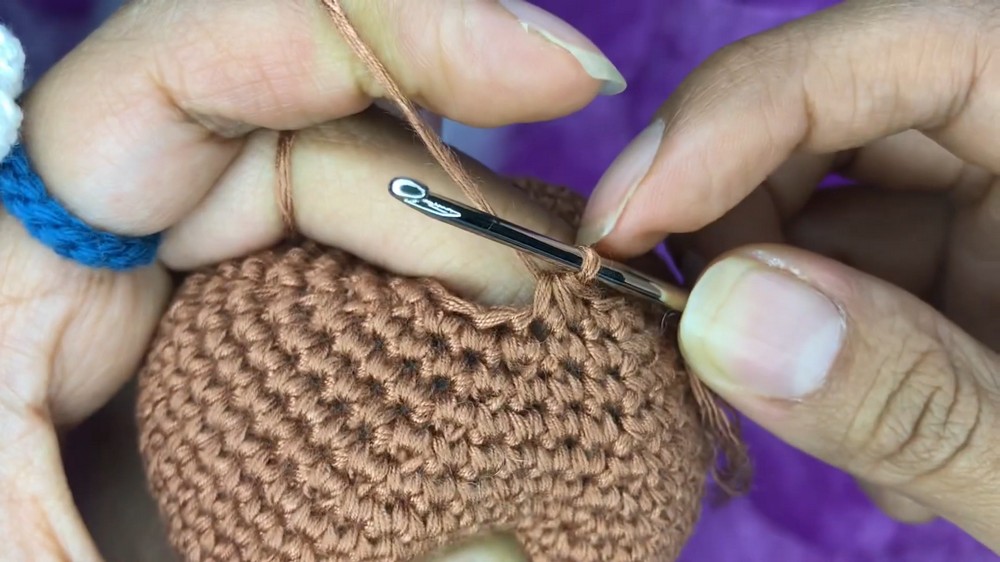
To close, thread a needle with the tail, weave through front loops of remaining stitches, pull tightly to close the hole, tie off and weave in.
4.2. Body
Rounds 1–5: Shape Increases
- Start with a magic ring as in the head:
- Round 1: 6 sc into the ring. (6 sts)
- Pull tightly to close.
- Round 2: Inc in each st → 12 sts
- Round 3: (1 sc, inc) around → 18 sts
- Round 4: (2 sc, inc) around → 24 sts
- Round 5: (3 sc, inc) around → 30 sts
Rounds 6–8: Shape
Rounds 6–8:
Work 30 sc stitch by stitch per round. Stuff lightly but firmly to maintain shape.
Round 9–15: Decrease
- Round 9: (3 sc, dec) around → 24 sts
- Round 10–11: 24 sc stitch by stitch.
- Round 12: (2 sc, dec) around → 18 sts
- Round 13: (1 sc, dec) around → 12 sts
- Round 14–15: 12 sc stitch by stitch.
Stuff before closing and finish with a slip stitch. Leave a long tail for sewing the head to the body.
4.3. Arms (Make 2)
- Round 1: Begin with a magic ring, 6 sc into ring.
- Round 2: Inc in each st → 12 sts
- Rounds 3–4: 12 sc per round.
- Round 5: (5 sc, dec) → 11 sts
- Round 6: (3 sc, dec) → 9 sts
- Round 7: 9 sc around.
Stuff lightly, leaving the arm flexible and flat. FO with a long tail for sewing.
4.4. Legs (Make 2)
- Rounds 1–6: Start as in arms, increasing to 18 sts.
- Rounds 7–9: Gradually decrease as:
- Round 7: (6 sc, 3 dec) → 15 sts
- Round 8: 5 sc, dec → 13 sts
- Round 9: 4 sc, dec → 11 sts
- Stuff lightly and finish with a long tail.
4.5. Ears (Make 2) and Tail
- Rounds 1–6: Start with a magic ring, increasing as in rounds for the arms.
- Final shape after decrease to 12 sts:
- Fold slightly in half to shape the ears, leaving a slight gap.
- The tail is shaped similarly but stuffed lightly in a rounded shape.
4.6. Bow
Top Chain Piece
- Chain 20 for the bow’s base piece. FO.
Second Chain Piece
- Chain 22, FO, and use tails to sew the two pieces perpendicular in center.
- Wrap tails around the center and knot securely to accentuate the bow shape.

5. Assembly
Attach Parts
- Head to Body: Sew head firmly onto the top of the body.
- Limbs:
- Position arms at neck level and legs below. Sew securely in a sitting position by folding slightly for shaping.
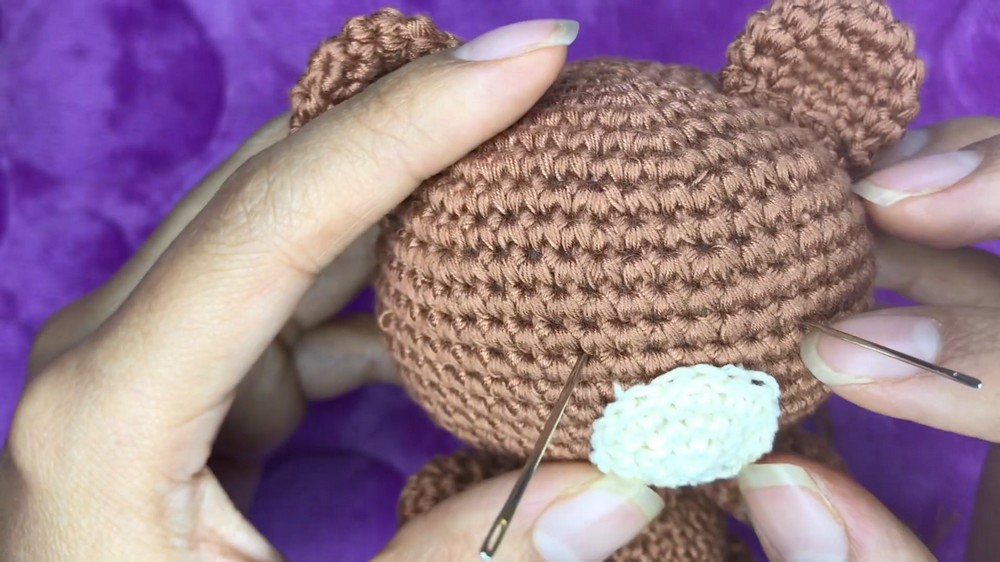
- Ears: Position ears symmetrically on the head and sew.
- Tail: Sew the tail onto the back.
Finishing Details
- Eyes: Insert safety eyes as desired, securing with backside washers. Use embroidery thread to create sunken eye effects to add expression.
- Nose and Mouth: Embroider a triangle-shaped nose and optional curved mouth using fine thread or yarn.
6. Customization Ideas
- Holiday Theme: Use red and white yarns for accessories like scarves, hats, and bows.
- Sitting Position: Slightly under-stuff lower legs to make sitting seamless.
- Charms/Buttons: Decorate bow or accessories with seasonal buttons or charms.
- Flexibility: Experiment with different colors for year-round variations (pastels for spring, darker tones for autumn/winter).
7. Final Words & Tips
Congratulations on completing your Christmas teddy bear! Its compact size makes it perfect for gifting, ornaments, or holiday decor. Take care to sew all parts securely for durability.
Tips
- Stitch Count: Double-check counts at the end of rounds to avoid misalignments.
- Expression: Manipulate the stuffing and stitches behind the eyes for unique expressions.
- Patience: Crochet with consistent tension, especially since small parts may require tighter stitching.
Final Look
Your finished bear will have structured limbs, expressive features, and a charming holiday bow! Attach a chain or ribbon to transform it into an ornament or gift-ready accessory.