
Adorable Free Crochet Baby Hello Kitty Pattern For little one’s
Create the cutest baby Hello Kitty with this easy crochet pattern – perfect for beginners, customizable, and a heartwarming gift idea for all ages!
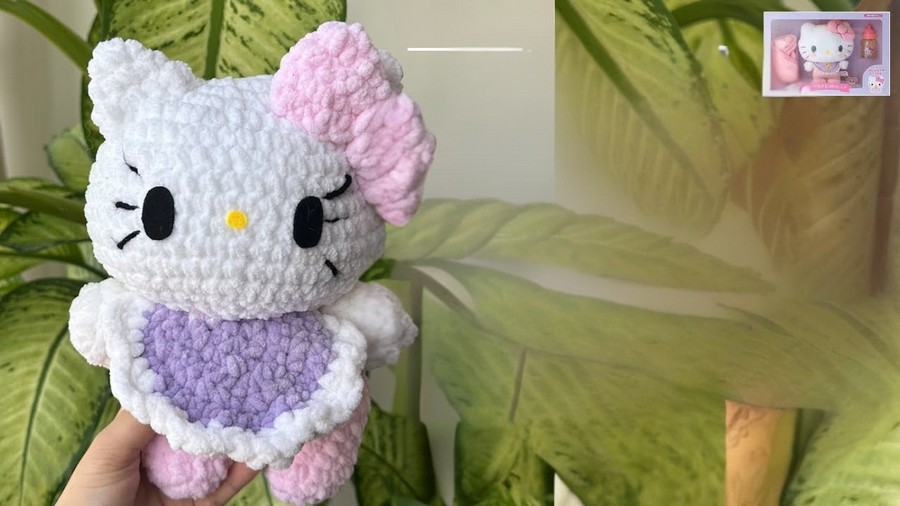
Who doesn’t adore the iconic Hello Kitty? Now imagine turning soft, colorful yarn into a baby version of this beloved character—perfect for gifting or decorating nurseries. This free crochet pattern provides an easy-to-follow guide for making an adorable Baby Hello Kitty. It’s a wonderful option for both beginners and experienced crocheters looking for a fun project. Whether you’re preparing a thoughtful handmade baby shower gift or adding a cute touch to your little one’s toys, this pattern brings charm and heartwarming results into your creations.
Crochet Baby Hello Kitty Pattern for Cute Creations
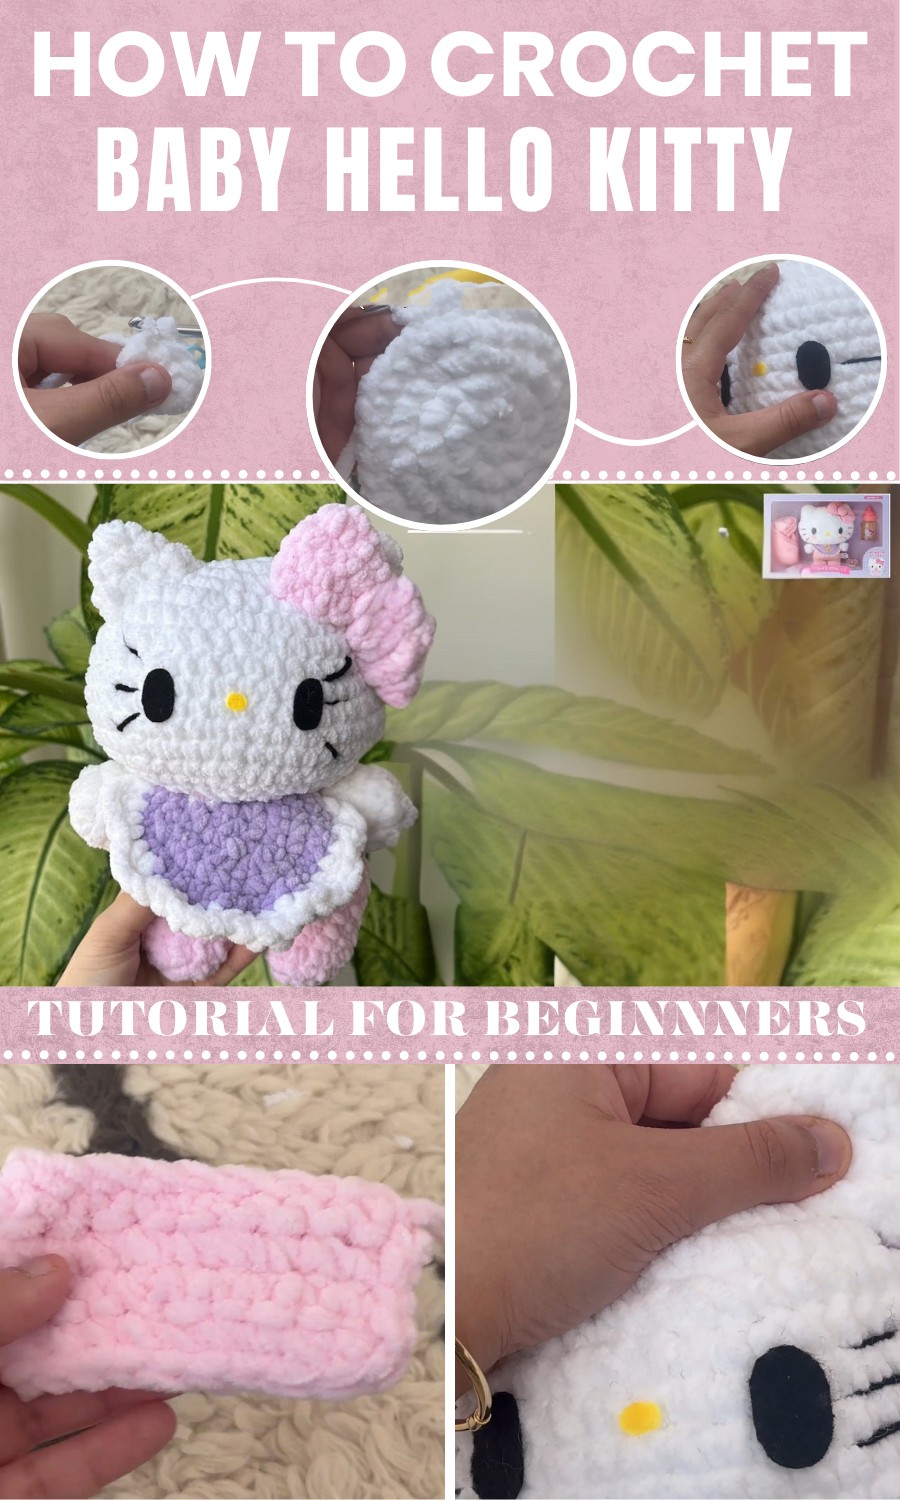
The finished product can be used as a cuddle buddy for kids, an adorable nursery display piece, or even a delightful birthday present. Plus, it’s customizable! Change the colors or add your own special touches to make your Hello Kitty truly unique. The best part? It's relaxing and rewarding, allowing you to enjoy a calming moment while stitching something meaningful. With zero cost for the pattern, you can focus on what matters—transforming simple yarn into something memorable. Perfect for any Hello Kitty fan or anyone who loves handmade treasures, this project is sure to brighten your day. Grab your yarn and hook and enjoy making a keepsake that’s both precious and personal
Step-By-Step Guide to Crochet a Lion – Based on Video Instructions
This video tutorial offers an in-depth step-by-step guide to crocheting an adorable lion, useful for creating handmade toys, gifts, or decor pieces. The process focuses on clear explanations, making it approachable even for beginners, while incorporating advanced techniques for more experienced crocheters. The special pattern showcases thoughtful finishing details such as whiskers, oval-shaped eyes, and vibrant accents, giving the lion its charming personality throughout the design process.
Adorable Free Crochet Baby Hello Kitty Pattern
Materials
- Yarn:
- Main Body: Light or pastel colors (e.g., beige, cream, soft pink, light gray).
- Bow: Contrasting bright or pastel yarn (e.g., light blue, white, or purple).
- Ears/Belly Accent: Use the same color or a coordinating shade.
- Secondary Color: White or another contrasting color for ear accents (optional).
- Black Yarn: For embroidering whiskers.
- Hook:
- 2.5 mm crochet hook (for most yarn weights, adjust accordingly).
- Stuffing:
- Polyester fiberfill or toy stuffing.
- Safety Eyes:
- Preferably 6–8 mm size (position between rows as noted; you can use felt to make oval eyes if you prefer).
- Scissors & Tapestry Needle:
- For sewing, weaving in ends, and embroidery.
- Stitch Marker:
- For tracking the beginning of rounds.
- Optional:
- Glue gun for securing features (use only if not gifting to children).
Gauge
- The gauge is not critical, but ensure your stitches are tight enough to prevent the stuffing from showing.
- To scale the bunny, experiment with yarn weights and hook sizes. A thicker yarn and a larger hook will yield a larger bunny, while finer yarn and a smaller hook will create a miniature version.
Finished Size
- Approximately 15–18 cm (6–7 inches) tall, depending on yarn weight and tension.
Pattern Instructions
Head
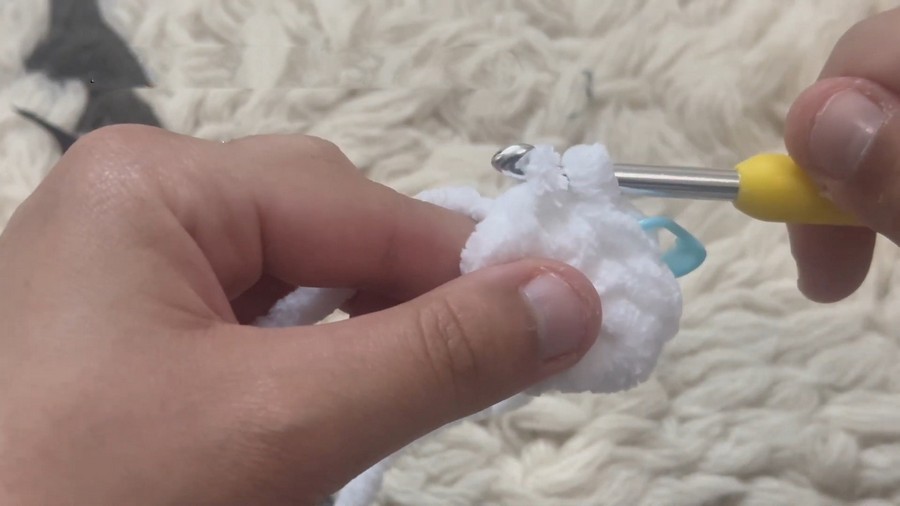
R1 – Magic Ring:
- Leave a short yarn tail.
- Create a magic ring. Work 8 single crochet (SC) stitches into the ring. (8 stitches total)
R2:
- Increase (2 SC in each stitch) all around. (16 stitches total)
R3:
- SC 1, inc in the next stitch. Repeat 8 times. (24 stitches total)
R4:
- SC 2, inc in the next stitch. Repeat 8 times. (32 stitches total)
R5:
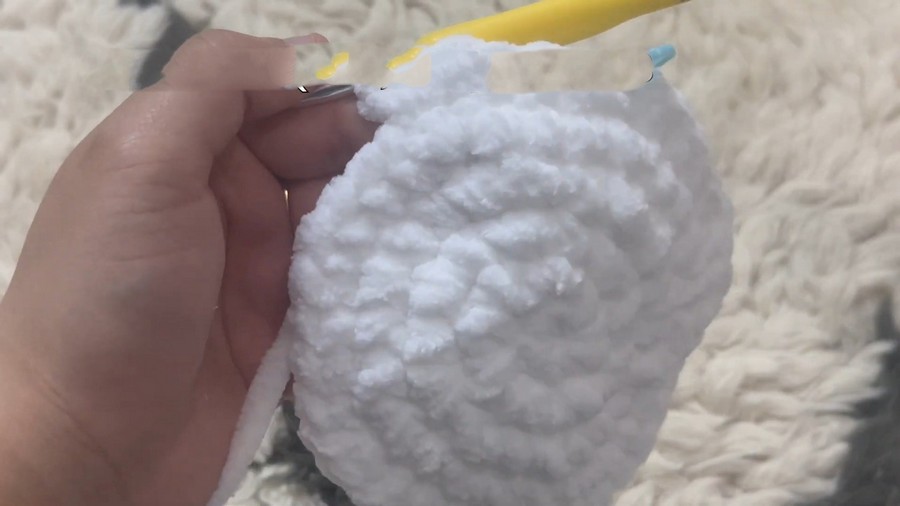
- SC 3, inc in the next stitch. Repeat 8 times. (40 stitches total)
R6–13:
- SC in each stitch around for 8 rounds. (40 stitches per round)
R14 – Decreasing Round:
- SC 3, decrease (dec) in the next stitch. Repeat all around. (32 stitches total)
R15:
- SC 2, dec in the next stitch. Repeat all around. (24 stitches total)
R16:
- SC 1, dec in the next stitch. Repeat all around. (16 stitches total)
R17:
Stuff the head firmly with polyester stuffing.
- Dec all around. (8 stitches total)
Adding Facial Features
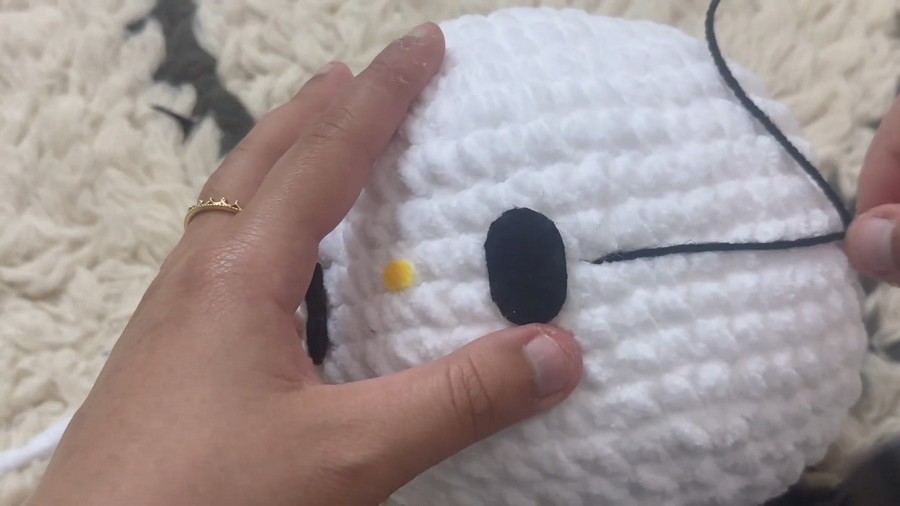
- Eyes:
- Insert the safety eyes between Rows 8–9, leaving 6 stitches between them.
- Alternatively, cut oval shapes from black felt and glue them securely.
- Whiskers:
- Use black yarn to embroider three whiskers on either side of the face. Start from the inside of the head, pull the thread, and create straight lines through the stitches. Hide the yarn ends securely within the head.
- Nose:
- Embroider the nose with pink yarn below and centered between the eyes.
Body
R1:
- Create a magic ring. Work 6 SC into the ring. (6 stitches total)
R2:
- Increase (2 SC in each stitch) all around. (12 stitches total)
R3:
- SC 1, inc in the next stitch. Repeat 6 times. (18 stitches total)
R4:
- SC 2, inc in the next stitch. Repeat 6 times. (24 stitches total)
R5:
- SC 3, inc in the next stitch. Repeat 6 times. (30 stitches total)
R6–9:
- SC in each stitch around for 4 rounds. (30 stitches per round)
R10 – Connecting the Legs:
- Use the following steps to attach the legs:
- Place the first leg (already made separately) next to the body.
- Chain 2, mark the second chain with a stitch marker.
- Insert the hook into the first stitch from the separate leg, and begin with an SC, connecting the legs.
- Continue to SC around the perimeter of both legs, ensuring the chain stitches are snugly included.
R11:
- SC 14, dec. Repeat 2 times. (28 stitches total)
R12–14:
Stuff the body, ensuring it is firm and shaped.
- SC in each stitch around for 3 rounds. (28 stitches per round)
R15 - Decrease Round:
- SC 5, dec. Repeat 4 times. (24 stitches total)
R16:
- SC 2, dec in the next stitch. Repeat 8 times. (16 stitches total)
Final Step:
- Leave a long yarn tail to sew the body and head together.
Arms (Make 2)
R1:
- Create a magic ring. Work 6 SC into the ring. (6 stitches total)
R2:
- SC 1, inc in the next stitch. Repeat 3 times. (9 stitches total)
R3–5:
- SC in each stitch around for 3 rounds.
Final Step:
- Lightly stuff the arms, close the top, and leave a yarn tail for sewing.
Legs (Make 2)
R1:
- Create a magic ring. Work 6 SC into the ring. (6 stitches total)
R2:
- Increase (2 SC in each stitch) all around. (12 stitches total)
R3:
- SC in each stitch all around. (12 stitches total)
Final Step:
- Stuff the legs lightly and leave a yarn tail for sewing.
Ears (Make 2)
R1:
- Create a magic ring. Work 6 SC into the ring. (6 stitches total)
R2:
- Increase (2 SC in each stitch) all around. (12 stitches total)
R3:
- SC 1, inc in the next stitch. Repeat 6 times. (18 stitches total)
R4–6:
- SC in each stitch around. (18 stitches per round)
Final Step:
- Leave a tail for sewing. Do not stuff the ears.

Tail
R1:
- Create a magic ring. Work 6 SC into the ring. (6 stitches total)
R2:
- SC in each stitch all around. (6 stitches total)
R3:
- Leave a long tail for sewing and finish off.
Accessories (Bow and Bib)
-
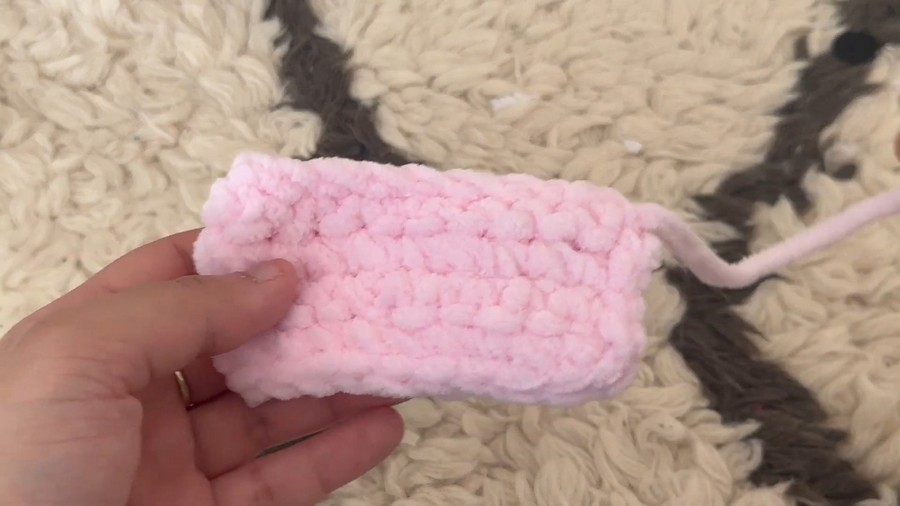
Bow: Ch 21. Starting in 2nd ch from hook, work 20 sc. Ch 1, turn, and work 20 sc for 3–4 rows. Fold into a loop, sl st the ends together, and wrap yarn around the center to pinch into a bow shape.
-
Bib: * R1: 6 sc in MR. Turn (do not join).
-
R2: 6 inc (12). Turn.
-
R3: (1 sc, 1 inc) repeat 6 times. Turn.
-
R4: (2 sc, 1 inc) repeat 6 times.
-
Edging (Switch to White): (1 hdc, 2 dc in next, 1 hdc, 1 sl st) repeat to create waves.
-

Final Step:
- Sew or glue the bow to the bunny's neck or head.
Assembly
- Attach Head to Body:
- Align the head and body. Use long yarn tail to sew securely.
- Sew Arms and Legs:
- Attach arms just below the head on each side. Sew the legs to the bottom of the body.
- Ears:
- Sew the ears to the top of the head, ensuring symmetry.
- Tail:
- Attach the tail to the back of the body.
Customization Ideas
- Add Personality:
- Use blush on the cheeks for a rosy look.
- Add tiny buttons or bows to the front of the bunny.
- Color Combos:
- Try different color combinations for fun themes: shades of blue, pink and white, or multicolor.
- Accessories:
- Turn the bunny into a keychain or attach decorative elements like hearts or stars with floral wire.
Special Techniques
- Invisible Decrease:
- For less visible decreases, work through front loops only of the two stitches you’re decreasing.
- Changing Colors:
- Connect new yarn by pulling the new color through the last pull-through of the previous stitch.
- Magic Ring:
- This ensures a tight, seamless start at the center of your work.
Conclusion
Congratulations! You’ve completed crocheting a charming amigurumi bunny. Its playful design and adorable bow make this project an excellent gift, nursery accessory, or décor piece.