Easy Crochet Pumpkin Keychain Pattern for Seasonal Style
A tiny pumpkin can bring big smiles with this Free Crochet Pumpkin Keychain Pattern that is perfect for everyday accessories and gifts.
Autumn has arrived, and your adorable new friend is here to bring warmth and festive charm to your keys and decorations. This small crochet pumpkin is not just adorable but also very simple to make. The charm of this crochet project shines with its tiny, round shape, beautiful textured ridges, and a lovely stem on top. It’s so lightweight and pocket friendly that you can easily hang it on your school bag, keys, zippers, or even gift it to a loved one.
Free Crochet Pumpkin Keychain Pattern Full of Cozy Charm
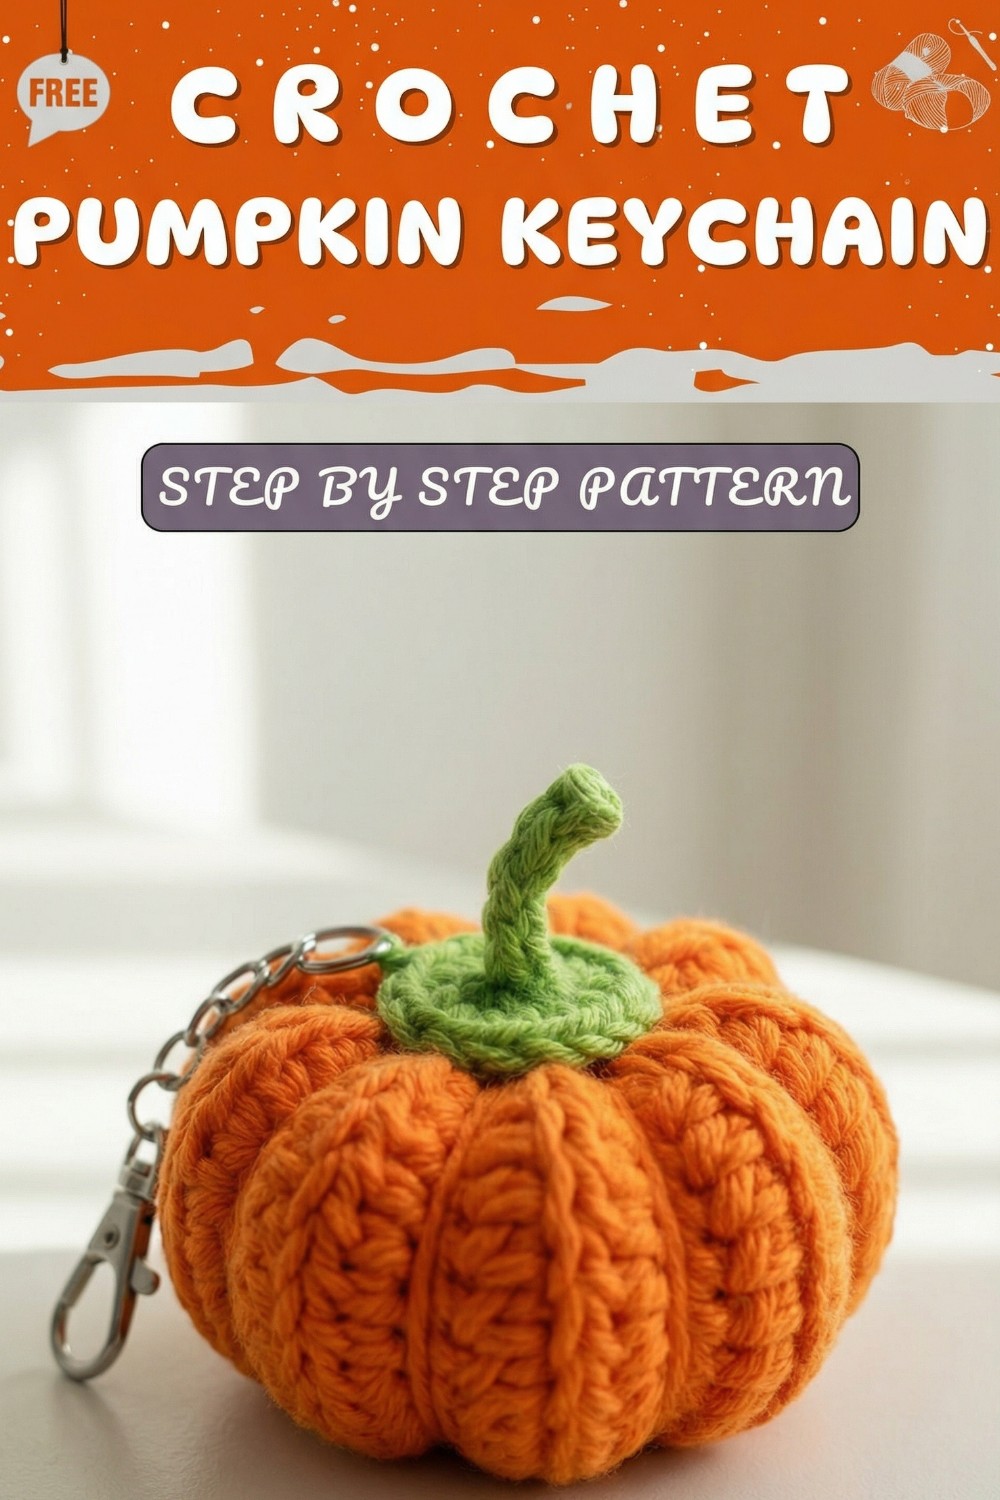
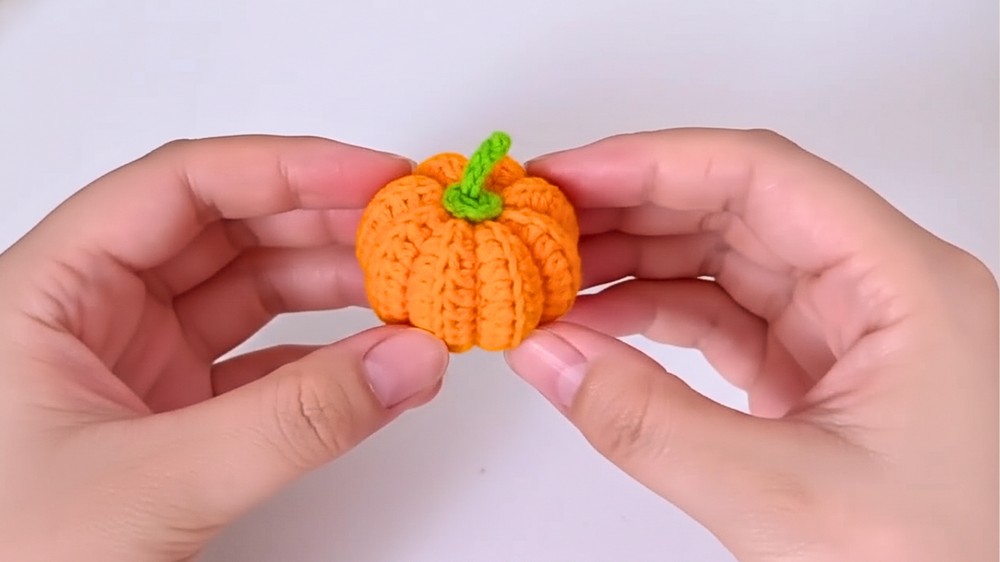
The pumpkin has a unique design with raised ridges, making it look like a real pumpkin. The cheerful orange yarn for the main body and the soft green color for the stem give it a natural and sweet appearance. Its size makes it especially cute, catching everyone's attention. You can even customize the colors to match your personal style.
This pattern is beginner friendly and uses only basic crochet stitches like the half double crochet (HDC), slip stitches, and simple chains. The steps are easy to follow, starting with chaining for the main body, shaping ridges from the back loops, and finally closing both ends to create the pumpkin’s round shape. Fiberfill stuffing is added inside to make it soft and squishy. The small stem on top is crocheted with slip stitches and adds extra cuteness to the design.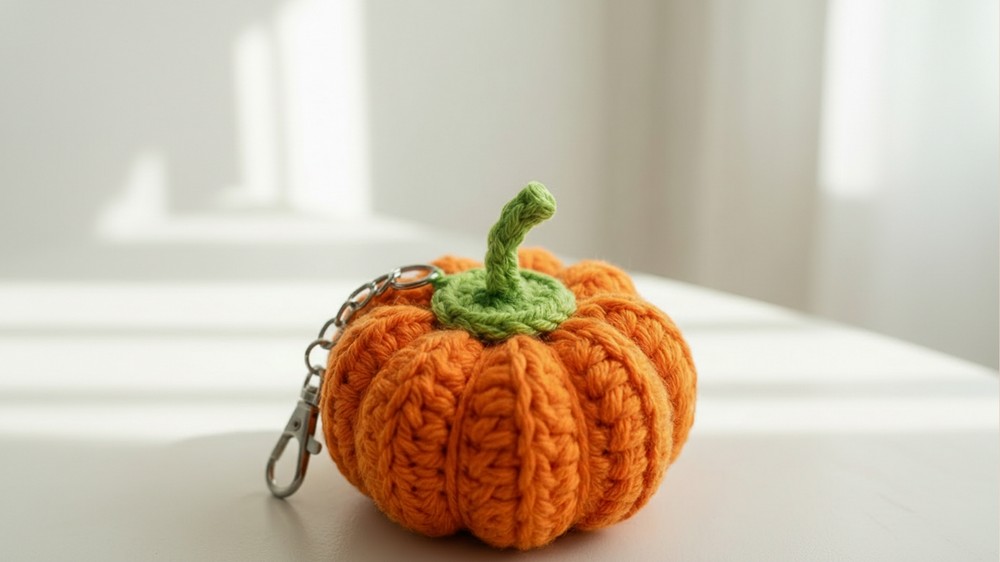
Stunning Crochet Pumpkin Keychain – Step by Step Pattern
Materials Needed
- Yarn: 4 ply yarn in two colors (orange for the pumpkin body and green for the stem).
- Hook: Crochet hook, 3.0 mm or 2.5 mm (depending on your tension preference).
- Tapestry needle: For sewing and weaving in yarn ends.
- Scissors: To cut yarn neatly.
- Fiberfill stuffing: To fill the pumpkin and give it shape.
- Keychain ring: To attach the pumpkin and transform it into a keychain.
- Glue: Hot glue (optional, but recommended for securing the stem).
- Stitch marker: To mark the beginning of each round.
Special Techniques
- Magic Ring: Used to begin circular parts like the pumpkin stem base.
- Working into the Back Loop: Gives a ribbed texture to the pumpkin body.
- Half Double Crochet (HDC): A basic stitch where the hook pulls through all loops at once.
- Slip Stitch: A seamless closure stitch to secure edges without adding height.
Crochet Pumpkin Keychain Pattern
Step 1: Crocheting the Pumpkin Body
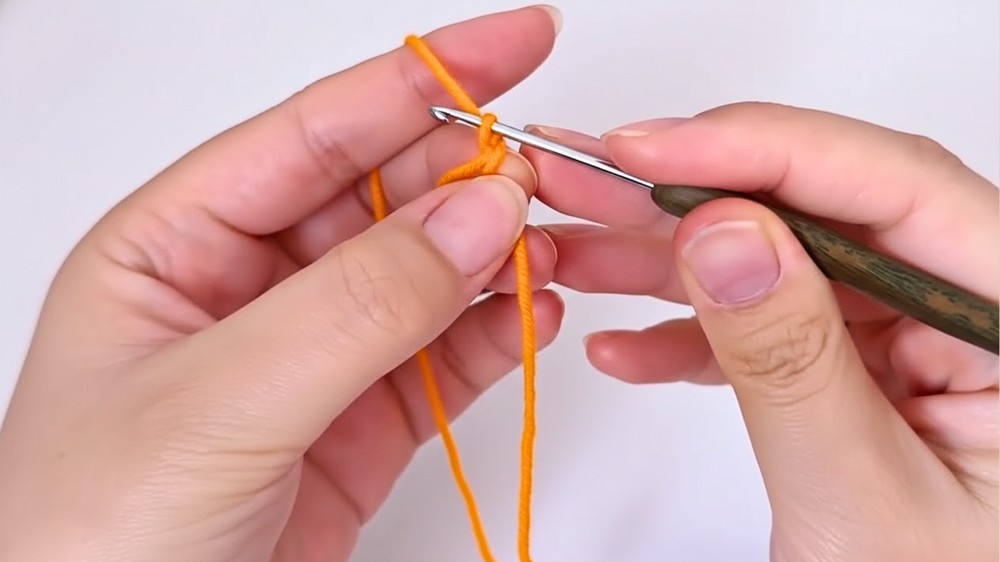
- Start with a slip knot: Wrap the yarn around your fingers as described and insert the hook under the yarn. Yarn over, pull through the loop, and secure tightly.
- Chain 15:
- To create the foundation, yarn over and pull through the loop repeatedly for fifteen chains.
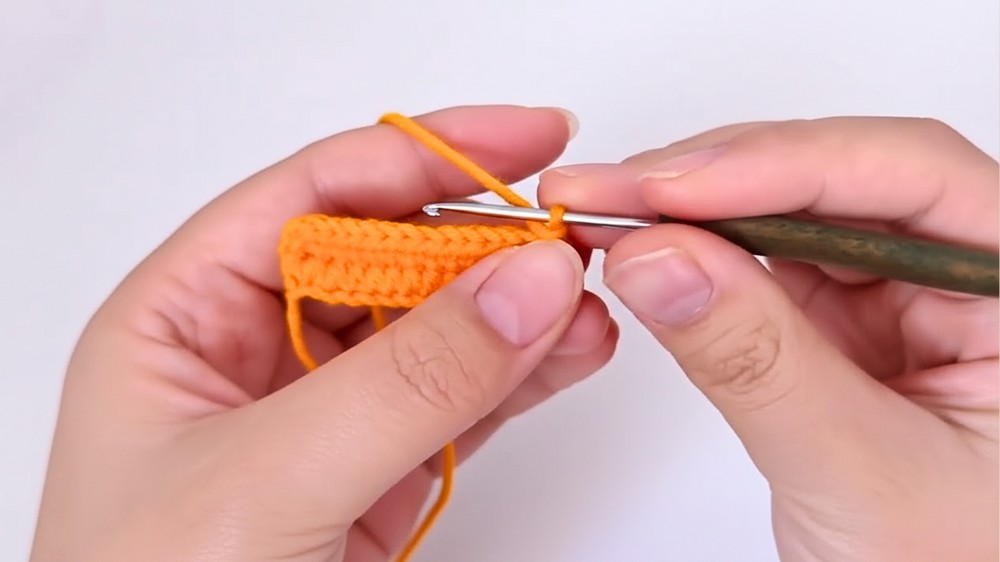
- Row 1:
- Starting from the second chain from the hook, work half double crochet (HDC) into the back loop.
- Repeat HDC across the row for a total of 14 stitches.
- Tip: Always insert the hook into the back loop of the chain to create ridges.
- Rows 2 to 18:
- Chain 1, turn the piece, and continue working HDC into the back loop for each row.
- Again, each row will consist of 14 stitches.
- After completing Row 18, you will notice nine raised ridges on each side of the body.
- Finishing the Pumpkin Body:
- Leave a long yarn tail and cut the yarn.
- Pull this tail through the loop, securing the edge.
Step 2: Sewing the Pumpkin Body
- Using a tapestry needle, match one stitch to one stitch along one side of the pumpkin body.
- Sew through both layers carefully, closing the seam.
- Once sewn, start closing one opening:
- Pick up loops from the raised ridges around the top edge using the needle.
- Pull the yarn tightly to close the opening.
- For added security, sew around the edge a second time and pull tight again.
- Stuff the Pumpkin:
- Insert fiberfill stuffing into the body through the remaining open end.
- Be careful not to over stuff; ensure the pumpkin retains its soft and squishy look.
- Closing the Second Opening:
- Repeat the steps for closing the first opening. Pick up loops from the ridges, sew around, and pull tightly.
Step 3: Shaping the Pumpkin
- Using a tapestry needle, insert the yarn through the center of one opening, pull it out through the center of the opposite side, and then bring it back.
- Pull the yarn between two ridges to create the iconic pumpkin segments.
- Repeat this process several times until the pumpkin has a segmented appearance.
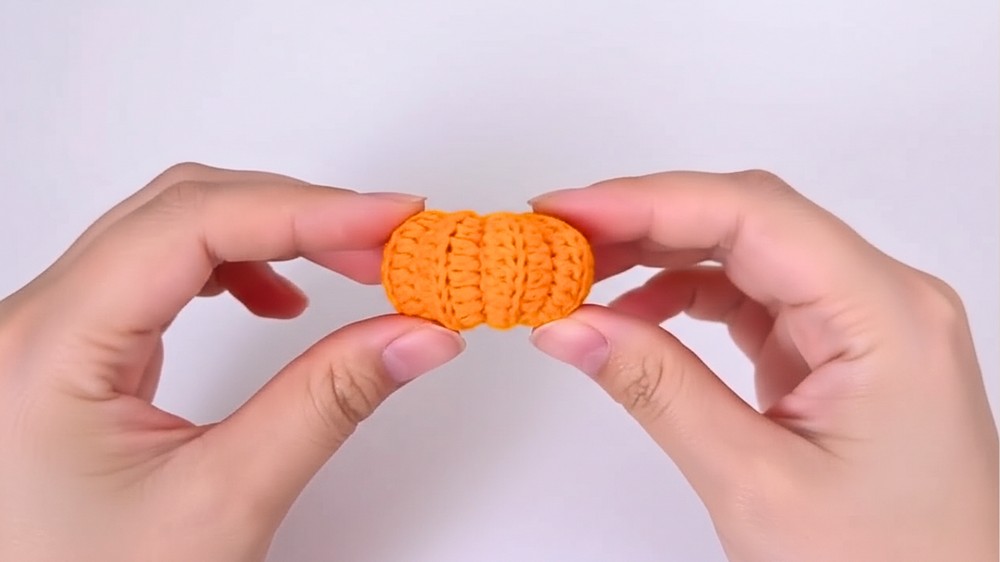
Tip: Pull gently to avoid deforming the pumpkin shape.
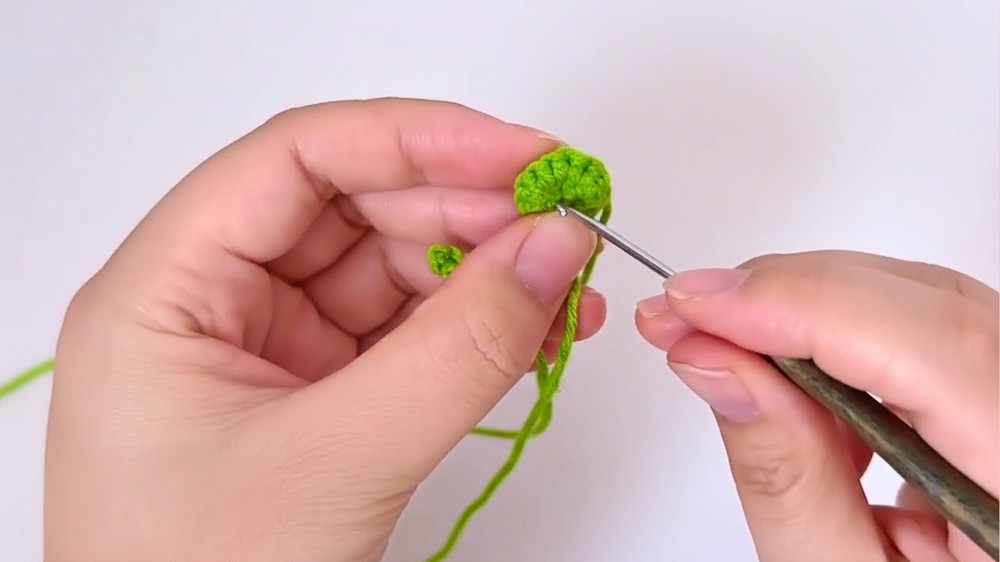
Step 4: Crocheting the Stem Base
- Begin with a magic ring:
- Wrap the yarn around your finger, insert the hook into the loop, and pull up a loop.
- Round 1:
- Work 6 single crochets (SC) into the magic ring. Place a stitch marker in the first stitch to track your rounds.
- Pull the short tail tight to close the ring.
- Round 2:
- Remove the stitch marker from the first stitch.
- Work 6 single crochet increases (two single crochets in each stitch), resulting in 12 stitches total.
- Finishing the Base:
- Skip the slip stitch and chain up; locate the first stitch, join with a slip stitch, and fasten off.
- Leave a long tail for sewing.
- Thread the yarn ends into a tapestry needle and weave through the base for a clean finish.
Step 5: Crocheting the Pumpkin Stem
- Start with a chain: Make a slip knot and chain six.
- Row 1:
- Work into the second chain from the hook: Slip stitch into the back loop.
- Repeat slip stitches across the chain for a total of five slip stitches.
- Finishing the Stem:
- Chain one, leave a long tail, cut the yarn, and pull it through.
- Thread the yarn tails into a tapestry needle and prepare to assemble.
Step 6: Assembling the Stem and Base
- Attach the stem to the pumpkin base:
- From the back of the base, thread the two yarn ends of the stem through the center.
- Tie knots securely with the yarn ends of the base.
- Trim excess yarn tails for a neat finish.
- Glue the Stem Assembly:
- Apply hot glue to the top of the pumpkin body and place the stem assembly precisely in the center.
- Hold for a few seconds to ensure proper adhesion.
Step 7: Finalizing the Keychain
- Attach a keychain ring to the top of the stem assembly or one side of the pumpkin body.
- Ensure the ring is securely fastened so it doesn’t slip off.
Final Words
Your crochet pumpkin keychain is now complete. This cheerful and simple project is great for beginners or as a fun seasonal crochet. Its ribbed texture and segmented look resemble a real life pumpkin, while the soft stuffing gives it a squashy charm. Add some creativity by experimenting with yarn colors to create pumpkins in shades of orange, white, red, or even green.
Tips for Maintaining Your Pattern
- Keep your stitches loose: Especially when working slip stitches or closing openings, to avoid tight spots or deformities in the shape.
- Trim yarn ends neatly: Uneven tails can make the finished look untidy.
- Maintain the pumpkin segments: Use firm but gentle tension when shaping the pumpkin to preserve its design.
- Use quality materials: Durable yarn and sturdy fiberfill will ensure your keychain lasts longer.
By following this detailed pattern, you can celebrate the beauty of handcrocheted crochet projects while adorning your keys or bags with a charming autumn inspired accessory.