
Tooth Keychain Crochet Free Pattern with Adorable Details
Flash playful style with Free Crochet Tooth Keychain Pattern perfect for keys bags dental fans and cheerful little everyday moments.
A tiny, smiling tooth made of soft yarn can brighten up your day in a snap. Lily, the creative mind behind the YouTube channel DIY Yarn Crafts, designed a sweet and simple keychain that’s easy to make and full of charm. This little tooth has a smooth, rounded shape with bright white yarn that looks fresh and friendly.
Perfect for backpacks, pencil cases, or keys, this tooth charm adds a touch of joy wherever it goes. Its lightweight feel and soft texture make it a cozy accessory you’ll love carrying around. The design is playful and warm, making it a perfect gift for kids losing their baby teeth or anyone who enjoys cute handmade items.
Free Tooth Keychain Crochet Project for Beginners
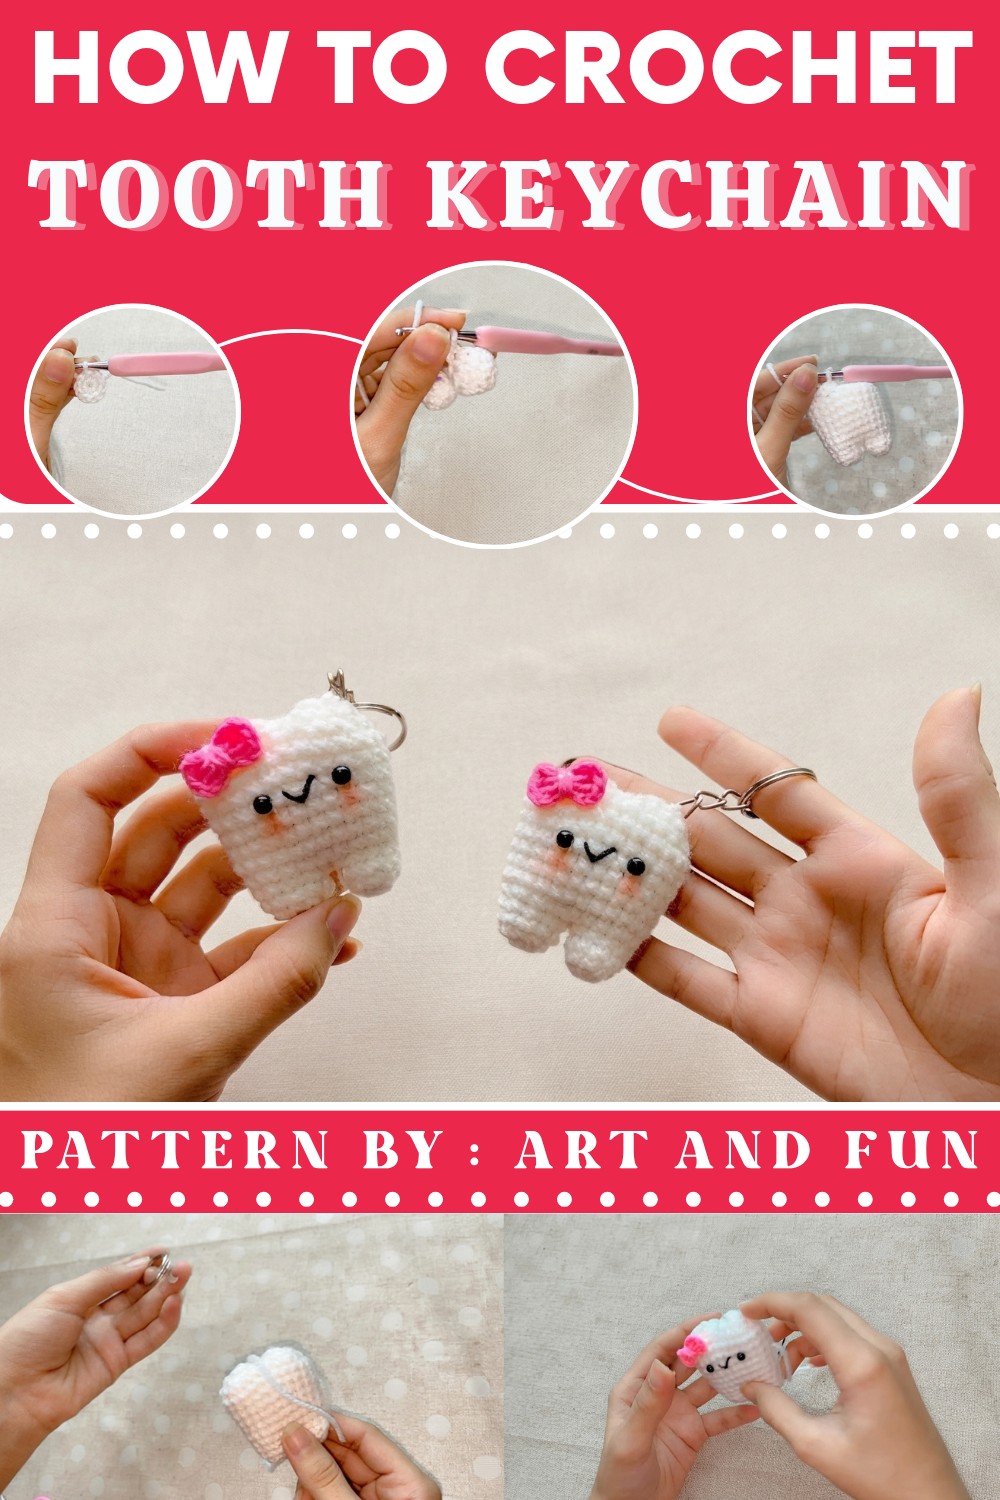
People will appreciate how unique and special this piece feels compared to regular keychains. Handmade with care, it shows off a personal touch that store-bought charms often lack. Plus, the simple style is great for beginners looking for a fun and quick crochet project.

This is exactly why you’ll enjoy the free crochet Tooth Keychain Pattern—it helps you create a delightful little keepsake that fits into your daily life easily. Give it a try and carry a bit of handmade happiness with you everywhere!
Crochet Tooth Keychain Pattern
This detailed crochet pattern will guide you step-by-step through creating a cute and compact tooth keychain. The pattern is constructed in multiple phases that involve crocheting two main tooth halves, joining them to form the body, shaping the distinctive tooth roots, and adding adorable finishing touches like a tiny bow, facial features, and a blush accent. The result is a charming amigurumi-style tooth perfect for gifting or personal use.
Pattern Highlights
- Two main pieces forming the tooth halves worked from magic rings.
- Seamless joining of the tooth halves to create a 3D body.
- Shaping the roots to mimic tooth anatomy with strategic decreases and chains.
- Detailed facial features including sewn smile, safety eyes, and optional blush.
- Tiny removable bow worked with double crochet stitches.
- Assembly with stuffing, sewing, and attaching a keychain ring.
Notes
- Work all rounds in continuous rounds unless noted otherwise.
- Use stitch markers if needed to track the beginning of rounds.
- Maintain consistent tension for smooth shaping and clean joins.
- Stuff firmly but moderately during the body assembly to maintain shape without stretching stitches.
- When attaching eyes and embroidery, position carefully for balanced facial expressions.
- Use a tapestry or yarn needle for sewing and joining parts.
- Finishing with a small bow adds character but may be omitted or customized.
Skill Level
Intermediate beginner to intermediate — This pattern requires knowledge of working in the round, magic ring, single crochet (SC), increases, decreases, joining rounds, embroidery, and some basic crochet shaping.
Materials
- Amigurumi yarn or any smooth medium-weight yarn in white or desired tooth color.
- Crochet hook suitably sized for your yarn (e.g., 2.5mm or 3.0mm).
- Stuffing (polyester fiberfill).
- Safety eyes (small size for keychain scale).
- Black embroidery thread for smile.
- Tapestry needle for weaving and sewing.
- Scissors.
- Keychain ring or clasp.
- Optional: small amounts of yarn in other colors for bow and blush.
- Fabric glue (optional, for attaching bow).
Measurements / Sizing
- The finished tooth keychain is approximately 6 cm tall and 3.5 cm wide (depending on yarn thickness and tension).
- Keychain length variable based on your ring and attachment method.
Gauge and Stitch Pattern
- Gauge is not critical but aiming for tightly closed stitches to keep the stuffing inside is recommended.
- Sample gauge: Approximately 8 single crochet stitches per 2.5 cm in diameter on rounds worked as increases.
- Stitch pattern is exclusively single crochet (SC) unless specified for the bow.
Stitch Abbreviations
| Abbreviation | Stitch |
|---|---|
| ch | Chain |
| sc | Single crochet |
| inc | Increase (2 SC in the same stitch) |
| dec | Decrease (crochet 2 stitches together) |
| sl st | Slip stitch |
| MR | Magic ring |
| dc | Double crochet |
Special Stitches
- Magic Ring (MR): Used to start rounds without a hole, tightening the loop after initial stitches.
- Invisible Decrease (dec): Crochet two stitches together invisibly to avoid obvious gaps for shaping.
The Crochet Pattern
Phase 1: Creating the Two Main Tooth Pieces
- Magic Ring:
- Begin with a magic ring. Chain 1 to prepare for the first round.
- Round 1:
- Work 6 single crochet (SC) stitches into the magic ring.
- Pull the ring tight to close the hole.
- Slip stitch (SS) to the first SC to join the round.
- (Total 6 stitches)
- Round 2:
- Chain 1 to start the round.
- Follow the pattern: (1 SC, 1 SC, increase); repeat this entire sequence twice.
- This means you do 1 SC in the first stitch, 1 SC in the second stitch, then 2 SC in the third stitch (increase). Repeat this twice to complete the round.
- (Total 8 stitches)
- Round 3:
- Chain 1.
- Work 1 SC in each stitch all around (8 stitches).
- Slip stitch to join the round.
- Important:
- For the first tooth piece, fasten off and cut the yarn.
- For the second piece, do not fasten off as you will continue with this yarn to join the two pieces.


Phase 2: Joining and Main Body
- Round 4 (Joining):
- Join the two separate pieces by working 8 SC around the first piece.
- Crochet 1 SC into the connecting chain between them.
- Then work 8 SC around the second piece.
- (Total 18 stitches)
- Round 5:
- Chain 1.
- Repeat the sequence (1 SC, 1 SC, increase) six times by crocheting 1 SC, 1 SC, and 2 SC in the next stitch, repeated around.
- (Total 24 stitches)
- Rounds 6–11:
- Work 1 SC in every stitch all around for 6 consecutive rounds.
- Before closing, add adequate stuffing through the hole to shape the body firmly and evenly.
Phase 3: Shaping the Tooth Roots
- Root Setup:
- Chain 4 stitches.
- Count 12 stitches across the crochet piece and slip stitch to create division, effectively splitting the work into two halves for two roots.
- Root 1 (Round 12):
- Chain 1.
- Work the pattern (2 SC, decrease) repeated 3 times.
- Follow this by working 1 SC in each of the 4 chains created earlier.
- Root 1 (Round 13):
- Chain 1.
- Work (1 SC, decrease) repeated 3 times.
- Finish with 2 decreases over the remaining chain stitches to close the root shape.
- Fasten off and sew the hole closed neatly.
- Root 2:
- Repeat the Rounds 12-13 instructions for the other root side.
- Remember to add extra stuffing before final closure for firmness.

Phase 4: Details and Finishing
- Tiny Bow:
- Start a magic ring.
- Chain 3.
- Work 2 double crochets (DC).
- Chain 3 and slip stitch into the ring.
- Repeat this sequence once more on the other side of the ring to form the bow loops.
- Tighten the ring and wrap the yarn around the center tightly to secure the bow shape.
- Facial Features:
- Attach safety eyes between Rounds 9 and 10, spaced approximately 3–5 stitches apart for a balanced expression.
- Using black embroidery thread, embroider a smile between Rounds 10 and 11 using simple back stitches or straight stitches.
- Assembly:
- Sew or glue the tiny bow securely onto the tooth’s head area.
- Optional: apply blush to the cheeks using pink yarn or fabric blush for added cuteness.
- Use the remaining yarn tail to attach a keychain ring or clasp to the top of the tooth securely, ensuring it is safe for hanging.

Assembly & Finished Size
- After assembling, the tooth keychain measures approximately 6 cm tall and 3.5 cm wide, making it compact and perfect for use as a keychain or bag charm.
- The parts are all securely sewn or glued in place to ensure durability during everyday use.
- You may customize by adjusting yarn colors, attaching additional accessories, or switching up the bow style to suit your preference.

Conclusion
This adorable crochet tooth keychain pattern offers a rewarding project that combines basic amigurumi techniques with neat shaping and charming detailing. The step-by-step instructions provide a reliable guide from start to finish, ensuring an enjoyable crochet experience and an end product you will be proud to show off or gift. Keep consistent tension, stuff firmly for good shape retention, and have fun customizing your tooth with unique touches. Thank you for choosing this pattern.