
Sweet Crochet Bunny Pencil Tip for Every Pencil Lover
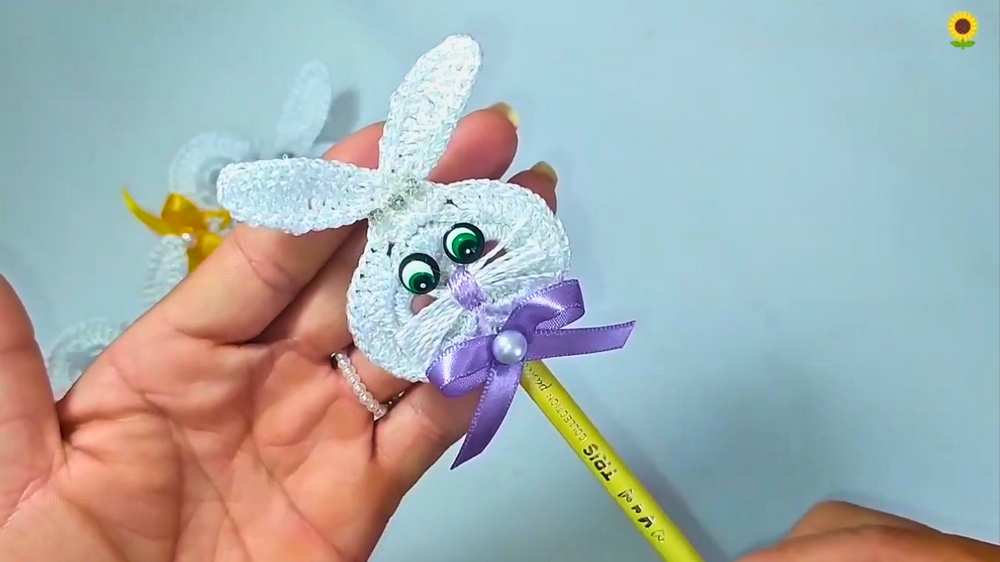
Hop into fun with this Crochet BUNNY PENCIL TIP Pattern that turns ordinary pencils into adorable, smile-inducing writing buddies.
A small, creative gesture can transform ordinary items into cherished treasures, and this charming crochet bunny pattern brings that spirit to life. Inspired by the idea of recycling soda can seals into delightful art pieces, the Bunny Pencil Tip has become much more than a simple decorative addition, it’s a versatile, heartwarming creation.Beyond its adorable appearance atop a pencil or pen, this bunny can serve a wide variety of purposes: from fridge magnets and keychains to embellishments for Easter baskets or even gift bags.
Cute Crochet Bunny Pencil Tip to Personalize Your Tools

What makes this crochet bunny so special is not only its aesthetic appeal but also the thoughtfulness sewn into its purpose. Assembling the bunny onto a pencil tip or pen adds a spark of joy to everyday tasks, turning mundane writing tools into mini works of art. Whether gifted as part of an Easter celebration or used to brighten someone’s desk, it carries a personal touch and a reminder of resourcefulness through upcycled materials. This charming creation demonstrates how simple techniques can yield extraordinary results, blending cheerfulness with eco-conscious creativity.

Crochet Bunny Pencil Tip Pattern
Skill Level
Beginner to Intermediate: This project combines crochet techniques with upcycled materials (soda tabs). It is straightforward to make but requires attention to detail for assembly and adding final touches. Perfect for Easter or other playful decorations.
Finished Size
Approximately 3 inches tall x 2 inches wide (excluding the pencil topper or keychain loop).
Materials
Crochet Materials
- Yarn:
- Silk thread (Tex 288): White for the bunny's body and tail.
- Lilac or Light Pink Yarn: For the nose and decorative accents.
- Optional: Additional colors for customization.
- Crochet Hook: 1.75 mm hook.
- Yarn Needle: For assembly and weaving ends.
Assembly Materials
- Two Soda Tabs: Washed and cleaned beforehand.
- Hot Glue Gun and Glue Sticks: For attaching decorative parts securely.
- Fiber-Fill: Optional, for stuffing if used for larger applications.
- Scissors and Lighter: For trimming and sealing thread as needed.
- Pencil or Keychain Ring: For final assembly based on the desired use.
Gauge
Gauge is not crucial for this project, but aim for tight and tidy stitches to ensure proper coverage of the soda tabs.
Special Techniques
- Working Around Soda Tabs: Crochet stitches are worked into and around the soda tabs to create the bunny’s head and ears.
- Magic Ring: Used to create small, circular crochet pieces, such as the pencil topper base.
- Surface Crochet: Used to embroider details like the bunny’s nose and mouth.
Pattern Instructions
Part 1: Preparing the Soda Tabs
- Clean and Inspect:
- Ensure the soda tabs are clean, smooth, and free of sharp edges. These will form the bunny's face and base structure.
- Position the tabs side by side, aligning the larger holes at the top for the ears and the smaller ones at the bottom to form the face.
Part 2: Bunny's Face
Step 1: Crochet Around the Tabs
- Attach White Yarn:
- Insert the hook and attach the yarn at the top larger hole of one soda tab.
- Work Upholstery Stitches:
- Crochet 8 single crochet (SC) stitches evenly around the larger hole of one tab.
- Move to the Second Tab:
- Insert the hook through the adjacent tab and crochet 10 SC stitches around the larger hole.
- Join the Tabs:
- Single crochet 2 SC stitches between the two tabs to connect them securely.
- Work another 10 SC into the second tab's larger hole.

Step 2: Working the Top Curve
- Insert your hook at the first single crochet stitch and work slip stitches (SL ST) across the top curve of connected tabs.
Step 3: Adding Bunny Ears
- Chain 12 for the First Ear:
- Create a chain loop for the right ear.
- Attach Ear Details:
- Work 1 SC at the base of the chain, followed by 1 HDC.
- Work 3 DC stitches along the chain, and then stitch 2 tall treble crochets (TR) at the curve.
- Complete the ear by stitching 3 DC stitches, followed by 1 HDC, and finishing with 1 SC.
- Anchor the First Ear:
- Attach the final ear stitches directly to the soda tab.
- Repeat for the Second Ear:
- Follow the same steps above to create the left ear.


Part 3: Adding Decorative Details
Step 1: Bunny’s Face
- Nose:
- Using lilac yarn, embroider a small triangular nose over the soda tabs' holes using surface crochet techniques.
- Mouth:
- Stitch a short “Y”-shaped line below the nose to mimic a cute bunny mouth.
Step 2: Whiskers
- Cut 3–4 short pieces of white yarn to form whiskers (if desired).
- Secure them to the face using hot glue or tie them in place with stitches.
Part 4: Pencil Topper
Step 1: Base Foundation (Magic Ring)
- Using white yarn, make a magic ring.
- Chain 2 to start.
- Work 8 half double crochets (HDC) into the ring.
- Close the magic ring tightly and SL ST into the first HDC.
Step 2: Topper Rows
- Work Rows of SC:
- For rows 2–12, work single crochet (SC) into each stitch around (8 stitches per round).
- Do not increase stitches to maintain the tube-shaped topper.
- Secure and Finish:
- Cut the yarn and seal ends once all rows are complete.

Step 3: Assemble the Bunny
- Use hot glue to attach the bunny face securely onto the pencil topper base.
- Adjust placement for symmetry.
Customization Ideas
- Add a keychain ring instead of a pencil topper for versatility.
- Use colorful yarns for the bunny’s ears or embroider details for a playful look.
- Create a magnet version by attaching a small magnet to the back instead of assembly with a pencil.
Tips for Success
- Ensure soda tabs are free of sharp edges to prevent injury during crafting or use.
- Use sturdy yarn and tight stitches when working around the tabs to keep the bunny structured.
- Test the hot glue placement before fully securing any parts to ensure alignment.
Conclusion
Congratulations, you’ve created an adorable Soda Tab Bunny pencil topper! This creative project combines crochet techniques with recycling to encourage sustainability while crafting delightful accessories. Customize your bunny with different colors, embellishments, and uses for endless possibilities.
Final Words
This bunny design is perfect for Easter decorations, party favors, or gifting. Its simplicity and minimal materials make it a budget-friendly project while allowing you to add a personal touch.