
Royal Free Crochet Bella Princess Pattern With Storybook Grace
Elegant charm surrounds this Crochet Bella Princess Pattern, shaping a graceful doll perfect for gifts, display, and fairy tale decor styles.

Free Crochet Bella Princess Pattern Straight From Dreams
A graceful doll with a flowing gown and soft facial details brings a fairytale feel to any collection. This princess-inspired design stands out for its elegant shape, gentle colors, and carefully styled dress that adds charm from every angle. The finished piece looks lovely on shelves, dressers, or in children’s rooms, and it is often chosen as a thoughtful gift for birthdays or special occasions. Its calm expression and balanced proportions make it appealing to both kids and adults, while the overall look feels classic and timeless.

Crochet Bella Princess Keychain Pattern
Materials List
- Yarn: Thick acrylic or cotton yarn in these colors: skin tone, pink (dress), yellow (hair), gold (crown)
- Crochet Hook: 2.70 mm
- Stuffing: Polyester fiberfill or similar (for head)
- Keyring Hanger: Any small metal keychain ring
- Tapestry Needle: For sewing parts together and embroidering face
- Scissors
- Pins: To hold pieces in place (optional)
- Hot Glue or Silicone: For securing hair, crown, and mouth (optional)
- Lighter: To carefully singe and neaten yarn ends (optional)
- Embroidery Thread: Black and pink for eyes and mouth
Key Abbreviations
| Abbreviation | Meaning |
|---|---|
| ch | Chain |
| sc | Single Crochet |
| hdc | Half Double Crochet |
| dc | Double Crochet |
| st(s) | Stitch(es) |
| sl st | Slip Stitch |
| inc | Increase (2 sc in st) |
| dec | Decrease (2 sc together) |
| MC | Magic Circle |
| rep | Repeat |
Special Notes
- Pattern is written in US crochet terminology.
- Stitch counts are crucial for small amigurumi; count at the end of each round.
- Stuff head firmly but do not overstuff.
- Parts can be sewn or glued together depending on preference.
- Safety eyes can be used for the face, or simply embroider with black thread.
Pattern Instructions
1. Head
With skin-tone yarn, 2.70 mm hook:
- Start with a magic circle (MC), ch 1.
Round 1: 6 sc in MC. (6) - Close the circle tightly. Join with a sl st.
- Round 2: Ch 1, 2 sc in each st around. (12)
- Round 3: Ch 1, sc in next st, inc in next st, rep around. (18)
- Round 4: Ch 1, sc in next 2 sts, inc in next st, rep around. (24)
- Rounds 5–10: Ch 1, sc in each st around. (24)
(6 rounds total) - Round 11: Ch 1, sc in next 2 sts, dec, rep around. (18)
- Round 12: Ch 1, sc in next st, dec, rep around. (12)
- Stuff head firmly at this stage.
- Round 13: Ch 1, dec around. (6)
- Fasten off and weave in end securely.

Face Details:
- Eyes: Attach safety eyes or embroider between rounds 8 and 9, leaving 2 sc between.
- Eyelashes: Embroider above the eyes.
- Mouth: Using doubled pink thread, embroider a small line between the eyes, secure with a dab of glue to make a "smile."

2. Arms (Make 2)
With skin-tone yarn:
- Start with a MC, ch 1.
Round 1: 5 sc in MC. (5) - Join with a sl st.
- Rounds 2–6: Ch 1, sc in each st around. (5)
(5 total rounds for length) - Fasten off, leaving a long tail for sewing.
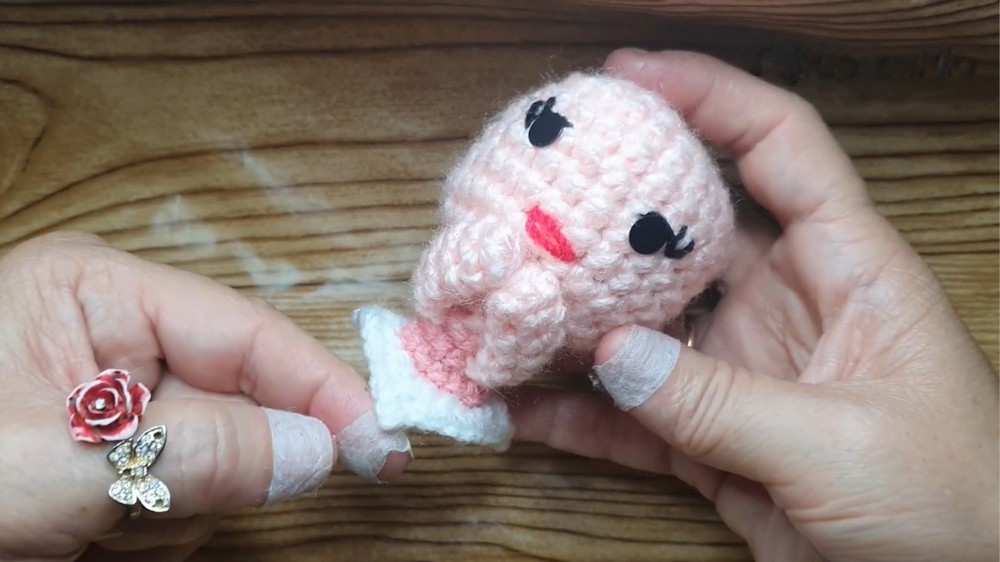
3. Dress/Blouse
With pink yarn:
A. Upper Dress
- Attach yarn to the back of head (bottom edge), ch 1.
- Round 1: 2 sc in each st around the bottom of the head. (12)
- Join with a sl st.
- Rounds 2–3: Ch 1, sc in each st around. (12)
- Fasten off.
B. Skirt (Lower Flare)*
- Attach pink yarn to front loops at base of blouse, ch 1.
- First group: In same st: 2 sc, in next st: 2 sc, in next st: 2 hdc, in next st: dc, ch 2, sl st in 1st ch (picot), dc, next 2 sts: 2 hdc, next 2 sts: 2 sc each.
- Repeat group twice more for skirt points (for a total of 3 lower points across the bottom edge).
- Join and fasten off. Weave in ends.
4. Hair
With yellow yarn:
- MC, ch 1.
- 6 sc in MC.
- Close, sl st to join.
- Round 2: Ch 1, 2 sc in each st around. (12)
- Round 3: Ch 1, (sc in next st, 2 sc in next st), rep around.** (18)
- From here:
- For Curls (Make 12):
Ch 25, sc in 2nd ch from hook, 2 sc in next ch, repeat 2 sc in each ch for 4 times (for more curl at the end), then sc in each ch back toward hair base. Attach with a sl st to next st on base.
- For Curls (Make 12):
- Repeat for total of 12 long curls.
- For Bangs/Fringe:
- Make 4 shorter curls by *ch 8, 2 sc in 2nd ch, sc in rest. Join as above.
- Arrange and glue or sew hair to head, positioning fringe at the front.

5. Crown
With gold yarn:
- Ch 20, join with sl st to form a ring.
- Round 1: Ch 1, sc in each ch around. (20)
- Join with a sl st.
- Ch 1, sc in each of next 6 sts. In next st: hdc, ch 2, sl st in 1st ch, hdc in same st. Sc in next st, hdc in next, dc in next, ch 3, sl st in 1st ch, dc in same st. Dc in next, hdc in next, sc in next, hdc in next, ch 2, sl st in 1st ch, hdc in same st, finish with sc in each remaining st.
- Join, fasten off. Weave in all ends.

6. Assembly
- Sew or glue arms to sides of body at blouse edge.
- Align arms centered with the front point of blouse.
- Place hair over head, tack or glue in place.
- Attach crown to front/top of hair with glue or by sewing.
- Add keyring loop by threading through top of head/crown.
- Trim and burn ends gently with a lighter to neaten finish (adults only — caution advised!).
- Gently brush or arrange curls/fringe as desired.
Pattern Correction & Tips
- Always confirm stitch counts after each round for small pieces.
- You may scale entire pattern by using finer or thicker yarn and matching hook.
- If using hot glue, apply sparingly and allow to cool before moving on.
- Parts can be firmly sewn or securely glued; sewing is more durable for keychains.
- Personalize by changing hair or dress color, adding blush with a crayon, or beads to the crown.
Conclusion
This enchanting Sleeping Beauty Princess Keychain is a quick and fun crochet project that results in a beautiful, characterful doll suitable for gifts, bags, or personal use. With clear, simple steps and basic shaping, it’s perfect for beginners and advanced crocheters alike. The design is highly customizable and uses only a small amount of yarn.