
Quick Free Crochet Puppet Pattern for Playful Kitchen Accessories
Bring creativity to life with our free crochet puppet pattern, helping you easily make playful, engaging toys that spark imagination and endless fun.
Creating playful and charming characters with yarn is one of the most rewarding crochet projects. This particular free crochet puppet pattern is perfect for anyone looking to make a soft, cuddly friend that doubles as a fun toy and, interestingly, it can also serve as a practical kitchen accessory like a pot holder. The puppet features a rounded shape with a plush texture achieved through tight, simple stitches that give it both structure and softness.
Free Crochet Puppet Pattern with Colorful Yarn Ideas
Designed to be accessible for beginners yet enjoyable for more experienced crocheters, this project can be sized up or down by adjusting yarn weight and hook size, making it suitable for kids, adults, or even as a quirky kitchen tool. The standout features include expressive facial details and a sturdy build that offers heat resistance when used as a pot holder.

The construction involves working in rounds to form the head and body, with additional pieces like eyes and ears crocheted separately and sewn on. For this dual purpose, choosing a cotton or cotton-blend yarn is ideal because cotton handles heat well and shows stitch details beautifully. Using stitch markers helps keep your rounds even and your shaping consistent.

Drawing from the charm of classic puppet shows and storytelling traditions, this design brings creativity to both playtime and everyday tasks. It makes a charming gift for birthdays or holidays, and you can personalize it with embroidery, buttons, or bright colors to match any kitchen or kid’s room. This free crochet puppet pattern is a versatile, fun, and meaningful project to enjoy.

Crochet Puppet or Pot Holder
In this pattern, you’ll learn how to crochet a whimsical puppet (that also works as a pot holder) with a fun, friendly face. This versatile piece is cushioned for hand safety when handling pots, and its playful look makes it perfect for kids or as a quirky kitchen accessory. The puppet or pot holder is made by crocheting two round panels, joining them, and adding easy details such as eyes, a felt tongue, and safety doll eyes for added character.
How do you begin and what skills are needed?
The pattern starts with a simple magic ring and uses only double crochet, single crochet, and basic increases—so it’s perfect for new crocheters or those looking to make a fast gift.
Skill Level & Terminology
Skill Level: Beginner
Terminology: This pattern uses standard US crochet terms.
Not sure about crochet language?
Double crochet (dc), single crochet (sc), slip stitch (sl st), and increases are all you need. Every stitch or technique used is explained below—no surprises!
Materials & Tools
- Yarn: Medium weight (worsted/aran) acrylic or cotton yarn in green (main body) and green (optional for extra accents)
- Yarn held double or triple if needed to make it chunky
- Two doll safety eyes (or 2 black buttons)
- Red and green felt (for tongue)
- 4.5 mm crochet hook
- Stitch marker/safety pin
- Yarn needle (for weaving in ends and sewing)
- Scissors
- Hot glue gun (for attaching felt and eyes)
Gather your supplies first:
Lay out your yarn, hook, and accessories so you can enjoy following each step without interruption.
Gauge
Gauge:
12 double crochet stitches x 6 rows = 4 in x 4 in (10 x 10 cm) in double crochet with yarn held double or thick yarn.
Tip: If you make your first round and it’s too small or big, just change hook size or yarn thickness to get the size you want. The gauge is not critical if you are making a puppet or pot holder to fit your hand.
Abbreviations List
- ch — chain
- sl st — slip stitch
- sc — single crochet
- dc — double crochet
- inc — increase (2 sts in one st)
- st(s) — stitch(es)
- rnd — round or row
Special Stitch Instructions
- Magic Ring: Make a loop, hold it in place, insert hook, pull up a loop, then work stitches into the ring. Pull the yarn tail to close the circle.
- Increase (inc): Work 2 stitches into the same stitch (applies to both sc and dc).
Finished Size
- Diameter: Each base panel should be about 7–8 in (18–20 cm) across when using chunky yarn or yarn held double/triple with 4.5 mm hook.
- Final puppet: Will fit an adult hand comfortably; if you need it smaller or bigger, just use thinner or thicker yarn, or decrease/increase beginning rounds.
The Pattern Itself
Main Base Panels (Make 2)
To make it chunky:
If you have only thin yarn, hold 2 or 3 strands together as you crochet. This gives you the “thick” look of chunky yarn.
First Panel:
- With green yarn, make a magic ring.
- Ch 2 (does not count as stitch).
- Rnd 1: 12 dc into the ring.
Pull tail tight to close circle. (12 sts) - Join with a sl st to the first dc.


At the end of this part, you have a flat round base—just like the bottom of a basket!
Second Panel
- Repeat steps 1–4 above for Second Panel—but do not fasten off at the end; keep the yarn attached for joining.

Two circles will form the puppet or pad. If you can make a basic circle, you’re halfway done!
Increase Round
Rnd 2:
- Ch 2 (not a stitch),
- 2 dc in each st around (increase in each st) (24 sts)
- Sl st to join.
This builds up the size fast. Remember to chain 2 only at the start of each round, and it never counts as a stitch.
Rnds 3 through 8:
- Ch 2,
- 1 dc in each st around for each round (no increases).
- Sl st to first dc at the end of each round.
You will work a total of 6 rounds of dc here. Make sure you keep your round edges flat and even! Your panel will grow like a dinner plate.
- On your Second Panel, do not fasten off at the end of Round 8—keep going with the joining instructions below.
Don’t worry if you’re not used to patterns: Simply make two large, flat red circles with double crochet and you’re ready for the next step!
Joining the Two Panels
- Place one panel on top of the other, lining up the stitches.
- Insert your hook through the corresponding stitch of both panels, join with slip stitch or single crochet (whichever you prefer—single crochet will make the edge a bit more defined, slip stitch is flatter).
- Continue joining 12 sts across one side.
(Mark off half of your round with your stitch marker.) - You have now joined the centers, making a mouth opening (puppet) or a “pocket.”
- Turn and sc or sl st around the remaining perimeter, joining the outside edges of the two circles together all around.
- Sl st to finish.
After joining, you should have two panels connected in the center with a mouth/pocket opening, joined around the outer edge like a stuffed pancake.
For those who learn visually:
You made two red circles, stitched one side together, then closed the outside—so your puppet/pad is a single, thick piece!
Face Details: Eyes (Make 2)
- With black yarn (or same color as your desired eye), make a magic ring.
- Ch 1 (not a stitch).
- Rnd 1: 6 sc into ring.
Pull tail tight. Place stitch marker. - Rnd 2: 2 sc in each st around (increase in every stitch). (12 sts)
- Rnd 3: (1 sc, inc) around. (18 sts)
- Sl st to first sc, fasten off.

Make two circular eyes. You can add doll safety eyes or buttons to the centers before assembly for more character!
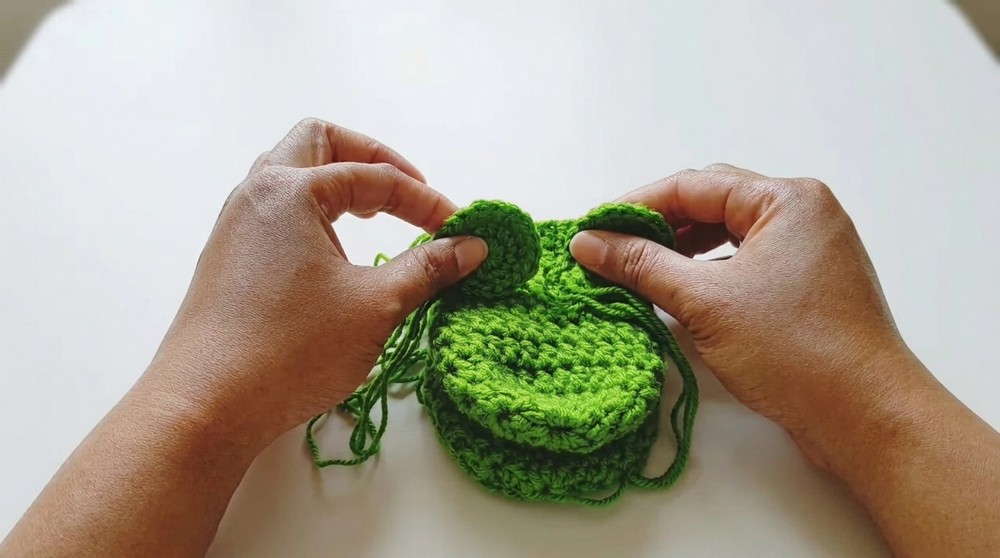
- Sew or glue the eyes to the pad/puppet, about 1 inch from the top edge, spaced evenly apart.
If you aren’t comfortable with pattern language:
Start your eyes as a small ring, add lots of single crochets, and keep increasing until they’re the size you like.
Tongue (Felt)
- Cut a football or oval shape from red felt, about 1.5 in (4 cm) wide.
- Fold in half and trim until you have a shape you like for a tongue.
- Glue with hot glue to the inside of the mouth opening, just peeking out.
- Cut a small green felt piece if you want to create a “smile line” above the tongue.
Assembly & Finishing
- Attach face: Sew or glue the eyes and tongue as described above. Add safety eyes or black buttons for “glow.” Optionally, embroider a nose or eyelashes.
- Weave in all ends securely using a yarn needle.
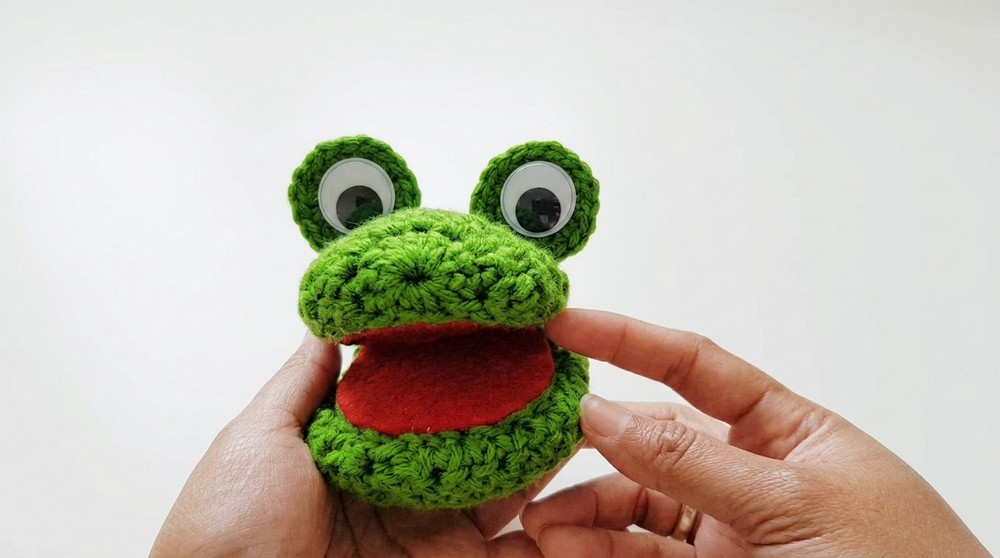
When you’re done assembling, your puppet/pad will have a fun, cartoonish face—guaranteed to delight kids or guests!
Conclusion
Congratulations! You’ve completed a cheerful puppet or pot holder featuring double crochet rounds, simple amigurumi-style increases, and easy applique details for the face. Don’t be afraid to experiment with colors or expressions. Use yours in the kitchen or as a playful puppet for storytelling. This pattern is beginner-friendly, quick to work up, and a great stash buster for leftover yarn.
Quick Recap for Non-readers:
Make two thick red circles, stitch one side for a pocket, join the outside into a tidy oval, then add simple crocheted circles for eyes and felt for the tongue. Finish with a smile!
Happy hooking—share your creations and be proud of your new skills!