
Modern Crochet Cat Keychain Pattern That’s Simply Paw-some
A cute and colorful accessory can brighten up anyone's day, and a Crochet Cat Keychain Pattern is the perfect little charm to add a playful touch to your keys, bags, or even as a gift! Made with soft crochet stitches, these keychains not only showcase the adorable features of a cozy cat but also offer a fun and simple way to personalize everyday items. They are light, easy to carry, and perfect for making your belongings stand out while keeping them organized.

These charming creations are versatile and can be used as decorations for backpacks, purses, or even as thoughtful homemade presents for your loved ones. With their irresistible appeal, cat keychains have a way of spreading smiles wherever they go. Whether it's for yourself or someone special, you’ll adore the beauty and usefulness of a Crochet Cat Keychain Pattern.
Showcase your love for cute designs with this Crochet Cat Keychain Pattern that perfect for gifts or adding charm to your daily accessories.
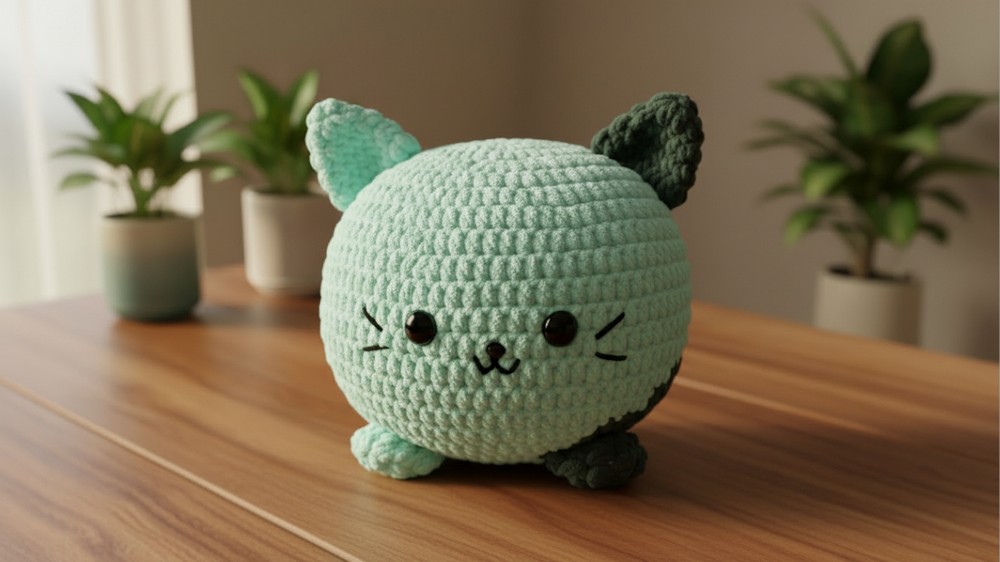
Purr-Fect Crochet Cat Keychain Pattern You’ll Adore
Materials
Yarn:
- Bernat Blanket (6 - Super Bulky, 100% polyester, 300g/10.5 oz, 201 m/220 yds):
- A - Greenish-sage: Less than 1 ball.
- B - Dark forest green: Less than 1 ball.
- C - Ashy green: Less than 1 ball.
Note: This pattern originally used Bernat Blanket O’Go for Colors B and C. This format is discontinued but can be replaced with standard Bernat Blanket yarn.
- Bernat Maker (5 - Bulky, 72% cotton, 28% nylon, 250g/8.8 oz, 317 yds/290 m):
- D - Black: Approximately 2 yards.
Tools and Miscellaneous:
- Hook: 8.0mm, Susan Bates.
- Microbead Pillow Ball (10") or Fiber Fill for stuffing.
- Safety Eyes: 24 mm (2).
- Safety Nose: 15 mm (1).
- White Felt (approx. 1.5" square): Optional for securing the nose.
- Stitch Markers.
- Scissors.
- Yarn Needle: For sewing and weaving in ends.
Key Abbreviations
(US Terminology)
- ch: Chain
- sl st: Slip Stitch
- sc: Single Crochet
- hdc: Half Double Crochet
- hdc2tog: Hdc Decrease (Half Double Crochet Two Together)
- st(s): Stitch(es)
- rep: Repeat
Special Notes:
- Rounds are worked in a continuous spiral. Do not chain 1 at the beginning of a round or join with sl st unless the pattern specifies.
- Move a stitch marker along the first stitch of each round to track progress.
- When changing colors, finish the final stitch of the current color using the new color to create clean transitions.
- Some pieces alternate between rows and rounds, so pay close attention to instructions.
Gauge
5"/10 cm across after Round 3 of the Body.
Size
Approx. 10 inches across/tall, excluding ears, feet, and tail.
Pattern Instructions
Step 1: Body
Key Notes:
- The body is worked in Color A with sections of B and C.
- For seamless color transitions, crochet OVER Color A but break and rejoin Colors B and C as specified.
Instructions:
- Round 1: With A, make a magic circle, ch 1, sc in the ring, 9 hdc in the ring (10 sts).
- Round 2: 2 hdc in each st around (20 sts).
- Round 3: (Hdc in next st, 2 hdc in next st), repeat around (30 sts).
- Round 4:
- [2 hdc in next st, hdc in next 2 sts] × 6 with B.
- [2 hdc in next st, hdc in next 2 sts] × 2 with A.
(40 sts).
- Round 5:
- [Hdc in next 3 sts, 2 hdc in next st] × 5 with A.
- Hdc in next 3 sts, with B [2 hdc in next st, hdc in next 3 sts] × 2.
- Finish with A hdc in last sts (50 sts).
- Round 6:
- [Hdc in next st, 2 hdc in next st, hdc in next 3 sts] × 5.
- Switch to B and work [Hdc in next 4 sts, 2 hdc in next st] × 3.
- Finish with A [Hdc in next 4 sts, 2 hdc in next st].
(60 sts).
- Rounds 7-15: Follow the written color and stitch sequences provided in the transcription for rounds, gradually increasing. By Round 15, decrease sections are introduced.

Step 2: Tail
Instructions:
- Round 1: With C, make a magic circle, ch 1, 6 sc in the ring (6 sts).
- Round 2: Sc in each st around, finishing last st with A. Break C.
- Rounds 3-6: With A, sc in each st around.
- Rounds 7-9: Loosely sl st in next 2 sts, sc in next 4 sts. After Round 9, break yarn and finish off, leaving a long tail for sewing.

Step 3: Ears (Make 2)
Instructions:
- Round 1: Make a magic circle, ch 1, sc in the ring, 5 hdc in the ring (6 sts).
- Round 2: (Hdc in next st, 2 hdc in next st), repeat around (9 sts).
- Round 3: (2 hdc in next st, hdc in next 2 sts), repeat around (12 sts).
- Rounds 4-6: Continue as written, stopping at Round 6. Break yarn, leave a long tail, seamless join.
Step 4: Feet (Make 4)
Instructions:
- Round 1: Make a magic circle, ch 1, sc in the ring, 6 hdc in the ring (7 sts).
- Rounds 2-4: Follow written instructions, including optional toe beans with Color B.

Step 5: Belly
- Repeat Rounds 1-6 of the Body as written above. Attach Feet using stitch markers for proper alignment.
Final Assembly
- Eyes & Nose Placement:
- Safety eyes: Around Rounds 13 and 14.
- Safety nose: Around Rounds 14 and 15. Use felt behind the nose if needed.
- Add Face Details:
- Whiskers and mouth: Embroider with Color D using yarn needle.
- Attach Ears & Tail:
- Sew ears on opposite sides around Rounds 5-8, ensuring proper alignment with body colors.
- Sew tail on the back around Round 17.
- Insert Stuffing:
- Add the microbead pillow ball or fiber fill generously.
- Attach Belly:
- Align Belly to Body, matching A with A and C with C where applicable.
- Use whip stitch to sew Belly to Body securely.

Conclusion
Congratulations! You’ve completed your Cat Squish! This charming and fluffy feline plush can brighten any space, whether used as décor or a cuddle buddy.

Pattern Tips and Corrections
- Color Management: Break and rejoin contrasting colors to maintain smooth transitions between motifs.
- Toe Beans (Optional): Adding toe beans gives a cute detail but requires additional time.
- Gauge: If the gauge is inconsistent, the finished size may differ slightly—adjust hook size accordingly.
