
Free Crochet Christmas Star Face Pattern With Festive Colors
Shine festive cheer with the Free Crochet Christmas Star Face Pattern, a cute, soft, and joyful handmade ornament perfect for décor or gifts
Twinkling lights reflect off frosty windows as families gather, and the spirit of the season fills the air with warmth and joy. Capturing that festive magic in a small, handmade charm brings a special touch to holiday celebrations. The Free Crochet Christmas Star Face Pattern transforms simple yarn into a cheerful star with a friendly smile, perfect for hanging on trees, adorning gift packages, or adding a whimsical accent to shelves and mantels. Its bright colors and gentle shape make it a delightful decoration that radiates holiday cheer.
Pocket-Friendly Free Crochet Christmas Star Face Pattern With Easy Steps

Beyond its visual charm, the Free Crochet Christmas Star Face Pattern offers practical benefits: it is beginner-friendly, quick to complete, and ideal for using leftover yarn. Compact yet striking, this little amigurumi brings warmth, cheer, and a handmade touch to holiday décor, while offering the satisfaction of a finished creation that is both playful and meaningful. Its whimsical form ensures it stands out while spreading festive joy in any setting.
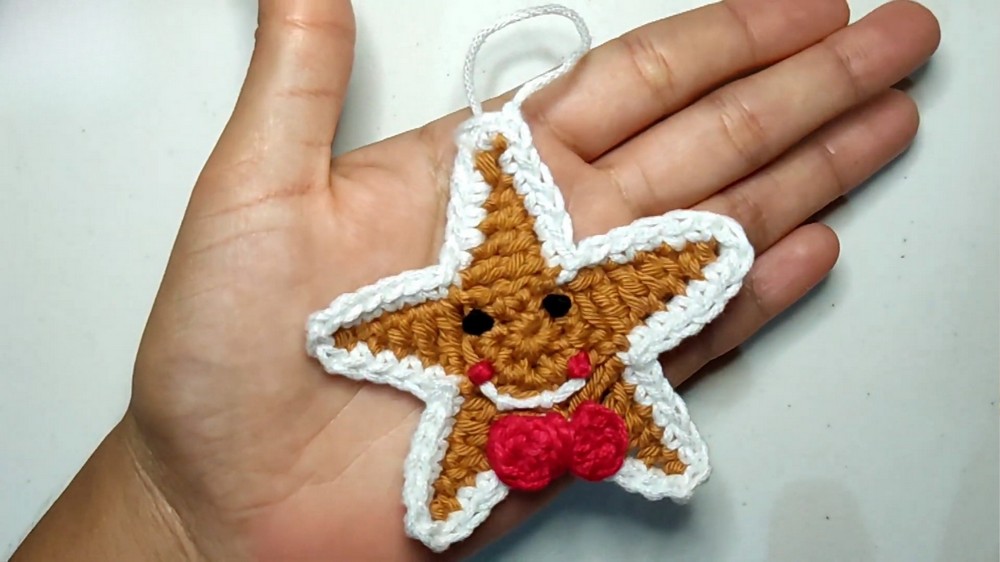
This pattern uses approachable single crochet stitches worked in rounds, with gradual increases to shape the star points and decreases to finish neatly. Embroidered or sewn facial features add character, giving the star a joyful expression. Optional attachments, such as loops or keyrings, make it functional as an ornament or festive accessory.
Gingerbread Star Ornament Free Crochet Pattern
Materials
- Yarn:
- Light Brown (main color, cotton or acrylic DK/light worsted)
- White (edging and face details)
- Black (tiny amount, for eyes)
- Red (tiny amount, bow and cheeks)
- Hook: 3.5 mm crochet hook (or as recommended for yarn)
- Optional: 2.5 mm hook for bow (or as needed for tension, especially with thinner yarn)
- Tapestry needle: for sewing and weaving in ends
- Scissors
- Stitch Markers: optional, to mark rounds
- Glue or Safety Eyes: optional, for attaching eyes if you are not embroidering
Abbreviations
- MR: Magic Ring
- ch: Chain
- sc: Single crochet
- hdc: Half double crochet
- dc: Double crochet
- tr: Treble (triple) crochet
- inc: Increase (2 sc in same stitch)
- sl st: Slip stitch
- st(s): Stitch(es)
- FO: Fasten off
Special Notes
- Work in continuous rounds unless otherwise specified.
- Stuffing is not required; it is a flat ornament.
- The “peaks” are the points of the star.
- All embroidery and embellishments are sewn on at the final stage.
- Optional: You can make two stars and sew together to hide the back of embroidery.
Pattern Instructions
Main Star (With Light Brown)
With light brown yarn and recommended hook:
- Round 1: Make a MR, ch 1, work 8 sc into ring. Tighten ring. (8 sts)
- Round 2: 2 sc in each st around (inc in every st) (16 sts)
- Join with a sl st to the first st.

First Star Point (Peak):
- Ch 6.
- Working down the chain:
- Skip the first ch from the hook, in the 2nd ch: sl st
- In next ch: sc
- In next ch: hdc
- In next ch: dc
- In last ch: tr (triple/treble crochet)
- Skip the next 2 sts on the circle base, sl st in the 3rd st (this “anchors” your peak).
- Repeat steps 3-5 four more times around, so you have a total of 5 points.
- After completing the final point, sl st into the base of the first point to join. FO.


Optional: Edge/Decorative Icing (With White)
- Attach white yarn with a standing sc or sl st at any place (preferably a tip/point).
- Sc evenly around the entire star, placing 2 sc in the tips of each point (this gives the icing a nice curve).
- At the dips between points, you may do a sl st or keep sc tight to maintain the shape.
- When finished, join with a sl st to starting sc or FO.
- Weave in ends.
If desired, you can also add a hanging loop at the top with a chain of about 15-20 ch, secured back in the same st.
Face Embroidery
Eyes:
- Use black yarn:
- Make secure French knots or small stitched circles at desired eye locations.
- Option: Use small safety eyes or glue on black felt dots.
Smile:
- Use white yarn:
- Make a small curved stitch (backstitch or surface embroidery) between the eyes for a smiling mouth.
Cheeks (Optional):
- Use red yarn or sewing thread:
- Make small knots or embroider red circles at the corners of the smile.

Bow (With Red)
With a 2.5 mm hook (or as suitable for small, tight bow):
- MR, ch 2.
- 2 dc, ch 2, sl st into ring, repeat (for second bow loop):
- Ch 2, 2 dc, ch 2, sl st into ring.
- Tighten the MR firmly, FO leaving a long tail for sewing.
- Wrap the tail several times around the bow center to cinch.
- Sew (or glue) the bow onto one side of the face or at a star point.
Assembly & Finishing
- Weave in and hide all yarn ends at the back.
- If you wish to cover the back (especially if you have many visible knots), crochet a second star and sew or crochet the two together.
- Attach a hanging loop or ribbon if desired.

Conclusion
You have completed a sweet little gingerbread star ornament! Perfect as a holiday gift tag, tree decoration, or as a cheerful add-on for festive décor.
Pattern Corrections & Tips
- Tip: Work the star points tightly and ensure skip stitches are accurate, so the star lays flat.
- For a crisper star, lightly block after completion.
- Embellish with additional surface stitches, sequins, or buttons as desired!
- Correction: Increases at the points of the star in the white edge make the points nice and sharp—be sure to place 2 sc (or an increase) there.