How To Crochet St. John’s Bonnet For Recycling Can Seals
Recycling can seals add a unique touch to this crochet St. John’s Bonnet, blending sustainable materials with elegant style effortlessly.
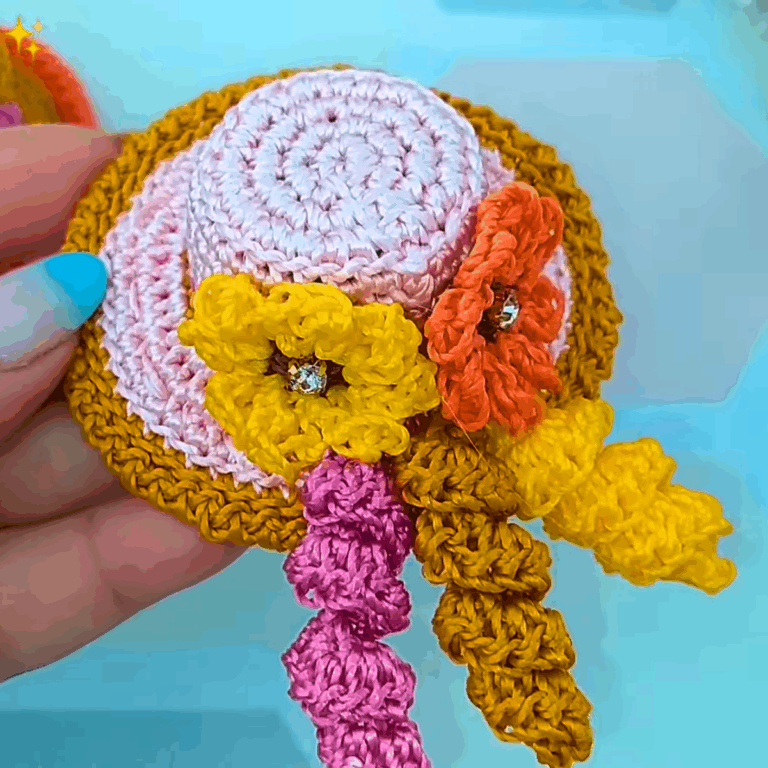
Repurposing ordinary objects into decorative treasures is ingenuity at its finest. The Crochet ST. JOHN’S BONNET Pattern takes something as unassuming as soda can seals and transforms them into stunning works of art. This innovative project blends practicality with artistic flair, capturing attention through its detail and resourcefulness. By using an interplay of single and double crochet stitches across the seals, the design achieves both sturdiness and delicate intricacy. It’s an activity that fosters creativity while giving new life to overlooked materials, making it both visually delightful and eco-conscious.
Crochet St. John’s Bonnet Featuring Recycling Can Seals for Long-Lasting Shape

What makes this creation truly special is its versatility. The bonnet can be adapted for a variety of uses, ranging from decorative hair accessories to unique fridge magnets or even design enhancements for handbags. Each piece, tailored with colorful threads, adds vibrance and personality, whether it’s crocheted in subtle earth tones or playful, bold hues. Its lightweight yet dynamic structure makes it perfect for sprucing up everyday items or offering as a one-of-a-kind gift with a personal touch.
Beyond its beauty, this crochet project serves as a meditative and calming practice. Stitch by stitch, the process provides an escape from the bustling pace of life, offering a sense of fulfillment with every loop woven. The end result is more than just an accessory—it’s an emblem of sustainability, creativity, and care. Whether displayed on a shelf, worn with pride, or given as a gift, the ST. JOHN’S BONNET radiates charm and timeless appeal, leaving a lasting impression wherever it goes.
Materials:
- A soda can tab (cleaned and burrs removed).
- Crochet hook (as per yarn size).
- Yarn in orange, red, and brown for the flames and logs.
- Scissors and a tapestry needle for finishing.

Step-by-Step Details
1. Preparing the Soda Can Tab
Steps:
- Start by removing the burr (sharp edges) of the can tab using pliers.
- Check the tab’s surface by running your finger over it to ensure it’s smooth.

2. Creating the Base with Crochet Stitches
Steps:
- Use the smaller hole of the soda can tab as the base.
- Crochet 12 single crochet stitches into this smaller section.
- Move on to the larger part of the tab and create 10 double crochet stitches, ensuring they are evenly distributed.
- Add two chain spaces and complete the larger section with another 10 double crochet stitches, creating a full and symmetrical base.

3. Building the Structure
Steps:
- Work single crochet stitches along the base.
- Add layers to the work using half stitches and increases in designated spaces. This creates a gradual shaping effect.
- At the midpoint, add a double crochet in the space between the chain stitches from the previous row, followed by two chain spaces and another double crochet.

4. Decorative Elements for the “Flames”
Steps:
- Begin with orange yarn to represent the flames. Start by chaining 8 stitches.
- Work single crochet into each stitch along the chain and add chains at the midpoint to create a flame-like effect.
- Continue adding layers to create a 3D flame design by working into the back loop of stitches in each subsequent row.

5. Finalizing the Fire with Relief Details
Steps:
- Repeat the stitching pattern (single crochets, turning work, using the back loop) to create layers of flames.
- Ensure symmetry is maintained by creating identical patterns for each side of the flame.
6. Adding the “Wood Logs” at the Bottom
Steps:
- Switch to brown yarn to crochet the wooden logs. Start with 15 chains.
- Work single crochets along the chain, rounding the edges by adding three stitches in the curve for a realistic effect.
7. Assembling the Bonfire
Steps:
- Sew or otherwise securely attach the components (flame and wood) together.
- Optionally, add extra embellishments to enhance the design further.

Special Features
- Creative recycling of soda can tabs.
- A beautiful and unique design representing the São João Festival.
- Customizable as a fridge magnet, purse accessory, or decorative craft piece.
Level of Difficulty
This project is beginner-friendly to intermediate, thanks to the detailed walkthrough provided by the tutor. Even if you are new to crochet, the slow-paced, explained steps make it easy to follow. Some precision is required when shaping the flames and logs, but it is manageable with a little practice.
Tutor’s Suggestions
- Always smooth out the soda can tab to avoid scratches or harsh edges that might damage your yarn or fingers.
- Use vibrant flame-colored yarns (like red, orange, or yellow) for a realistic look.
- Work patiently and check your progress after each step to maintain symmetry.
Uses:
- Fridge magnets.
- Purse or accessory decorations.
- Fun handmade gifts or souvenirs.
Tips for Success
- Ensure tension consistency throughout the project to maintain a uniform look.
- Stretch and block the final piece lightly to help it settle into shape.
- If you’re new, practice single and double crochet stitches on scrap yarn before starting with the soda tab.
Conclusion
The “São João Bonfire” crochet project is an excellent example of combining creativity with sustainability. By transforming a simple soda can tab, you can create a decorative craft piece that is visually stunning. With the detailed guidance provided by the tutor, anyone can complete the project, whether a beginner or a seasoned crochet artist. Have fun exploring your artistic potential with this unique project!