
How Crochet Penguin Fridge Magnet Brings Fun to Spaces
Adorn your kitchen with the Free Crochet Penguin Fridge Magnet Pattern, a playful handmade accessory perfect for gifts, décor, and cheerful accents.
In many households, the sight of a cute animal nestled on the fridge can bring a smile and a sense of warmth. Penguins, with their adorable tuxedo-like appearance and playful demeanor, have become beloved symbols of charm and resilience. This free crochet penguin fridge magnet captures that irresistible appeal, transforming a simple creature into a delightful miniature figure that adds a touch of whimsy and personality to any magnetic surface.
Free Crochet Penguin Fridge Magnet Pattern for Fun Projects

This penguin holds notes, photos, or reminders and brings a cheerful, lively presence to your kitchen or workspace, making everyday interactions more joyful. Its vibrant black and white colors, combined with a splash of orange for the beak and feet, contribute to its eye-catching appeal, making it a perfect accessory for animal lovers and crochet enthusiasts alike.
The method ensures a symmetrical, well-balanced penguin with a charming personality. Its compact size makes it an ideal project for quick finishes, perfect for gifting or adding a playful element to your home décor. The finished magnet is both functional and adorable, an instant conversation starter and a cheerful reminder of the fun that comes with crochet.

Crochet Penguin Fridge Magnet Pattern
Skill Level
Beginner to Intermediate – This pattern involves simple stitches, working in rounds, and basic assembly with mixed media (crochet, glue, etc.).
Introduction
This charming and eco-friendly penguin magnet is crafted using a sardine can's opener tab and crochet techniques. It's a quick and creative way to upcycle while making a fun refrigerator decoration.
Finished Size
The penguin magnet measures approximately 2.5–3 inches tall (including its beak and feet) and is a lightweight yet functional fridge magnet.
Materials
- Yarn and Thread:
- Small amounts of fine-weight crochet thread or embroidery thread in the following colors:
- Black (penguin body).
- White (belly).
- Yellow or Orange (beak and feet).
- Small amounts of fine-weight crochet thread or embroidery thread in the following colors:
- Crochet Hook: Size 1.75 mm.
- Sardine Can Opener Tab: Ensure the tab is wide open and in good condition.
- Tabs that are completely straightened or narrow won't work for this project.
- Hot Glue Gun and Glue Sticks: To attach eyes and magnet.
- Eyes (Optional): Small adhesive craft eyes or crochet thread/pearl beads to make the eyes.
- Magnet: Cut into a small piece to attach to the back of the penguin.
- Scissors, Lighter: For cutting and sealing thread ends.
- Yarn Needle: For weaving in ends.
Gauge
Gauge is not critical for this project due to its decorative nature. However, stitches should be tight and compact to ensure the work's durability and visual appeal.
Customization Ideas
- Thread Selection: Use metallic thread or shiny embroidery floss for a more festive appearance.
- Eyes: Crochet tiny black-and-white eyes instead of using plastic craft eyes for an entirely handmade look.
- Variation: Instead of a penguin, modify the design to other animals like a cat or owl by adjusting the colors and shapes.
Pattern Instructions
Part 1: Preparation of the Can Opener Tab
- Ensure the sardine can opener tab is wide open and straight.
- Tabs that remain closed or are too narrow will limit your workspace for crocheting.
- Thoroughly wash and clean the tab to ensure it’s free of debris or sharp edges.

Part 2: Penguin's Body
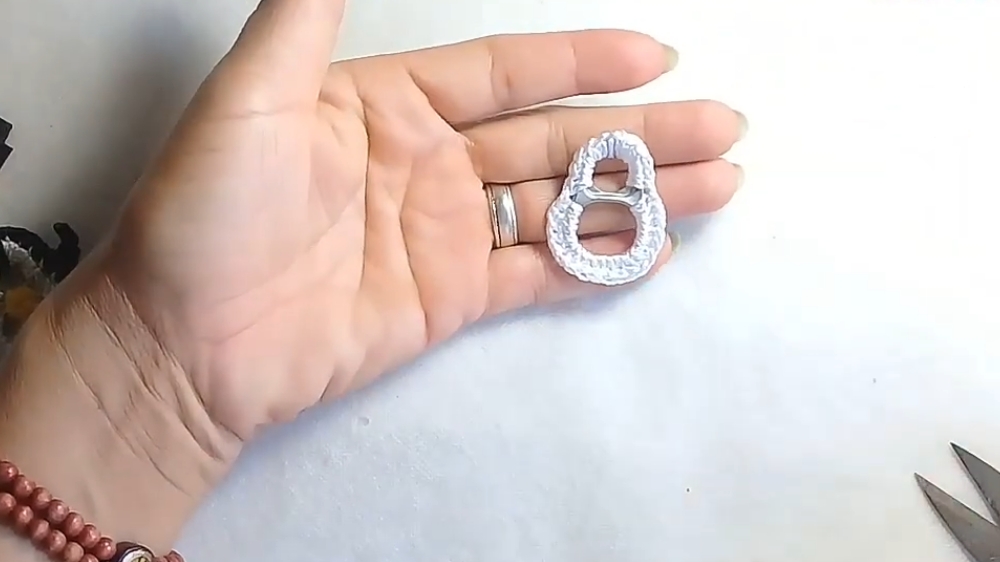
Step 1: Base Foundation (White Thread)
- Start with a slip knot.
- Insert your hook into the wide part of the opener tab.
- Work directly into the metal as your foundation.
- Make a foundation row of single crochets (SC):
- Work SC evenly around the bottom edge of the tab.
- There is no set number of stitches; add enough SC to fully cover the metal base without leaving gaps.
- Crochet over the starting tail to secure it as you go.
- Join the round with a slip stitch (SL ST) into the first SC.
Step 2: Body Rounds
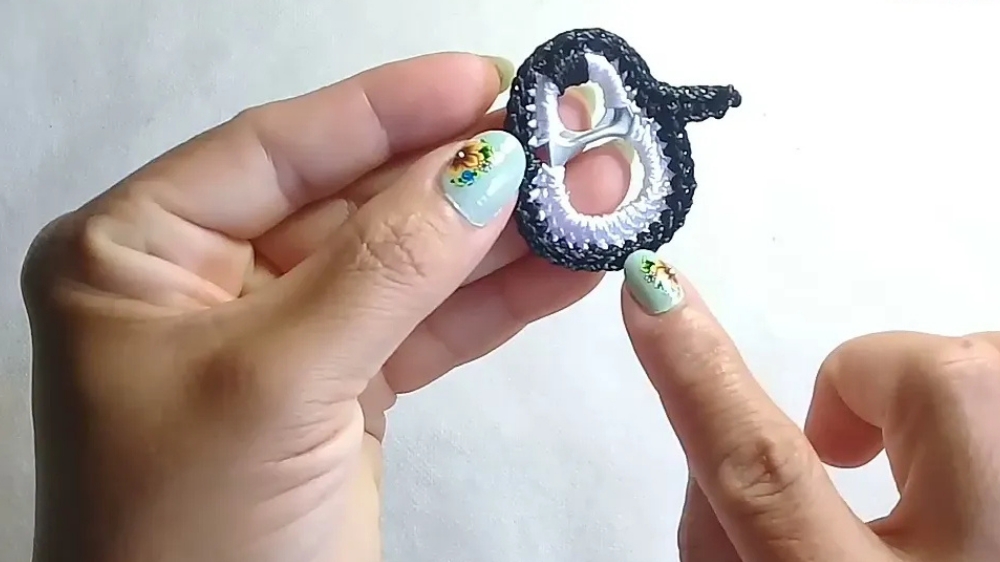
- Change to Black Thread for the penguin's body.
- Join the black thread into any stitch of the white base and work 1 SC into every stitch around.
- This creates a "border" in black that expands the base.
- Work 4 SC evenly spaced rises along the top of the tab to shape the “head” of the penguin:
- Chain 4 at the top edge of the black round, then single crochet back down each chain. Anchor the chain with 1 SC into the next base stitch.
- Continue working SCs around the black border until you complete the round.
- Secure with an invisible join: Cut the thread and weave it under stitches neatly.
Part 3: Beak and Feet (Yellow/Orange Thread)
Step 1: Beak
- Use yellow/orange thread and attach it near the center-top of the penguin's “head.”
- Work the beak in 3 simple steps:
- Work 2 chains, then 1 slip stitch into the same starting hole for a small triangular shape.
- Pull the thread through and secure the beak by weaving in the ends to the back of the work.
Step 2: Feet (Make 2)
- Insert the hook near the bottom left side of the penguin’s body inside an SC.
- With yellow/orange thread:
- Chain 3, then SL ST into the same base stitch to form a small "toe."
- Chain 4, SL ST into the same stitch to form the next toe.
- Chain 3, SL ST into the same stitch to form the third toe.
- Fasten off and weave in the thread tail.
- Repeat the same steps on the other side for the second foot.

Part 4: Assembly
Step 1: Attach Eyes
- Use a hot glue gun to attach pre-made small craft eyes in the appropriate position on the penguin’s "face.”
- Position them just above the beak for a cute look.
- Alternatively, embroider small eyes with black and white thread or attach small black beads.

Step 2: Add Magnet
- Turn the penguin body over and add a small piece of magnet to the back using a hot glue gun.
- Place a small amount of glue on the center of the back, press the magnet piece into it, and hold firmly until secure.
Special Techniques
- Freehand Shaping: Use your discretion when evenly spacing stitches along the tab’s edge or when creating small sections like the beak.
- Invisible Fasten Off: After completing sections, secure thread ends by working them into the back of stitches to keep the appearance neat.
Conclusion
Congratulations! Your penguin magnet is now complete and ready to adorn your refrigerator or any other magnetic surface. The adorable design uses upcycled materials and simple threadwork to create a fun and customizable home décor piece.
Tips for Success
- Work tight stitches to ensure the fabric covers the metal base evenly.
- If the edges seem too loose, go back and add a second round of SC or SL ST for reinforcement.
- Safety Tip: Be cautious when working with hot glue and cutting edges of the metal for this project.
Important Remarks
This project is versatile and can be repurposed to create a variety of animals or other designs depending on the colors and shapes you use. Try experimenting with different colors and thread types to make your penguins pop! Furthermore, consider making a set of magnets as a gift or for craft fairs.
Materials
- An open pull tab from a sardine can.
- Crochet hook (1.75 mm).
- Crochet yarn in black, white, and a small amount of yellow for the beak and feet.
- Scissors.
- Hot glue gun.
- Lighter to seal the yarn ends.
- Googly eyes (two). Alternatively, you can use a pearl or crochet the eyes with yarn.
- A piece of a magnet.
Creating the Beak and Feet
- The Beak: Using yellow yarn, make a half-double crochet, followed by two chains, another half-double crochet, and a single crochet to form a small beak shape.
- The Feet: Three chain stitches are made, then a slip stitch is worked in the same base space. Repeat this process with four chains and then with three chains to create a complete foot.
Tutor's Suggestions and Tips
- Difficulty Level: This project is suitable for beginners and is easy to follow.
- Variations: The creator suggests that instead of using googly eyes, you could use a pearl or crochet the eyes with black yarn. They also mention that you can make the head detail with two stitches instead of three for a thinner look.
- Other Uses: The creator also suggests that if you use a soda can pull tab, you can turn it into an earring.
Step-by-Step Instructions
This tutorial provides a step-by-step guide to mastering various stitches, making it perfect for beginners and those looking to refine their skills. Follow along to learn the techniques with ease!
Conclusion
Ultimately, the tutorial concludes with the creator hoping that the viewers enjoyed the tutorial, and, moreover, encouraging them to share the video to help the channel grow.