
Festive Free Crochet Santa Claus Pattern For Christmas Decor
Charm your Christmas décor with this Crochet SANTA CLAUS Pattern bringing festive elegance, handmade detail, and timeless holiday warmth.
The tradition of handmade holiday decorations has long been cherished, bringing warmth and individuality to festive celebrations. Among these timeless creations is the Santa Claus crochet pattern, offering not just an artistic expression but a heartfelt nod to the magic of Christmas. This beautiful crochet item serves as more than just a décor piece—it symbolizes the holiday spirit through its charming details and delightful appearance. Whether displayed on a mantel, hung on a tree, or gifted to someone dear, this cheerful figure radiates joy and captures the essence of a season filled with love and togetherness.
Charming Free Crochet Santa Claus For Festive Home Decor

Its handmade nature makes it an excellent choice for personal collections or as a thoughtful gift, seamlessly blending nostalgia, artistry, and celebration. Furthermore, making this pattern provides a rewarding activity, allowing moments of peace and creative focus amidst the hustle of the holiday season.

This Santa Claus crochet piece is not simply an ornament but a reminder of the joys of handmade traditions. Rooted in holiday cheer and full of character, it tells a story of care, effort, and love qualities that embody the true meaning of Christmas. Whether you're finishing the last stitches or placing it proudly on display, this timeless creation is sure to enhance the magic of the season for generations to come.
Pattern Information
-
Skill Level: Easy to Intermediate
-
Terminology: US Crochet Terms
-
Construction: The pattern is worked by crocheting directly over a metal pull-tab (seal) from a beverage can.
Materials List
-
Yarn: Light weight (Size 3) or Fingering weight (Size 2) cotton yarn.
-
Colors: White (Beard/Trim), Beige/Skin Tone (Face), Red (Hat/Mouth).
-
-
Hook Size: 2.0 mm or 2.5 mm (depending on yarn thickness).
-
Pull-Tab: One clean metal seal from a soda/beer can.
-
Optional Items: * Craft glue (e.g., Pegamil or hot glue).
-
Small pearls or beads (for the hat decoration).
-
Small adhesive magnet or keychain ring.
-
Tapestry needle.
-
Key Abbreviations
-
Ch: Chain
-
Sc: Single Crochet
-
Hdc: Half Double Crochet
-
Dc: Double Crochet
-
Tr: Treble Crochet
-
Dtr: Double Treble Crochet (yarn over 3 times)
-
Sl st: Slip Stitch
-
St(s): Stitch(es)
Special Notes
-
Working over the tab: When working the first round, you are treating the holes of the metal tab like a magic ring. Insert your hook through the hole to pull up loops.
-
Color Changes: To keep the work neat, change colors during the final pull-through of the last stitch of a section.
Detailed Pattern
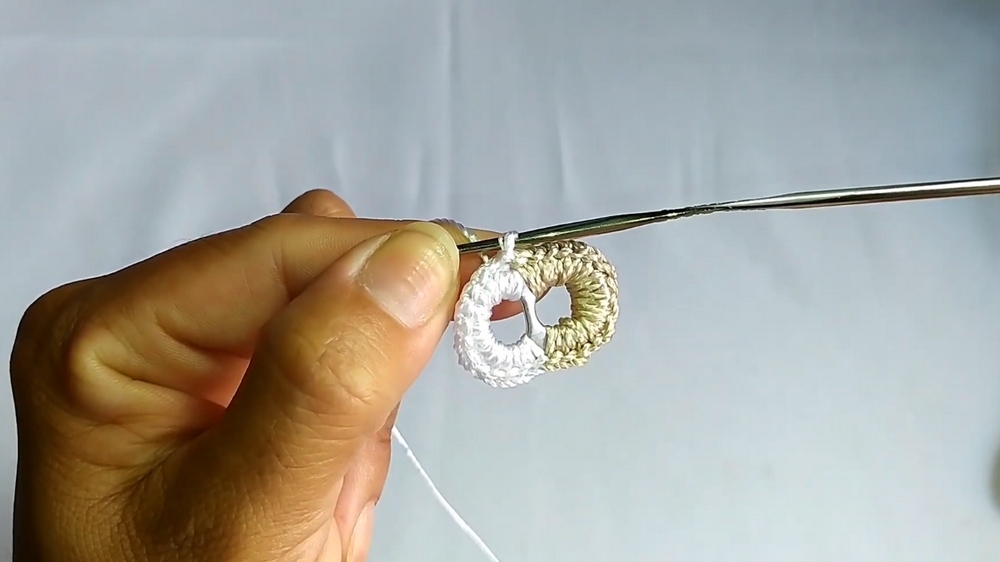
1. The Base and Face (Using the Metal Tab)
-
Step 1 (Beard Base): Join White yarn to the bottom hole of the metal tab. Work Sc stitches around the entire bottom half of the tab until the metal is completely covered.
-
Step 2 (Face): On the last Sc of the white section, change to Beige yarn. Work Sc stitches into the top hole of the tab to fill the space.
-
Step 3 (Closing): Change back to White yarn and finish with a Sl st into the first white stitch. Cut the beige yarn and weave in ends, keeping the white yarn attached.

2. The Beard Texture
-
Step 1 (Frame): Ch 1. Work one row of Sc all the way around the outer edge of the entire piece. Join with a Sl st.
-
Step 2 (Beard Loops): To create the curly beard:
-
Ch 4, Sl st into the same base stitch.
-
Ch 5, Sl st into the same base stitch.
-
Next Stitch: Sl st, Ch 5, Sl st into the same stitch.
-
Repeat the Ch 5 loop sequence across the bottom (white) section of the face.
-
Final Loop: End the beard section with a Ch 4 loop to match the start. Fasten off.
-

3. The Santa Hat
-
Step 1: Join Red yarn at the top side of the beige "face" section.
-
Step 2: Work a row of Sc across the top of the head. To create width, work 2 Sc into each space.
-
Step 3 (Decorative Pearl): Ch 5. Slide a pearl onto the yarn and secure it with a Sl st at the end of the chain.
-
Step 4 (Hat Shaping): Turn the work to the right side.
-
Skip the first stitch, Sc in the next.
-
Work Hdc in every stitch across the row to create the bulk of the hat.
-
At the final two stitches, work 1 Sc, then 1 Sl st. Fasten off and weave the tail to the back.
-

4. Facial Details
-
Mouth: Using a tapestry needle and Red yarn, sew a small horizontal stitch in the center of the beige area just above the beard.
-
Mustache: * Ch 4. Dtr (Double Treble) into the first chain made.
-
Ch 4, Sl st into the center of the work.
-
Ch 4, Dtr into the center, Ch 4, Sl st into the center.
-
This creates two small wings. Fasten off and glue the mustache over the mouth area.
-
Conclusion
This Santa Claus ornament is a brilliant example of "upcycling" everyday materials. By using a simple beverage tab as the internal structure, the ornament remains rigid and durable without the need for plastic inserts.
Pattern Correction
In the video at approximately 6:01, the narrator mentions switching between 4 and 5 chains for the beard loops. For a symmetrical look, ensure the first and last loops of the beard are Ch 4, while all center loops are Ch 5. This creates a tapered, natural look for the beard.
Pro Tip
If you are using these as refrigerator magnets, ensure the back of the metal tab is completely covered by your yarn or a small piece of felt before gluing the magnet. This prevents the metal tab from scratching the surface of the fridge. For a "Saveiro" (car mirror) charm, simply extend the initial top chain to 20+ stitches to create a long hanging loop.