
Easy Crochet Amigurumi Pumpkin Doll Free Pattern With Autumn Charm
Give your autumn collection a fun twist with this Crochet Amigurumi Pumpkin Doll Free Pattern featuring a lovable seasonal look.
Would you like a soft, cute friend made from yarn? The Crochet Amigurumi Pumpkin Doll Featured By DynamisCreations is a small, round toy that looks just like a little pumpkin with a friendly face. It can be made in different sizes—small enough to hold in your hand or larger for a cozy decoration.
Playful Crochet Amigurumi Pumpkin Doll Free Pattern For Halloween
This doll is bright and colorful. Most are made with orange yarn to look like a real pumpkin, but you can choose yellow, white, green, or any color you like to make it unique. Adding tiny green leaves or a brown stem on top makes it look even more like a pumpkin. Some have small eyes or smiles to make them fun and cheerful.
This Crochet Amigurumi Pumpkin Doll has many uses. It can be placed as a decoration for fall and Halloween. Children can play with it safely because it’s soft and gentle. Also, it can be a sweet gift for friends or family during the autumn season.
To make this doll, the most important stitch is the single crochet. This stitch helps keep the pumpkin tight so the stuffing does not come out. You also use increases and decreases to shape the pumpkin round and neat.
Working on a pumpkin doll helps practice crochet skills step by step. You count stitches and follow simple instructions, which is great for beginners. With just yarn and a hook, you can have a bright little pumpkin that brings a bit of fall cheer to any space.
About the Pattern
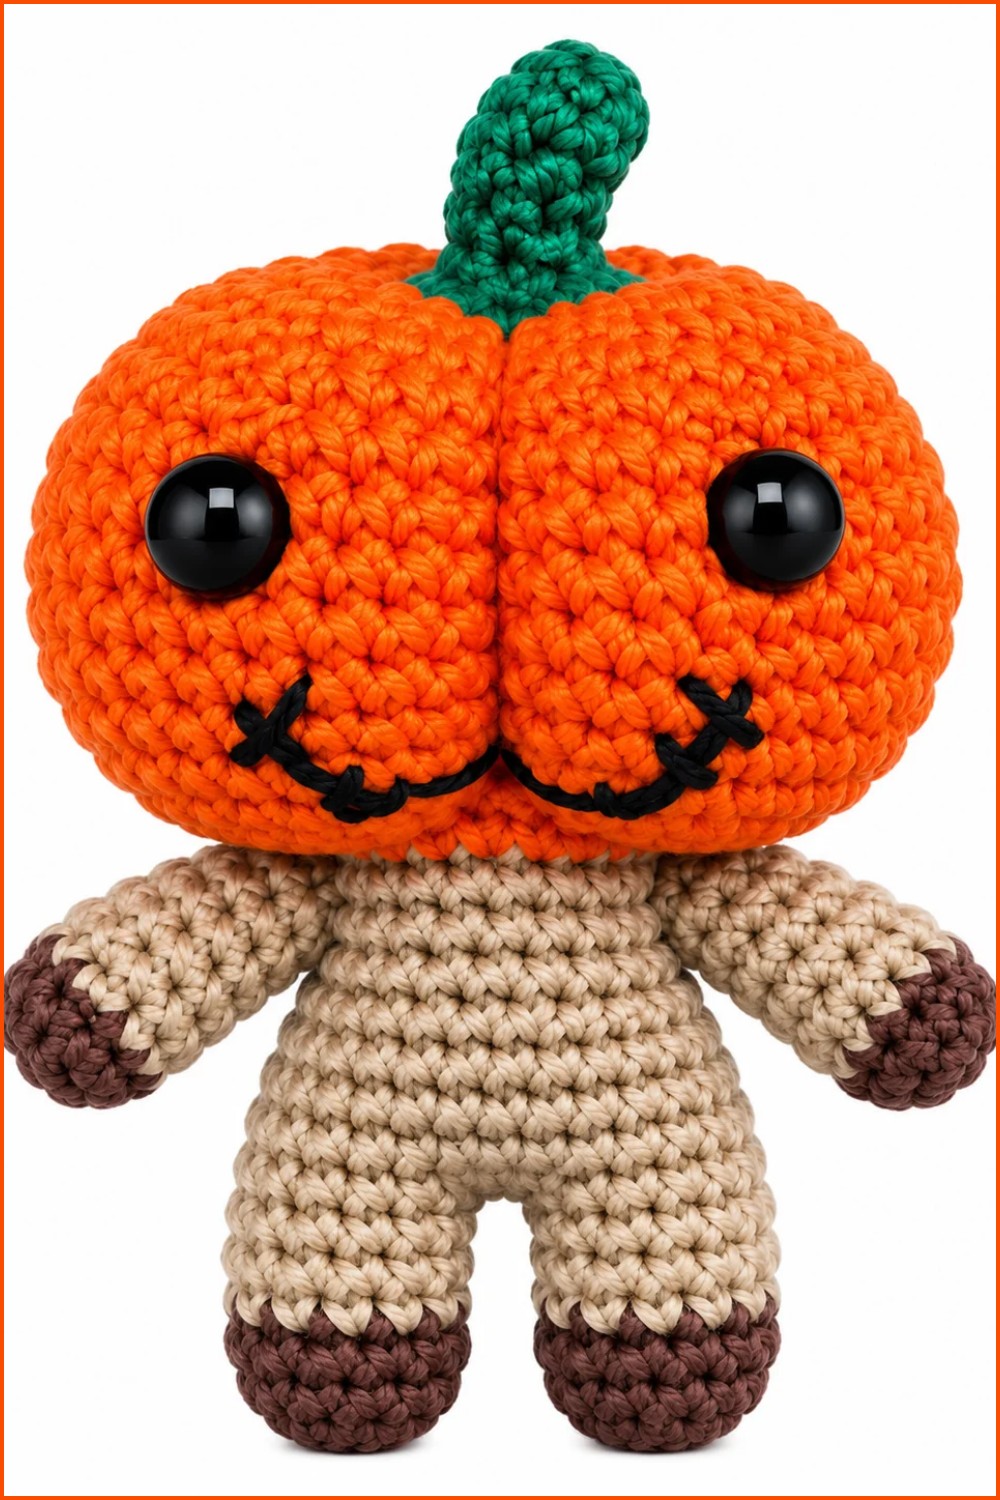
This pumpkin doll crochet pattern crafts a cheerful, harvest-inspired character with a classic amigurumi construction. The finished doll features a round segmented pumpkin head, sturdy body and legs, playful arms, and a whimsical stem. Designed for clarity and detail, this project creates a soft, stuffed figure with expressive shaping and charming finishing details. The pattern uses basic increases and decreases to achieve shaping and covers every element required for assembly.

Key Pattern Details
- Each component is worked separately in continuous rounds and joined at the end.
- Clear instructions guide increases and decreases for shaping.
- Special pumpkin ridging is achieved by strategic yarn wraps around the stuffed head.
- Embroidered details and a crocheted stem finish the look.
- Pattern uses precise transitions and round counts for accurately matching the video reference.
Important Notes
- The pattern is worked in the round without joining at the end of each round. Use a stitch marker to keep track of the beginning of rounds.
- Consistent tension is important for uniform shaping.
- Safety eyes are placed and stuffing is added prior to final assembly for best results.
- Use recommended yarn types for durability, and avoid over-stuffing to preserve shaping.
- All color changes, attachment points, and embellishments are directly from the video timeline referenced.
Difficulty Level
Skill Level: Suitable for adventurous beginners to intermediate crocheters.
Involves basic amigurumi techniques (magic ring, single crochet, increasing, decreasing) and simple assembly, embroidery, and shaping methods.
Supplies Needed
- Worsted weight acrylic yarn in orange (head and body), brown or green (stem), and black (for eyes/embroidery)
- Crochet hook size 3.0mm–3.5mm (US E/4)
- Pair of 8–10 mm safety eyes
- Polyester fiberfill stuffing
- Yarn needle and sewing pins
- Stitch markers
- Scissors
Size & Measurements
- Finished pumpkin doll measures approximately 16–18 cm (6.5–7 in) in height, depending on individual gauge and stuffing.
Gauge & Stitch Details
- Gauge: Tight crochet fabric preferred (about 6–7 sc per 2 cm), but exact gauge is not critical for amigurumi.
- All pieces are worked in a spiral, in single crochet unless otherwise noted.
Crochet Abbreviations
| Abbreviation | Meaning |
|---|---|
| mr | magic ring/circle |
| ch | chain |
| sc | single crochet |
| inc | increase (2 sc in next st) |
| dec | decrease (sc2tog) |
| st(s) | stitch(es) |
| sl st | slip stitch |
| FO | fasten off |
Special Stitch Guide
- Magic Ring (mr): Formed by loop and crocheting into adjustable ring for seamless start.
- Invisible Decrease (dec): Insert hook into front loop of each of next 2 sts, yarn over, pull through both loops, yarn over, draw through remaining loops.
Complete Crochet Pattern
Pumpkin Head
Round 1:
- 6 sc in magic ring. (6 sts)
Round 2:
- 1 inc in each st around. (12 sts)

Round 3:
- 1 sc, 1 inc repeat around. (18 sts)
Round 4:
- 2 sc, 1 inc repeat around. (24 sts)
Round 5:
- 3 sc, 1 inc repeat around. (30 sts)
Round 6:
- 4 sc, 1 inc repeat around. (36 sts)
Round 7:
- 5 sc, 1 inc repeat around. (42 sts)
Round 8:
- 6 sc, 1 inc repeat around. (48 sts)
Rounds 9–13 (5 rounds):
- 1 sc in each st around. (48 sts per round)
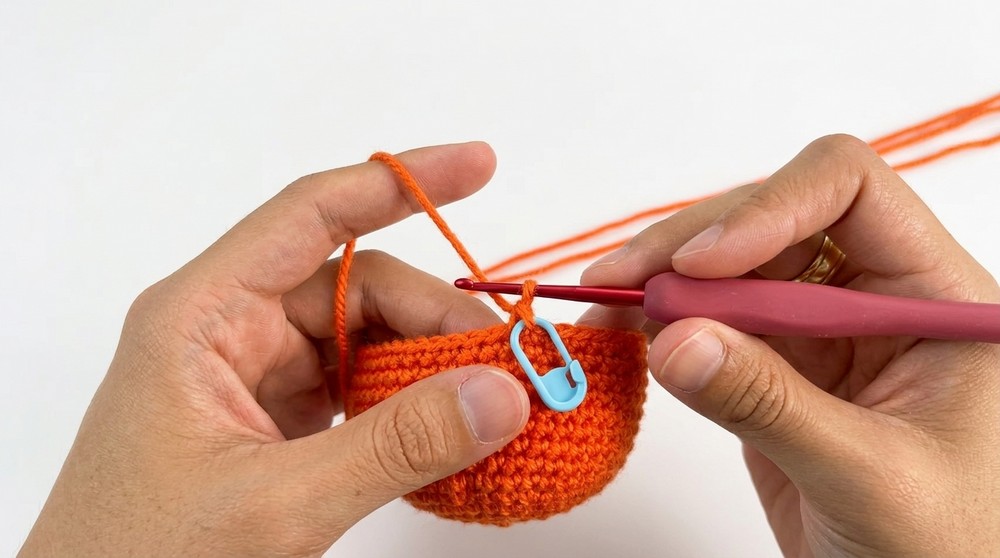
Round 14:
- 6 sc, dec repeat around. (42 sts)
Round 15:
- 5 sc, dec repeat around. (36 sts)
Round 16:
- 4 sc, dec repeat around. (30 sts)
Round 17:
- 3 sc, dec repeat around. (24 sts)
Round 18:
- 2 sc, dec repeat around. (18 sts)
Round 19:
- 1 sc in each st around. (18 sts)
FO, leaving long tail for closing and shaping pumpkin ridges. Do not close hole yet; stuff firmly and insert safety eyes between rounds 10–12, spaced as desired.
Pumpkin Stem
Round 1:
- 4 sc in magic ring. (4 sts)
Rounds 2–6 (5 rounds):
- 1 sc in each st around. (4 sts per round)
Round 7:
- 1 inc in each st around. (8 sts)
Round 8:
- 1 inc in each st around. (16 sts)
FO, leaving tail for sewing. Stuff lightly if desired.
Arms (make 2)
Round 1:
- 6 sc in magic ring. (6 sts)
Round 2:
- 1 inc in each st around. (12 sts)
Round 3:
- 2 sc, 1 inc repeat around. (9 sts)
Rounds 4–7 (4 rounds):
- 1 sc in each st around. (9 sts per round)
Round 8:
- 2 sc, dec repeat around. (8 sts)
Rounds 9–13 (5 rounds):
- 1 sc in each st around. (8 sts per round)
FO, stuff very lightly, leaving a long tail for sewing to the body.
Legs & Body
First Leg:
Round 1:
- 6 sc in magic ring. (6 sts)
Round 2:
- 1 inc in each st around. (12 sts)
Round 3:
- 1 sc in each st around. (12 sts)
Round 4:
- 1 sc, dec around. (9 sts)
Rounds 5–8 (4 rounds):
- 1 sc in each st around. (9 sts per round)
FO first leg. Make second leg, do not fasten off.
Second Leg:
Work as per first leg through round 8. Do not cut yarn.
Joining:
Round 9 (Leg Join):
- Ch 3, attach to first leg with sc, continuing around first leg (9 sts), then work 3 sc across chain spacer, continue around second leg (9 sts), work 3 sc across remaining side of chain spacer. (24 sts)
Round 10:
- 3 sc, inc repeat around. (30 sts)

Round 11:
- 4 sc, inc repeat around. (36 sts)
Rounds 12–13 (2 rounds):
- 1 sc in each st around. (36 sts per round)
Round 14:
- 4 sc, dec repeat around. (30 sts)
Round 15:
- 3 sc, dec repeat around. (24 sts)
Round 16:
- 2 sc, dec repeat around. (18 sts)
FO, leaving long tail for sewing. Stuff body firmly.
Attaching Arms
- Align arms with body and use remaining yarn tail to attach by working 4 sc through arm stitches directly to body at desired height, ensuring symmetrical placement of both arms.

Joining & Final Size
- With head, stuff firmly and use yarn tail to close bottom. Attach head to body, sewing securely in a circular fashion for stability.
- Use remaining long orange yarn tail to create classic pumpkin ridges: insert yarn from center top of head through the bottom, pull through and wrap tightly over outside of head, repeat evenly around head to form 6–8 segments.
- Attach the stem to the top center of the head, sewing around the base with yarn needle.
- Embroider smile using black yarn, passing needle through appropriate head stitches for desired expression.
- Weave in all ends and ensure all attachment points are secure.
Final Words
This pattern offers a rewarding exploration of amigurumi construction and creative detail, resulting in a whimsical, seasonally themed pumpkin doll. Working piece by piece and finishing with expressive shaping and simple embroidery, this project provides a balanced challenge and an enjoyable finished décor piece or gift. Careful assembly, appropriate yarn and stuffing usage, and close attention to rounds will achieve a vibrant doll with personality and charm.