
Crochet Christmas Pudding Amigurumi Pattern
Spread festive cheer with this adorable Crochet Christmas Pudding Amigurumi Pattern, a perfect seasonal handmade creation to brighten up your holiday celebrations.
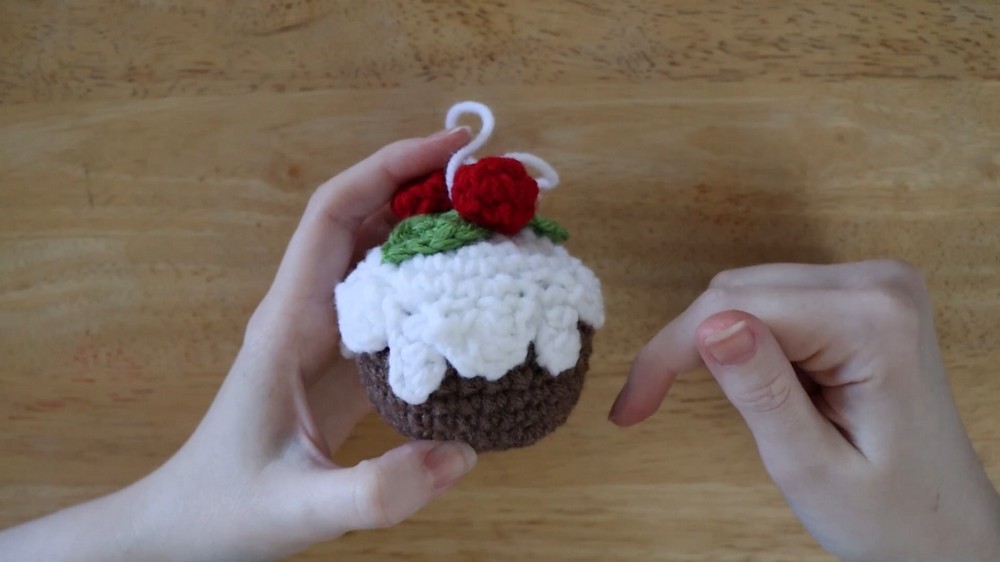
A traditional holiday treat brought to life, this Crochet Christmas Pudding Amigurumi is perfect for accenting your festive decorations or gifting loved ones. With its round shape, charming icing detail resembling realistic drips, vibrant berries, and adorable leaf accents, it’s both delightful and timeless. You can use it as an ornament, a centerpiece charm, or add it to your handmade Christmas décor collection.
Crochet Christmas Pudding

Christmas Pudding Ornament Crochet Pattern
This crochet pattern is designed to help you create a festive Christmas Pudding Ornament for your holiday decorations. It includes instructions for making the pudding body, icing, leaves, and berries, creating an adorable handmade ornament to hang on your tree. Whether you're a beginner or an experienced crocheter, this simple step-by-step guide will walk you through the process.
Materials
- Yarn:
- Brown yarn (for pudding body).
- White yarn (for icing).
- Green yarn (for leaves).
- Red yarn (for berries).
- Hook: Crochet hook appropriate for your yarn (e.g., 3.5mm or 4mm hook).
- Stuffing: Fiberfill or stuffing material.
- Scissors.
- Tapestry needle: For sewing.
Abbreviations (US Terms)
- ch: Chain.
- sc: Single Crochet.
- hdc: Half Double Crochet.
- dc: Double Crochet.
- sl st: Slip Stitch.
- inc: Increase (two stitches in the same stitch).
- dec: Decrease (combining two stitches into one).
Steps to Crochet Christmas Pudding Ornament
1. Pudding Body
Rounds 1–5 (Body Increase):
- Use brown yarn to begin.
- Round 1: Create a magic circle with 6 sc.
- Round 2: Inc in each stitch all the way around (12 sc total).
- Round 3: Sc in the first stitch, inc in the next stitch. Repeat all the way around (18 sc).
- Round 4: Sc in the first two stitches, inc in the next stitch. Repeat all the way around (24 sc).
- Round 5: Sc in the first three stitches, inc in the next stitch. Repeat all the way around (30 sc).

Rounds 6–10 (Straight Rows):
7. Round 6–10: Sc all the way around (30 sc per round).
Rounds 11–13 (Decreasing the Sphere):
8. Round 11: Sc in the first three stitches, dec in the next. Repeat all the way around (24 sc).
- Round 12: Sc in the first two stitches, dec in the next. Repeat all the way around (18 sc).
- Round 13: Sc in the first stitch, dec in the next. Repeat all the way around (12 sc).

Final Round:
11. Stuff the pudding.
- Round 14: Dec six times (6 sc).
- Cut the yarn and sew up the remaining hole.

2. Icing
Rounds 1–5: (Same as the pudding body)
Follow the exact instructions for rounds 1–5 of the pudding body using white yarn.
Round 6 (Adding Drips):
- Sl st into the next stitch.
- Ch 4.
- Hdc in the second chain from the hook.
- Hdc in the next two chains.
- Skip the next stitch on the main circle and sl st into the one after.
- Skip the next stitch, 5 dc into the next stitch.
- Repeat steps 2–6 three more times to make additional icing drips.
- When complete, cut the yarn with a long tail for sewing.

3. Leaves
- Make two leaves using green yarn:
- Ch 5.
- Sl st in the second chain from the hook.
- Sc in the next stitch.
- Hdc in the next stitch.
- Work 3 hdc into the last chain.
- On the other side of the chain: hdc in the next stitch, sc in the next, and sl st into the last stitch.
- Fasten off and sew to the icing.
4. Berries
- Make two berries using red yarn:
- Round 1: Start with a magic circle, work 6 sc into it.
- Round 2: Inc in each stitch around (12 sc).
- Round 3: Dec 6 times (6 sc).
- Sew and fasten off, sewing both berries onto the icing.
5. Assembly
- Sew the icing onto the top of the pudding body with the long tail from the icing.
- Attach leaves and berries securely to the icing.
- Add a string or ribbon to the ornament to hang it.
Conclusion
This simple yet festive Christmas Pudding Ornament design is a fantastic way to add a touch of handmade charm to your holiday décor. The pattern is designed for crocheters of all skill levels and allows for creativity, like varying icing drips or experimenting with colors. Enjoy crafting your ornament and hanging it on the tree!