
Charming Crochet Car Keychain Pattern For Car Lovers
Hit the road in style with this adorable Crochet Car Keychain Pattern that adds a unique handmade touch to your keys or bag effortlessly.
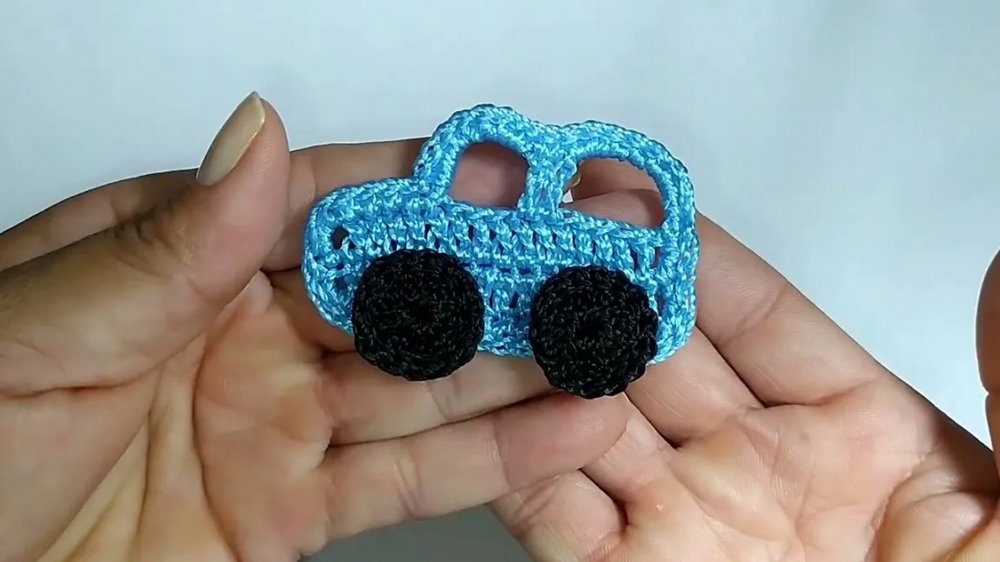
There’s something truly gratifying about turning simple threads into charming keepsakes. In this delightful step-by-step guide to a crochet car keychain, you’ll uncover a project that is as versatile as it is beautiful. From adorning your fridge as a magnet to serving as a miniature pencil sharpener case, or simply becoming the perfect sentimental addition to your keys, this tiny crochet car brings personality to the everyday.
Perfect Crochet Car Keychain for Stylish Organization

What makes this crochet car project so rewarding is not just its aesthetic value but its practicality and emotional charm. Perfect as a gift, a decorative piece, or a personal trinket, its versatility knows no bounds. To enhance your result, ensure you work with crisp stitches and select bright or personalized thread colors to bring out its playful essence.
In the end, a project like this is a reminder of how small, deliberate efforts can transform an idea into something cherished and useful. This little car keychain may be simple, yet it packs an enormous amount of charm and functionality in its 3D design – a testament to the beauty of crochet as both an art form and a means of utility.
Crochet Pattern: Mini Stroller
Overview
- Skill Level: Beginner to Intermediate
- Finished Size: Approximately 8 cm (3 inches) in width after assembly.
- Applications: Clothing appliqué, refrigerator magnet, pencil topper, or keychain accessory.
Materials Needed
- Yarn:
- Thick Silk Thread (Tex 288): 100% polypropylene. You may use lighter or heavier yarn depending on your preference.
- Alternative Yarn: Cotton or acrylic yarn can be used for a softer or firmer finish.
- Crochet Hook:
- 1.75 mm hook (or a size suitable for your yarn).
- Scissors: For cutting yarn ends.
- Tapestry Needle: For sewing and weaving in ends.
- Fabric Glue (optional): For attaching details like the wheels securely.
- Fiber Filling: For stuffing the pencil topper (if applicable).
Gauge
Exact gauge is not required for this pattern. Ensure tight stitches for a structured look.
Special Techniques Used
- Magic Ring: Creates a closed center for the wheels.
- Single Crochet (sc): Basic stitch used for most of the design.
- Slip Stitch (sl st): Used to join rounds and for seamless finishes.
- Chain (ch): Used for foundation and decorative loops.
- Double Crochet (dc): Creates taller stitches for stroller structure.
- Continuous Rounds: Crocheting in spirals to avoid visible seams.
Pattern Instructions
Step 1: Stroller Base
Foundation Row
- Ch 18: This will form the stroller’s base length.
Row 1
- Skip the first chain from the hook.
- Begin working dc in the next chain.
- Dc in each chain across.
- After the last dc, turn your work towards the short edge of the row.

Row 2: Stroller Side Handle
- Ch 2 to form the turning chain.
- Work sl st into the last chain to form a rounded corner.
- Ch 3 to start another row.
- Work dc across the row back toward the other end.
- Once you reach the last chain, leave a long tail for sewing later.

Row 3: Mid-Section
- Create a knot: Loosen the yarn loop from the hook, and pass the tail through the last stitch to secure.
- Count 6 dc from the start of the row and insert your hook into the 7th stitch.
- Fasten yarn onto the 7th stitch with a sl st.
Row 4: Decorative Loops
- Ch 7: This forms the partial stroller frame.
- Skip the next 4 chains, and work dc into the 5th chain.
- Work dc into the next chain.
- Repeat ch 7 to form another loop.
- Fasten the loop with a sl st to secure the design.
Row 5: Edge Border
- Turn the work and begin working sc stitches across the loops to form an edge.
- Work 8 sc into each loop, ensuring even coverage.
- Continue working sc stitches along the row, covering the base and side edge.

Step 2: Wheels
Wheel Base
- Start with a Magic Ring:
- Work Ch 3 into the magic ring (counts as the first dc).
- Add 13 dc into the ring (total of 14 dc).
- Pull the tail to close the ring tightly.
- Slip stitch into the first dc to join the round.
Row 2: Edge Border
- Begin working sl st around the entire circle.
- Insert hook into the stitch, pull up a loop, and pass through.
- Cut and seal thread after completing the outer edge.
Assembly of Wheels
- Create 4 wheels using the above instructions.
- Position and attach wheels evenly to the stroller base using fabric glue or sewing with thread.
Step 3: Decorative Handle Loop
- Insert your hook into the upper center of the stroller base (magic ring area).
- Ch 20 to form the keychain loop or stroller handle.
- Fasten the chain back into the base using a sl st.
Finishing Steps
- Assembly: Align and attach the second side of the stroller by sewing or gluing the pieces together. Ensure both sides are symmetrically aligned.
- Cut Thread Ends: Trim and weave in all loose threads using the tapestry needle.
- Optional Decoration: Add additional details to the stroller (e.g., embroidery, beads, or contrasting yarn colors).
Conclusion
Congratulations on completing your crochet mini stroller! This adorable piece is versatile, allowing you to create anything from appliqués to pencil toppers. Its small size and rounded edges make it ideal for quick projects or gifts.
Important Tips
- Yarn Selection: Use stiffer yarns (e.g., polypropylene) for a structured stroller or softer yarns for a flexible variation.
- Customization: Experiment with color combinations for added charm.
- Size Variations: To make a larger stroller, increase the foundation chain and insert additional rows.
- Gluing vs. Sewing: For pencil toppers or keychains, sewing offers better durability than glue.