
Cute Crochet Mouse Toy Pattern Perfect for Nursery Decor
Meet an adorable companion with this Free Crochet Mouse Toy Pattern that perfect for playful gifts, cute décor, or cheerful little creations.
This charming toy transforms ordinary spaces into cozy, playful corners, perfect for children and adults alike. Its handmade details and soft, tactile texture make it both visually appealing and comforting to hold. Designed with care, it balances durability with a friendly, lifelike appearance that sparks imagination and encourages interactive play.
Quick Crochet Mouse Toy Pattern That Kids Will Cherish

With its compact size, it fits seamlessly into nurseries, shelves, or as part of a handmade gift collection, making it a versatile decorative and functional piece.

Following the Crochet Mouse Toy Pattern allows makers to enjoy a rewarding journey from start to finish, producing a whimsical creation that combines artistic expression with practical charm.
Mouse Toy for Cats Crochet Pattern
Skill Level
Intermediate
Requires knowledge of working in the round, increases, sewing, and single crochet.
Finished Size
Approximately 2–3 inches (5–7 cm) wide.
Materials
- Yarn:
- Medium Weight Yarn (#4): Acrylic or cotton yarn works great for durability. Suggested colors: gray, black, or any customizable favorite for your mouse.
- Optional Embroidery Yarn: Black or pink yarn/thread for nose and eyes (if desired).
- Hook: 3.5 mm crochet hook.
- Safety Eyes/Nose (Optional): If you'd rather not embroider, use safety eyes or nose between rows.
- Stuffing: Polyester fiberfill (Optional). Add catnip for extra enrichment.
- Needle: Sewing needle. Use a yarn needle for assembling ears.
- Scissors: For trimming yarn tails.
Key Abbreviations (US Terminology)
- ch: Chain stitch.
- sc: Single Crochet.
- inc: Increase (2 single crochet into the same stitch).
- dec: Decrease (single crochet two stitches together).
- sl st: Slip Stitch.
- st(s): Stitch(es).
- FO: Fasten Off.
Special Notes
- This pattern is seamless, except for attaching ears.
- Leave the toy plain if your cat is destructive, avoiding embroidered details or safety features like eyes for safer play.
- Add stuffing or catnip before closing the body, as specified.
Pattern Instructions
Mouse Ears
Make two ears using the yarn color of your choice.
- Round 1: Start with a magic circle, and work 6 sc into the circle. Tighten the loop to close. (6 sts)
- FO. Leave a long tail if sewing the ears onto the body later.

Mouse Body
Using the same yarn as the ears:
- Round 1: Create a magic circle, and work 6 sc into the circle. Tighten to close. (6 sts)
- Round 2: [1 inc] repeat around. (12 sts)
- Round 3: [1 sc, 1 inc] repeat around. (18 sts)
- Round 4: [2 sc, 1 inc] repeat around. (24 sts)
- Round 5: [3 sc, 1 inc] repeat around. (30 sts)
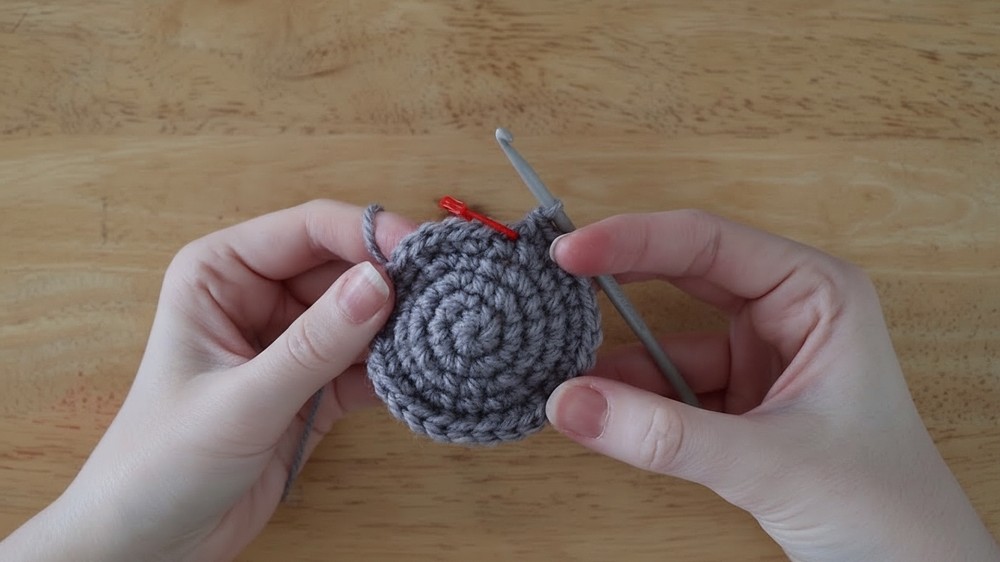
- Round 6: [4 sc, 1 inc] repeat around. (36 sts)
Assembly: Folding and Stuffing the Body
- Fold in Half: After completing Round 6, fold the piece in half so the edges align evenly.
- Single Crochet Along Edges:
- Work sc across both layers to join the front and back edges.
- Insert your hook through both sides of the fabric to ensure closure.
- Optional: Add stuffing, catnip, or both before fully closing the piece. Ensure the inside layer is compact and evenly distributed.
- Chain Tail: Once you’ve crocheted along the edge to close it, work a chain of 10 for the tail. FO the yarn securely. Use tweezers or your hook to tighten the tail base.


Attach the Ears
- Place the Ears: Position the two ears evenly on either side of the head, near the top. Align symmetrically for a balanced look.
- Sew: Thread a yarn needle and stitch the ears to the head using the long tails left earlier. Secure tightly so the ears remain stable.
Optional Details (If Desired)
- Eyes and Nose:
- Use black embroidery yarn and your embroidery needle to stitch tiny dots for eyes and a triangular nose at the front of the head.
- Alternatively, place safety eyes between rows for a defined look (ensure they are securely attached).
- Whiskers:
- Add whiskers using thin black embroidery yarn for added detail.
- Sew short lines outward on either side of the nose using small stitches.

Conclusion
Your cute kitty mouse toy is now complete! It is a perfect playmate for your cat, and the minimal design ensures long-lasting durability. Leave it plain if your cat prefers gnawing on toys without extra features, or customize the toy with embroidery for added personality.
Pattern Corrections
- Ensure alignment of ears and chain tail placement for balance.
- If stuffing is used, avoid overstuffing to keep the mouse lightweight for easy play.
Tips for Success
- Safety First: Avoid small, detachable details (like beads for eyes) if your cat is prone to biting or tearing toys.
- Switch Colors: Use contrasting or colorful yarn to make the features stand out. Gray, black, or bright mouse colors work well.
- Add Weight: Use scrap fabric, small bells, or beads inside the stuffing to create a weighted effect for added fun during playtime.