
Squishy Crochet Bee Amigurumi Pattern for the Ultimate Desk Pet
Whip up a buzzing little friend with this Crochet Bee Amigurumi Pattern, a fast and happy project to keep your workspace looking cheerful.

Chubby Crochet Bee Amigurumi Pattern to Buzz Around Your Room
Why does a tiny yellow and black friend feel so special in a room? A Crochet Bee Amigurumi Pattern yields a soft, plump toy that instantly brings a smile to your face. This little buzzy friend is perfect for many things, such as a nursery decoration, a cute bag charm, or a soft gift for a loved one. Its stripes and wings give it a classic look that fits well in any home.

Putting this piece together is a calm and fun way to spend your time. You focus on smooth round shapes and bold colors. The final result is a sturdy and squishy toy that is safe for little hands and lasts much longer than store-bought items. It helps make a space feel more cheerful and lively. With its friendly round eyes and bright body, this small companion adds a sweet touch of nature to your daily life.
Materials
-
Yarn: Medium weight (Number 4) or Bernat Blanket (Number 6) yarn in yellow, black, white (for wings), and pink (for cheeks).
-
Hooks:
-
Small Bee: 4.25 mm for the body and 5.5 mm for the wings.
-
Plush Bee: 5.5 mm for the body and 6.5 mm for the wings.
-
-
Safety Eyes: 10 mm for the small size; 18 mm or 22 mm for the plush size.
-
Notions: Stitch marker, polyester fiberfill stuffing, tapestry needle, and scissors.
Step-by-Step Pattern
The Body
-
Row 1 (Yellow): Work 8 single crochets (sc) into a magic ring or chain-2 loop. Pull tight to close [03:02].
-
Row 2: Work 2 sc in each stitch around (16 stitches total) [04:15].
-
Row 3: Work a sequence of 1 sc followed by 1 increase (inc) around (24 stitches) [05:41].
-
Row 4: Work 24 sc around. Change to black yarn on the last stitch [07:24].
-
Rows 5-6 (Black): Work 24 sc in each row. Change to yellow on the last stitch of Row 6 [10:00].
-
Rows 7-8 (Yellow): Work 24 sc in each row. Change to black on the last stitch of Row 8 [13:44].
-
Rows 9-10 (Black): Work 24 sc in each row. Change to yellow on the last stitch of Row 10 [16:42].
-
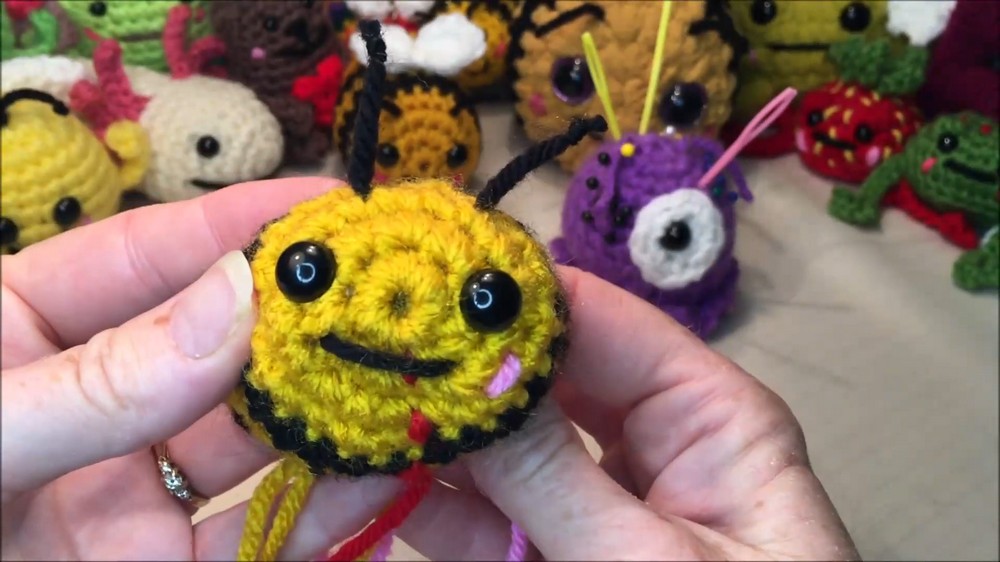
Face Assembly: Place eyes between Rows 2 and 3, about four holes apart. Embroider a black mouth, pink cheeks, and tie black yarn through the top for antennas [20:29].
-
Row 11 (Yellow): Work 24 sc around [28:12].
-
Row 12: Work 2 sc then 1 decrease (dec) around (18 stitches) [29:42].
-
Row 13: Work 1 sc then 1 dec around (12 stitches). Stuff the bee firmly [31:19].
-
Row 14: Work 6 dec. Fasten off and weave the tail to close the hole [34:13].



The Wings (White Yarn)
-
Foundation: Using the larger hook, chain 3.
-
First Wing: In the 2nd chain from the hook, work the following into the same stitch: 1 sc, 1 half double crochet (hdc), 1 double crochet (dc), 1 triple crochet (tr), 1 dc, 1 hdc, and 1 sc.
-
Second Wing: Repeat the same sequence on the opposite side of the chain.
-
Finishing: Wrap the yarn tail around the center of the piece 2-3 times to separate the wings, then sew them onto the middle yellow stripe [39:09].
Special Features
-
No-Sew Body: You crochet the entire body in one piece, requiring only the wings to be attached afterward.
-
Integrated Antennas: The pattern uses the internal knots of the embroidered mouth to anchor the antennas, ensuring they stay secure [23:33].
Level of Difficulty
This project is an easy beginner pattern. The tutor demonstrates every stitch and uses simple shaping techniques suitable for those new to amigurumi.
Tutor's Suggestions
-
Firm Stuffing: Stuff the bee quite firmly to help it hold its shape over time. Under-stuffed bees tend to become squishy and lose their form [32:57].
-
Antenna Height: Keep antennas about one to one-and-a-half fingers high. If you make them too long, they will flop over instead of standing up [24:48].
-
Color Changes: When switching colors, carry the yarn inside the project instead of cutting it to save time and reduce ends [09:44].
Uses
-
Keychains: The small version is perfect for backpack charms.
-
Nursery Decor: The plush version makes a soft, safe toy for children.
-
World Bee Day Gifts: A thoughtful handmade gift to celebrate pollinators.
Conclusion
By following these steps, you create a vibrant and sturdy bumblebee. This pattern serves as an excellent way to practice color switching and basic embroidery on crochet.
Pro-Tip
When closing the final row of a plush bee, weave the tail through only the front loops and pull gently. Plush yarn snaps easily if you apply too much pressure, so tighten the hole in small increments [36:40].