
Free Crochet Snail Fridge Magnet Pattern Using Soda Can Tab
Bring charm and personality to your kitchen with this crochet snail fridge magnet featuring a recycled soda can tab for a unique touch.
A simple household object, like a soda can tab, can hold untapped potential when paired with creativity. Turning unconventional materials into a delightful crochet masterpiece, this snail magnet or keychain is as charming as it is eco-friendly. Whether perched on your fridge or dangling from your keys, this crochet snail adds a splash of color and personality to your daily life. Its versatility shines, choose your favorite colors to match your interior style or make a vibrant set of three as gifts or items to sell. The project encourages not only creativity but also sustainability by repurposing everyday items into functional art.
Easy Crochet Snail Fridge Magnet Using Soda Can Tab for unique collections

This project is perfect for those looking to merge creativity with sustainability, turning everyday objects into something meaningful. From its eco-friendly base to its customizable appeal, it’s a perfect gift, personal addition, or an item to sell. Let the loving details and versatile applications inspire you to try unique colors and designs.
Free Crochet Snail Fridge Magnet Pattern Stp by Step
Finished Size
The finished snail measures approximately 4–5 cm (1.5–2 inches) in height. The size can vary depending on thread type and tension.
Materials Needed
- Yarn/Thread:
- Tex 288 Silk Thread (100% polypropylene):
- Yellow/Gold: Primary spiral body.
- Complementary Color: For highlights or decorative details (e.g., lighter shade for base accents).
- Black Thread: For facial details (eyes).
- Tex 288 Silk Thread (100% polypropylene):
- Crochet Hook:
- 1.75 mm hook.
- Soda Can Tabs:
- Two soda can tabs are required to form the snail spiral shell.
- Clip/Magnet/Keychain Ring:
- Duckbill clip (4 cm): To use the project as a hairpiece or clip.
- Magnet: For refrigerator use.
- Keychain Ring: For use on bags or keys.
- Decorative Flower:
- A rococo flower (or any small decorative element). Optional according to your desired design.
- Other Supplies:
- Hot Glue Gun: For assembling components.
- Scissors: For cutting thread.
- Lighter: For sealing thread ends.
- Tapestry Needle: For attaching small details.
Gauge
Gauge is not critical for this project; consistent tension, however, will ensure a polished look. Tex 288 thread with a 1.75 mm hook will create the approximate size listed above.
Special Techniques
- Magic Ring (MR):
Create an adjustable, tight ring to begin your rounds. - Single Crochet (sc):
Insert hook into stitch, yarn over, draw up a loop, yarn over, and pull through both loops. - Half Double Crochet (hdc):
Yarn over, insert hook into stitch, yarn over, draw up a loop, yarn over, and draw through all three loops. - Slip Stitch (sl st):
Insert hook, yarn over, pull through both the stitch and the loop on the hook. - Working Around Soda Can Tabs:
Insert the hook to crochet around tab edges, joining two tabs while enclosing the metal for a smooth, finished design.
Pattern Instructions
Step 1: Soda Can Tabs
Prepare the Tabs
- Remove any sharp edges and burrs on both soda can tabs using pliers.
- Position the two tabs, one stacked horizontally over the other, aligning the top and bottom holes for smooth crochet integration.
Step 2: Snail Shell
- Yellow Thread:
- Join the thread to one side of the soda can tab where the two tabs are aligned.
- Secure the thread with a slip knot, insert your hook into the holes of both tabs, and begin.
- Shell Spiral (First Curve):
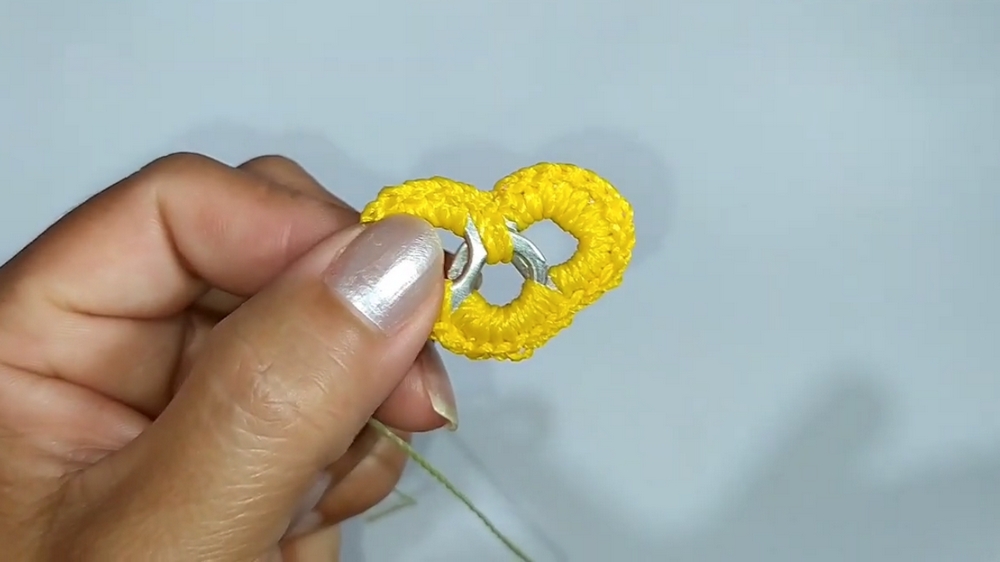
- Work 8 single crochet (sc) stitches evenly along the inner curve of the two joined tabs.
- Continue working evenly until you reach the larger curve.
- Outer Curve:
- Work 12 single crochet (sc) stitches into the outer curve of the dual soda tabs.
- Middle Join:
- Insert hook into the aligned center holes of both tabs and work 2 sc stitches to secure the connection.
- Opposite Curve:
- Work 12 single crochet (sc) stitches across the opposite outer curve.
- Finish the Round:
- Insert hook into the first single crochet of the base round and join with a slip stitch.
- Cut the thread and seal the ends for a neat finish.

Step 3: Snail Shell Edge
- Highlight Color Thread:
- Attach a complementary color to the base edge of the shell (at the bottom of the heart shape formed).
- Work one round of single crochet (sc) stitches evenly around the edge of the snail shell.
- Do not increase or decrease stitches; keep the work even and smooth.
- Finish Edge:
- Once the full round is complete, join with a slip stitch to the beginning, fasten off, and seal the yarn.
Step 4: Head and Antennae
- Locate the Center of the Snail Head:
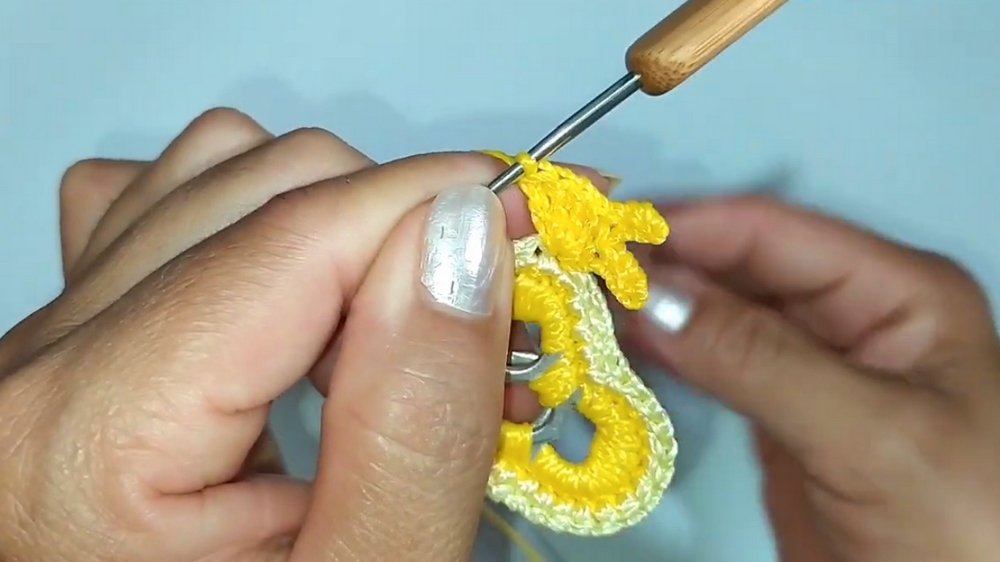
- With the yellow thread, identify the top middle of the snail's head. Count 5 stitches away from the center and insert the hook.
- Create First Antenna:
- Attach thread and chain 4 stitches.
- Work a slip stitch into each chain to form the antenna.
- Complete the last chain stitch with a slip stitch into the base of the snail's head.
- Create Second Antenna:
- Chain another 4 stitches and repeat the process, joining back at the base with a slip stitch to secure.
- Complete the Head:
- Below the antennae, work 4 double crochet (dc) stitches to create a rounded head.
- Transition to half double crochet (hdc) stitches along the remainder of the head.
- Form the Face Curve:
- To define the snail’s face, work single or half double crochet stitches carefully around the edge following the contour of the shell.
Step 5: Facial Features
- Eyes (Black Thread):
- Use small black thread to embroider the snail's eyes directly onto the head space. Alternatively, sew small beads or pearls symmetrically for added charm.
Step 6: Optional Application Attachments
- Magnet:
- Use hot glue to attach a small magnet to the center back of the snail.
- Clip:
- Glue a 4 cm duckbill clip to the back for use as a hair accessory or decorative clip.
- Keychain:
- Attach a keyring securely at the top of the snail's head using a slip knot and thread for strength.

Customization Ideas
- Experiment with Colors:
- Use mixed or gradient tones for a vibrant and whimsical design.
- Embellishments:
- Add embroidered patterns, sequins, or rhinestones to the shell for extra sparkle.
- Size Variations:
- Use thinner or thicker thread and adjust the hook size to create smaller or larger snails.
Conclusion
Congratulations on completing your adorable snail project! Whether as a keychain, hair clip, or refrigerator magnet, it is a practical and charming creation that allows you to repurpose soda can tabs creatively. This project is beginner-friendly, eco-conscious, and customizable for various applications.
Maintenance Tips
- Cleaning: Spot clean with a damp cloth if needed; avoid full water immersion to protect the glued seams.
- Storage: Store in a dry area to prevent damage or warping.
- Durability: Reinforce any glued or attached parts for added strength, especially if used on keychains.