
Free Fried Chicken Drumstick Crochet Pattern for Kids

This piece offers not just appealing looks but a pleasant tactile sensation as well. It makes a delightful and unexpected gift for friends or family members who have a fondness for unique collectibles or imaginative items. Adding this whimsical object to any room brings warmth, joy, and a bit of fun to everyday life.
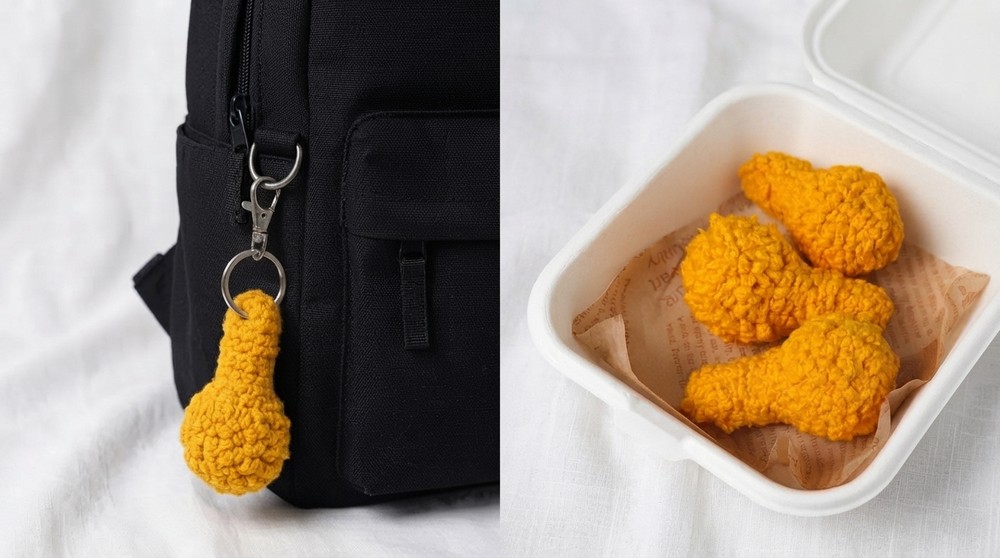
This friendly item is simple and enjoyable. Suitable for both beginners and experienced needleworkers, this project provides a wonderful opportunity to enhance skills while producing something playful and unique. Bring this delightful food-inspired companion to life and brighten your surroundings with a touch of creativity and cheer.
Fried Chicken Drumstick Crochet Pattern
This detailed crochet pattern walks you through creating a realistic, textured fried chicken drumstick using amigurumi techniques. The pattern crafts a drumstick base with carefully placed increases and decreases, followed by a crispy skin layer worked in front loops only to give a tactile look reminiscent of fried chicken skin. This project combines simple stitches with clever textural design, ideal for decorative purposes or as a delightful novelty gift.
Quick Overview of the Pattern
- Drumstick Base: Worked from a magic ring with rounds of increases and decreases, mostly in single crochet (SC).
- Texturing Technique: A separate crispy skin layer crocheted on top using slip stitches and chains worked in front loops only (FLO) for authenticity.
- Stuffing & Closure: The drumstick is stuffed and closed with invisible decreases to maintain a smooth shape.
Notes
- Work in continuous rounds unless stated otherwise.
- Back loops only (BLO) and front loops only (FLO) stitches are used creatively for shaping and texture, so pay close attention to stitch placement.
- Stitch tension should be moderate to tight to prevent stuffing from showing.
- Invisible decreases provide smooth shaping without gaps.
- Optional technique: splitting yarn strands when working the crispy skin adds messy realism by creating texture depth.
- Stuff firmly but carefully to preserve shape and support the embroidered or textured patterns.
Skill Level
Intermediate – The pattern requires familiarity with magic rings, single crochet, increases, invisible decreases including double decreases, and the ability to crochet in the front or back loops only.
Materials
- Worsteds or DK weight yarn in colors suitable for cooked chicken (e.g., warm beige/tan for meat, golden yellow/light brown for crispy skin).
- Crochet hook sized appropriately for your yarn (suggested 2.75-3.5 mm).
- Fiberfill stuffing.
- Tapestry needle for sewing and weaving ends.
- Scissors.
Measurements / Sizing (Approximate)
- Finished drumstick length: approximately 12 cm (depending on yarn and hook size).
- Circumference at thickest part around 8-9 cm.
Gauge and Stitch Pattern
- Average gauge: About 12 single crochet stitches per 5 cm (2 inches), but this is flexible.
- Stitch pattern primarily single crochet worked tightly to maintain firmness.
- Special stitch use: Invisible decreases and front/back loop stitches to sculpt the form and texture.
Stitch Abbreviations
| Abbreviation | Term |
|---|---|
| ch | Chain |
| sc | Single crochet |
| inc | Increase (2 sc in one stitch) |
| inv dec | Invisible decrease |
| inv dec2 | Invisible double decrease |
| sl st | Slip stitch |
| MR | Magic ring |
| BLO | Back loops only |
| FLO | Front loops only |
Special Stitches
- Invisible Decrease (inv dec): A decrease method worked by going under front loops of two stitches to produce a tighter, less noticeable decrease.
- Invisible Double Decrease (inv dec2): Similar to inv dec but decreases over three stitches, creating two stitches merged into one invisibly.
- BLO / FLO: Stitches worked only in the back or front loops of the stitches, used for shaping and surface texture.
The Crochet Pattern
Crocheting the Drumstick Base
Round 1:
- Create a magic ring (MR).
- Work 6 single crochets (SC) into the ring. (6 sts)

Round 2:
- Switch to back loops only (BLO) for all stitches starting this round.
- Work 6 increases by crocheting 2 SC in each stitch (BLO). (12 sts)
Round 3:
- 1 SC, 1 increase (2 SC in next stitch); repeat 6 times. (18 sts)
Round 4:
- 1 SC, 1 increase, 1 SC; repeat 6 times. (24 sts)
Round 5:
- 3 SC, 1 increase; repeat 6 times. (30 sts)

Rounds 6–8:
- Work 1 SC in each stitch around for 3 rounds. (30 sts per round)
Round 9:
- 3 SC, 1 invisible decrease (inv dec); repeat 6 times. (24 sts)
Round 10:
- 1 SC, 1 invisible double decrease (inv dec2), 1 SC; repeat 6 times. (18 sts)
Round 11:
- Work 1 SC in each stitch. (18 sts)
Round 12:
- 1 SC, 1 invisible decrease (inv dec); repeat 6 times. (12 sts)
Rounds 13–19:
- Work 1 SC in each stitch for 7 rounds. (12 sts)
Assembly Step
- At this stage, stuff the drumstick firmly with fiberfill to maintain shape and fullness.

Round 20:
- Work 6 invisible decreases (inv dec) evenly around to close the opening. (6 sts)
- Cut yarn and fasten off, weaving in loose ends securely.
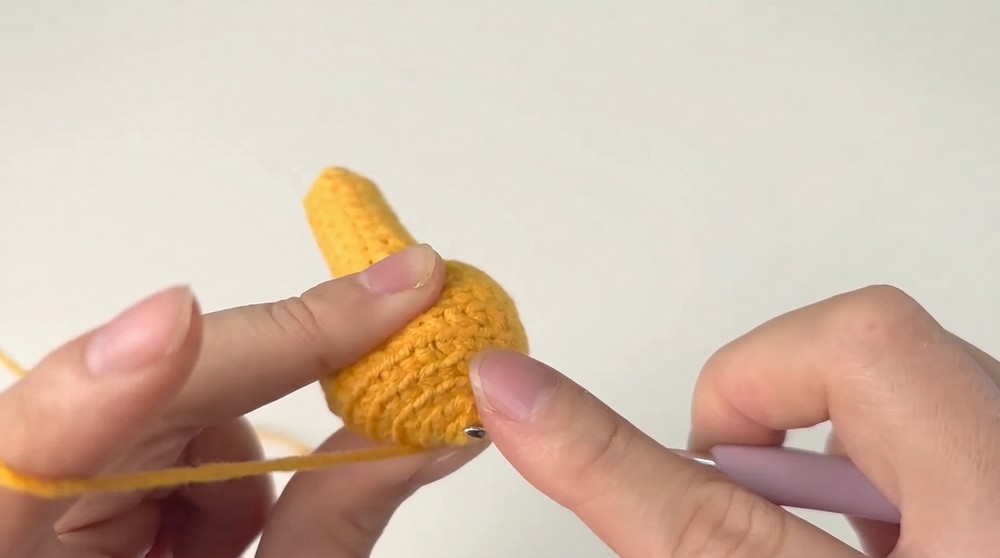
Crocheting the Crispy Skin
- Change to your yarn color representing the crispy skin (e.g., golden yellow or light brown).
- Join yarn by slip stitching into the front loops only (FLO) of the last round.
- Pattern:
- Chain 4.
- Slip stitch into the next stitch's front loop.
- Repeat this chain 4, slip stitch pattern evenly around the circumference.
- Styling tip:
- To simulate the rich texture of fried chicken skin, split your yarn strands and work the slip stitches and chains into only one or two strands of yarn rather than full yarn. This subtle technique adds light fuzz and texture reminiscent of crispy batter.
- For the final rounds of crispy skin, chain 3 instead of 4 before slip stitching to shape petals or skin edges more naturally.
- Continue the front loop slip stitch and chain pattern all the way around, finishing with clean joins.

Assembly & Finished Size
- After completing the crispy skin texture, ensure all ends are woven in neatly and trim any excess fibers.
- The finished fried chicken drumstick measures approximately 12 cm long with a circumference suitable for amigurumi displays or keychain accessories.
- It can be enhanced with a keychain ring, base for décor, or paired with other food amigurumi for display.
Conclusion
This fried chicken drumstick crochet pattern combines classic amigurumi single crochet techniques with advanced texture methods such as invisible decreases and specialized front and back loop stitches. The addition of the crispy skin layer, worked in fine slip stitches on front loops only, elevates the pattern into a tactile and visually appealing piece.

By following these comprehensive instructions, crochet enthusiasts can create an impressive novelty item that brings the warmth and humor of food craft to life. Whether for collectors, gifts, or your own playful projects, this drumstick will be a standout.