
Adorable Free Crochet Mrs. Santa Claus Pattern for Christmas
Make the holiday season special with this free crochet Mrs. Santa Claus pattern that helps you make a charming festive decoration or a heartfelt handmade gift.
There’s something truly special about creating charming holiday figures by hand, and I found this project especially delightful to make. It’s a lovely crochet doll that captures the warmth and kindness of Mrs. Claus. With just small tweaks—like changing her outfit or hairstyle—you can also turn this pattern into a festive elf or a sweet holiday helper. The free crochet Mrs. Santa Claus pattern offers a wonderful way to bring some holiday cheer into your home or gifting circle.
Free Crochet Mrs. Santa Claus Pattern for a Handmade Touch
What makes this Mrs. Claus doll so wonderful is her cozy and inviting look. She has a soft, rounded shape with gentle curves that give her a friendly and warm appearance. Using plush yarn and tight stitches gives the figure a smooth, cuddly texture that you’ll want to hold onto forever. Her classic holiday dress, complete with apron and bonnet details, really stand out and add lots of character to the design. It’s a perfect size for holiday decorating, mantel displays, or as a handmade gift that’s both personal and heartfelt.

This pattern suits beginners with some basic crochet experience and those who enjoy amigurumi. The main stitch you’ll use is the simple single crochet, worked mostly in rounds to create a smooth, seamless look. If you’ve played around with basic crochet toys before, you’ll find this project enjoyable and straightforward. Pay special attention while sewing on the details—they really bring Mrs. Claus to life and make all your hard work shine.
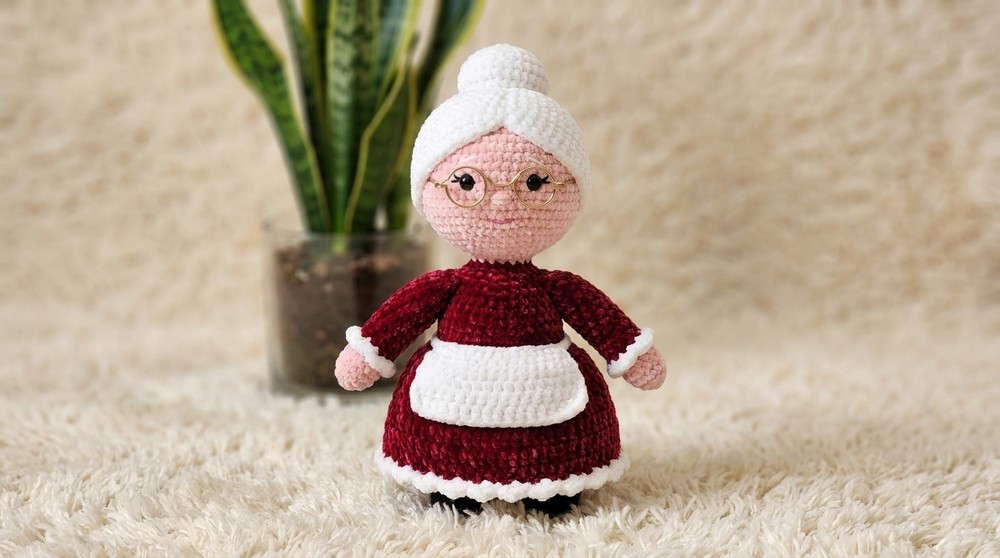
Mrs. Claus makes a perfect holiday gift or a charming decoration that can be treasured year after year. You can also create a small wearable version as a keychain or ornament by adjusting the size. If you love festive crochets that are easy to personalize and share, this pattern is a warm and inviting choice that’s sure to brighten your holiday season.
Amigurumi Mrs. Santa Claus – Step-by-Step Crochet Pattern
This amigurumi Mrs. Claus pattern produces an adorable and classic Christmas figure with all her signature trimmings. The main body is worked in continuous rounds, then shaped with increases and decreases, with color changes to create clothing and accessories. All elements—arms, skirt, apron, hair, and bun—are fully described for an authentic look. If you've made Santa Claus from a similar pattern, you'll love making his companion to complete your festive display or gift set.
Pattern Notes
- Work all rounds in continuous spirals unless otherwise noted (no joining/slip stitch at round ends). Use a stitch marker to keep your place.
- Change colors by pulling the new yarn through the last stitch of the current color.
- All increases are made by placing two stitches in the same stitch.
- Use the invisible decrease for best results unless otherwise indicated.
- Stuff pieces firmly as you go. Finish stuffing and close only after shaping.
- The skirt, apron, and hair are made separately and sewn on at the end.
Skill Level
Easy–Intermediate (Advanced Beginner to Confident Beginner)
- Requires single crochet, increasing and decreasing, color changes, double crochet and half double crochet in the round, and basic sewing.
Materials
- Acrylic (or cotton) yarn in:
- Skin tone or light pink (head/hands)
- Red (dress)
- White (skirt, apron, hair)
- Black (shoes)
- 3 mm crochet hook
- Toy stuffing (polyfill)
- Small safety eyes
- Small reading/doll glasses (optional)
- Tapestry/yarn needle
- Scissors
- Stitch marker or safety pin
Measurements / Sizing
- Approximate finished size: 24–28 cm (9.5–11 in) tall.
Gauge
- Gauge is not critical for amigurumi. If you crochet tightly, the doll will be smaller; looser, it will be larger.
- Reference gauge: 10 sc x 10 rows = 4 x 4 cm with 3 mm hook.
Stitch Abbreviations
- sc = single crochet
- inc = increase (2 sc in 1 st)
- dec = invisible decrease
- hdc = half double crochet
- dc = double crochet
- MR = magic ring
- ch = chain
- sl st = slip stitch
- FO = fasten off
Special Stitches
- Invisible Decrease: Insert hook in front loops of next two sts, yarn over, pull through, yo, pull through both loops.
- Working in the back loop/front loop only: As described; insert hook only under the indicated loop.
The Crochet Pattern
Head & Body
With skin tone/light pink yarn:
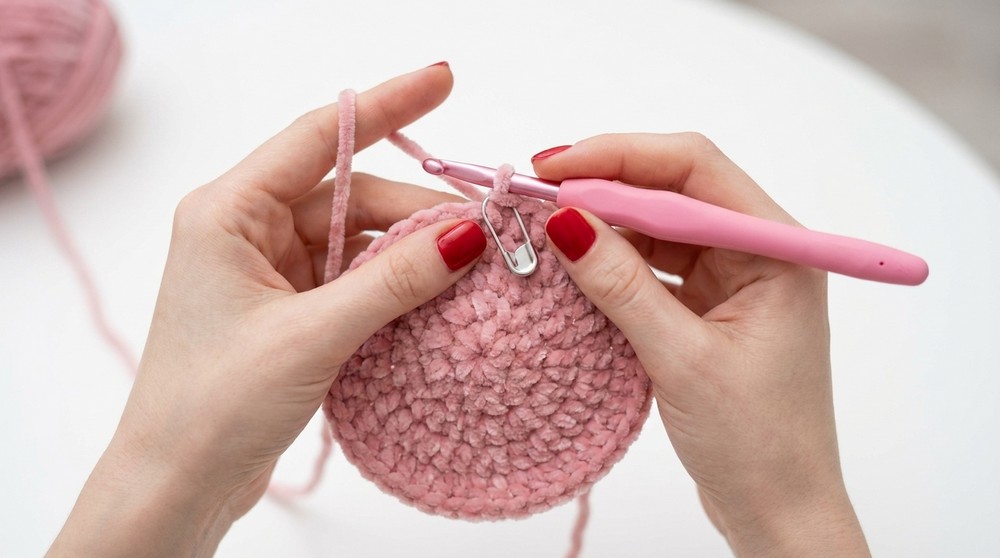
- MR, ch 1, 6 sc in ring (6)
- Inc around (12)
- (Sc, inc) around (18)
- (Sc in next 2, inc) around (24)
- (Sc in next 3, inc) around (30)
- (Sc in next 4, inc) around (36)
- (Sc in next 5, inc) around (42)
- (Sc in next 6, inc) around (48)
- (Sc in next 7, inc) around (54)
- (Sc in next 8, inc) around (60)
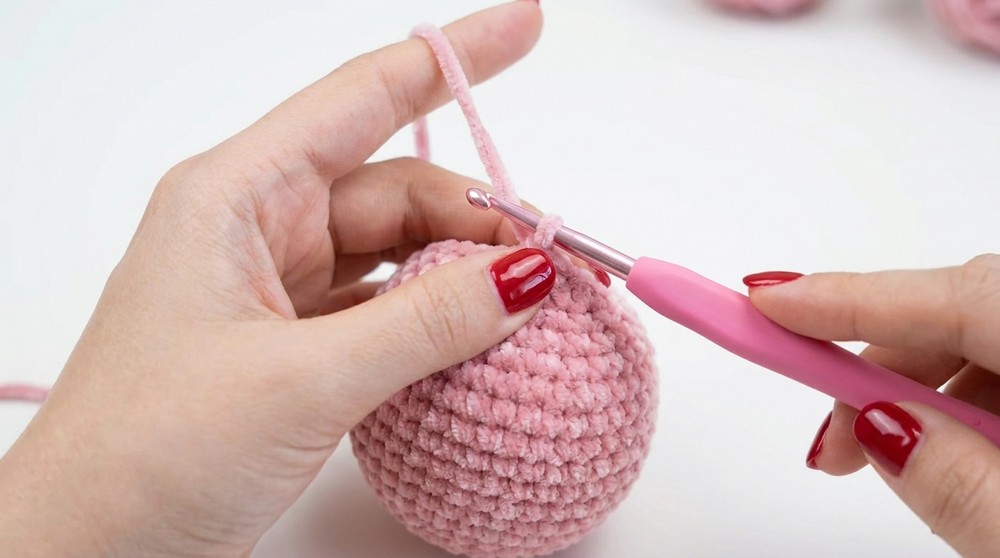
Rounds 11–20:
Sc around (60; 10 rounds).
Decrease for neckline:
21. (Sc in 8, dec) around (54)
- (Sc in 7, dec) around (48)
- (Sc in 6, dec) around (42)
- (Sc in 5, dec) around (36)
- (Sc in 4, dec) around (30)
- (Sc in 3, dec) around (24)
- Stuff the head as you go; add more with each decrease.
- (Sc in 2, dec) around (18)
- Sc around (18)
Change to red yarn for dress (switch in last step of previous round).
- Sc around (18)
- (Sc in 2, inc) around (24)
- (Sc in 3, inc) around (30)
- (Sc in 4, inc) around (36)
- (Sc in 5, inc) around (42)
- (Sc in 6, inc) around (48)
- (Sc in 7, inc) around (54)
- (Sc in 8, inc) around (60)
- (Sc in 9, inc) around (66)
- (Sc in 10, inc) around (72)


Arm Partition & Upper Body
- Flatten top edge. Mark out 16 stitches for each arm partition on either side, using stitch markers. The central 40 stitches are for the torso.
- Torso/Body:
- Rounds 1–7: Sc in each of 40 body stitches around. (7 rounds).
- Round 8: Sc in back loop only (40). Stuff torso well before dividing for legs.
Leg Partition & Legs (Make 2)
- Divide 40 sts: 20 stitches per leg. Finish off red yarn; join to next leg start.
- Rounds 1–12: Sc around (20 sts/round, 12 rounds).
- Change to black yarn for boots:
Rounds 13–17: Sc around (5 rounds; 20 per round). FO, stuff. - Sew bottom closed by weaving in/out with tapestry needle; secure and fasten off.
Repeat for other leg.
Arms (Make 2)
Using red yarn:
- Join at armhole, ch 1.
- Round 1: Sc in each of 16 arm sts around.
- Rounds 2–11: Sc around (11 rounds).
- Round 12: Sc in back loop only (16).
- Switch to skin tone yarn:
- Rounds 13–15: Sc in each st (3 rounds); stuff tightly, FO.
- Sew hand closed, weave in end.
Sleeve Edges:
Into front loop only round, join white yarn.
Ch 2, hdc in each front loop around, sl st to join, FO and hide tail.
Skirt
Using red yarn:
- Join red in front loop only round at waist.
- Ch 2 (not counted as dc), dc in the same st and next 3 sts, (dc inc in next st, dc in next 4) around (50 dc total). Sl st to first dc.
- Ch 2, (dc in next 4, dc inc in next) around (60 dc total). Sl st to join.
- For fullness:
- Rounds 3–5: Ch 2, dc in each st around, sl st to first dc (3 more rounds). (60 dc per round)
- Switch to white yarn. Ch 2, hdc in each st around, sl st, FO.

Apron
With white yarn:
- Ch 101.
- Row 1: Sc in second ch from hook and each st across (100 sc). FO.
- Body: Skip 30 sts each side, then into the 31st st, dc across next 40 sts.
- Rows 2–4: Ch 2, turn, dc in each st across for 3 rows. FO.
- Tie or sew apron in place at waist, make a simple bow at back.
Hair Cap
With white yarn:
- MR, 6 sc in ring.
- Round 2: 6 inc (12)
- (Sc, inc) x 6 (18)
- (Sc in 2, inc) x 6 (24)
- (Sc in 3, inc) x 6 (30)
- (Sc in 4, inc) x 6 (36)
- (Sc in 5, inc) x 6 (42)
- (Sc in 6, inc) x 6 (48)
- (Sc in 7, inc) x 6 (54)
- (Sc in 8, inc) x 6 (60)
11–18. Sc around for as many rounds as needed to cover upper head. - For hair edge: Sl st in next st, dc in next 58 sts, sl st in last, FO, leave tail for sewing.
Hair Bun
With white yarn:
- MR, 6 sc in ring.
- Round 2: 6 inc (12)
- (Sc, inc) x 6 (18)
- (Sc in 2, inc) x 6 (24)
- (Sc in 3, inc) x 6 (30)
6–8. Sc in each st (3 rounds).- Stuff, FO, sew to hair cap.

Assembly & Finished Size
- Stuff all pieces as you go.
- Sew arms to body in marked positions.
- Close off boots and hands, weave in all ends.
- Sew skirt edge to waist securely.
- Attach apron: stitch at waist or tie a bow at the back.
- Place hair cap on head and sew down perimeter, covering all skin yarn. Attach bun at back/side of head as desired.
- Insert safety eyes and place/glue reading glasses in position.
- Weave in all ends or hide them in stuffing.
- Finished doll: approx. 24–28 cm tall.
Quick Overview for Beginners
- Crochet the head and body as one piece, changing colors for clothes.
- When the torso is done, divide and crochet the legs from the body. Attach boots.
- Arms are worked from marked spaces; change to skin tone for hands, join sleeve trims.
- The skirt is worked directly to the waist on front loops left at the lower edge.
- Create and attach the simple apron, then fasten as you like.
- Crochet the hair cap and bun; sew to head once done.
- Add facial features—eyes and glasses.
- Sew all pieces together, weave in all ends, and enjoy your Mrs. Claus!