
Crochet Mini Moana Amigurumi Pattern Full of Character
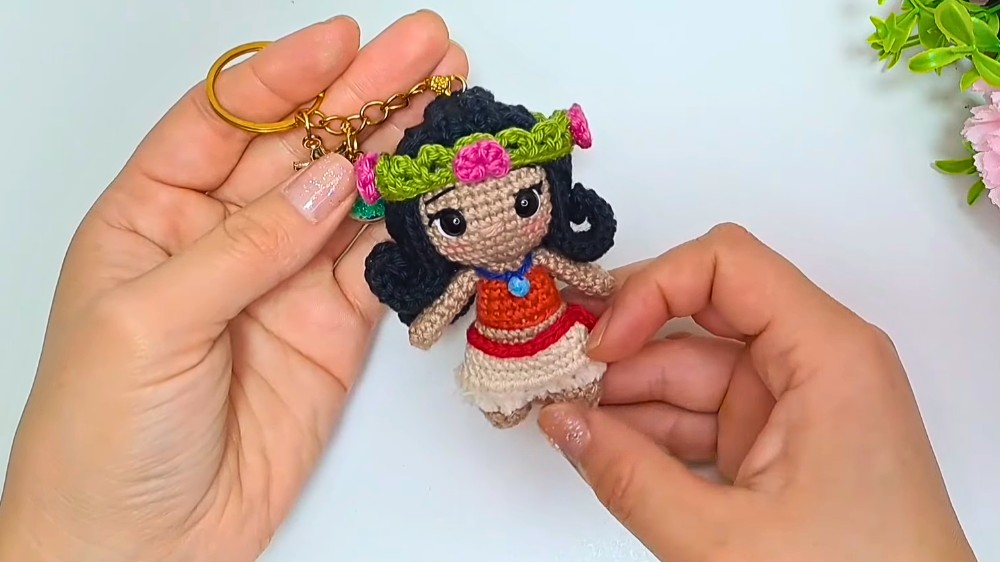
Bring lively charm to your day with the Free Crochet Mini Moana Amigurumi Pattern, a delightful keychain-sized project full of joy and purpose.
On bright, daydream-filled afternoons, small treasures often find special places whether dangling from keyrings or decorating desks bringing whimsy and delight to everyday life. The Crochet Mini Moana Amigurumi captures that joy by guiding you through the creation of a miniature Moana that charmfully carries a touch of adventure wherever she goes. Key features include her compact size ideal for attaching to bags or keys without weighing them down and the appealing mix of firmness and softness provided by tight stitching.
Crochet Mini Moana Amigurumi Pattern That’s Too Cute to Miss

Benefits go beyond aesthetics: this project builds stitch precision, enhances hand-eye coordination, and offers a satisfying outcome for both first-time amigurumi makers and experienced crocheters. Mini Moana becomes not just a decorative accent, but a wearable piece of personalized charm that brings joy both to the maker and to those who see her hanging in daily use.
Materials
- Yarn: 1 mm cotton yarn (colors: skin/flesh, terracotta, raw, black, red, green, fuchsia or desired flower colors)
- Crochet Hook: 2.0 mm
- Stuffing: Polyester fiberfill
- Safety Eyes: 7 mm
- Bead: Small light blue bead for necklace (optional)
- Needles: Yarn/tapestry and sewing needle
- Pins (for assembly)
- Scissors
- Glue: White (optional, for securing knots and details)
- Keychain ring (optional)
- Stitch markers
Abbreviations (US Terms)
| Abbreviation | Meaning |
|---|---|
| MR | Magic ring/circle |
| sc | Single crochet |
| inc | Increase (2 sc in same st) |
| dec | Decrease (sc2tog) |
| sl st | Slip stitch |
| ch | Chain |
| BLO | Back loop only |
| FLO | Front loop only |
| hdc | Half double crochet |
| st(s) | Stitch(es) |
| rep | Repeat |
Special Notes
- Work in continuous rounds unless otherwise specified.
- Use stitch markers for the first stitch of each round.
- For color changes, fasten off previous color and tie off securely.
- When attaching strips or fringe, use scraps of yarn and reinforce as needed.
- Do not overstuff limbs; shape as you go.
- Safety eyes recommended; glue or sewing for additional details.
Pattern
FEET & LEGS (Make 2)
With skin tone yarn:
- MR, 10 sc in ring. Sl st to join. (10 sts)
- Rnd 2: BLO, sc in each st around. (10 sts)
- Rnd 3–5: Sc in each st around. (10 sts per round)

- Cut yarn on first leg. On second leg, do NOT cut; proceed to join.
JOIN LEGS & BODY
- With working yarn, ch 1.
- Join the two legs with a sc near the last sts of each leg.
- Rnd 6: Sc around first leg (10 sts), sc in the joining chain, sc around second leg (10 sts), sc in joining chain. (22 sts total)
- Rnd 7–8: Sc in each st around. (22 sts per round)
- Stuff legs.
BODY SHAPING
Decrease rounds:
- Rnd 9: BLO (9 sc, dec) x2 (20 sts)
- Rnd 10: (8 sc, dec) x2 (18 sts)
- Change to terracotta yarn (top color)
- 1 round: Work 18 sl st around for neat color change.
- Rnd 11: Work sc into upper part of the sl st chain (one sc in each upper strand, 18 sts).
- Rnd 12: (7 sc, dec) x2 (16 sts)
- Rnd 13: Sc in each st around. (16 sts)
- Change to skin color
- Rnd 14: BLO (2 sc, dec) x4 (12 sts)
- Stuff body.
- Rnd 15: (sc, dec) x4 (8 sts)

DRESS FRINGE
With raw yarn:
- Attach to body where strands were left (from BLO rounds).
- Ch 1, sc in same loop, mark first sc. Work 22 sc around. (22 sts)
- Next 2 rounds: Sc in each st around. (22 sts per round)
- Fasten off, leaving tail. Use needle to finish skirt edge (bottom-to-top sewing optional).
- Strips: Cut yarn pieces, fold, and pull through stitches at skirt edge to create fringe. Shape and trim as desired. Reinforce knots with glue or a few stitches.
WAIST BAND
With red yarn (or preferred color):
- Make a slipknot, ch 32.
- Fasten off, position above skirt, glue or sew in place.
ARMS (Make 2)
With skin tone yarn:
- MR, 6 sc in ring.
- Rnd 2–8: Sc in each st around. (6 sts per round)
- Do not stuff arms.
- Leave a long tail for sewing.
HEAD
With skin tone yarn:
- Starting at neck: You now have 8 sts from body top.
- Rnd 16: Inc in each st around. (16 sts)
- Rnd 17: (sc, inc) x8 (24 sts)
- Rnd 18: (2 sc, inc) x8 (32 sts)
- Rnd 19–27: Sc in each st around. (32 sts per round)
- Place safety eyes between rounds 21 and 22, 6 sts apart. Stuff head.
Decrease rounds:
6. Rnd 28: (2 sc, dec) x8 (24 sts)
- Rnd 29: (sc, dec) x8 (16 sts) (Stuff head firmly.)
- Rnd 30: 8 dec around. (8 sts)
- Fasten off, sew hole closed using yarn needle.

HAIR
With black yarn:
- MR, 8 sc in ring. Sl st to join.
- Rnd 2: Inc in each st around. (16 sts)
- Rnd 3: (sc, inc) x8 (24 sts)
Hair Strands:
- Into each of the 24 sts, create strands:
- For 10 strands (skip one st at base):
- Ch 21, 20 hdc back along chain, sl st to next base st (skip 1 at base). Repeat 10 times.
- For 4 strands (do NOT skip at base):
- Ch 21, 20 hdc back along chain, sl st to next base st. Repeat 4 times.
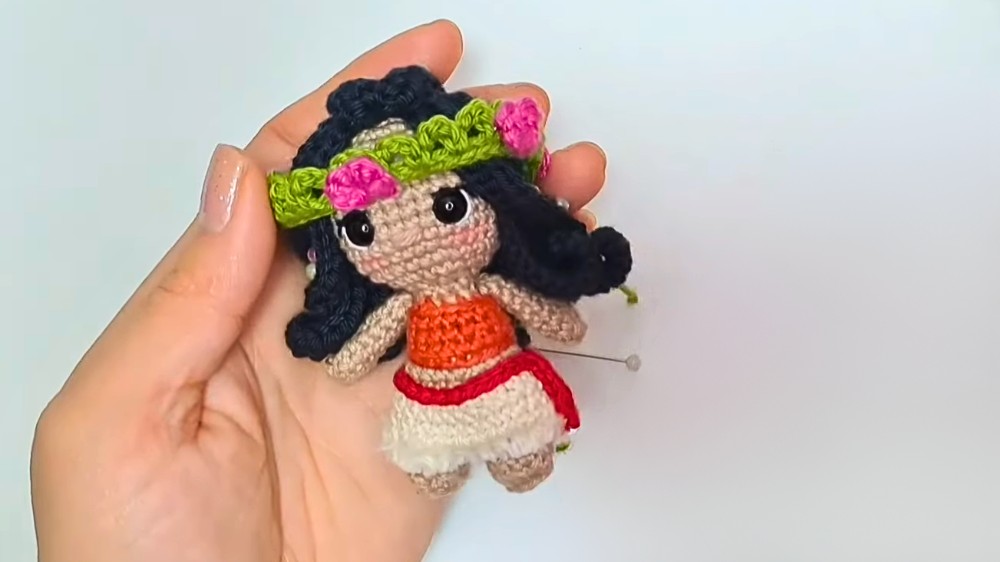
- Fasten off. Place and sew or glue hair to head as shown. Four strands are placed at the front.
- For 10 strands (skip one st at base):
HAIR DECORATION
With green yarn:
- Make a slipknot, ch 36.
- Work 35 sl st along chain.
- For flower loops: (ch 4, skip 1, sl st in next st); rep across.
- Fasten off, shape and sew to hair.
Flowers (Make 5):
- With fuchsia yarn:
- MR.
- (ch 1, sc, sl st) four times to make 4 petals.
- Pull ring closed, secure, and sew or glue flowers to decoration. Distribute as shown (one center, two each side).
NECKLACE (Optional)
- Thread light blue bead onto blue yarn.
- Tie necklace around neck.
Assembly
- Sew arms directly aligned with legs.
- Attach hair, then hair decoration and flowers as instructed.
- Embroider face as desired (refer to linked embroidery video for guidance).
- Attach keychain ring if desired.
Conclusion
Congratulations! Your Moana amigurumi is complete, featuring detailed hair, skirt, and accessories. You can customize colors, flower placement, or add optional details like a necklace and keychain ring.
Pattern Correction
- For increased neatness, ensure all strands/fringe are trimmed and knots are reinforced.
- Placement of facial features, hair, and flowers requires careful positioning. Use pins before securing.
Tips
- Use stitch markers to prevent mistakes in rounds.
- Stuff body and head as you go for even shaping.
- Reinforce knots with glue or stitches for durability (especially if selling).
- Sew arms and fringe securely.
- Adjust color choices to personalize Moana.