
Simple Crochet Amigurumi Pumpkin Free Pattern With Fall Charm
Celebrate the fall season with this Crochet Amigurumi Pumpkin Free Pattern featuring a classic shape and sweet decorative details.
A small, soft pumpkin made with yarn and a hook can be a fun and simple project for everyone. A Crochet Amigurumi Pumpkin Design By Cute n' Crafty is a tiny, cuddly pumpkin formed using crochet techniques. It works well as a decoration during the fall season or Halloween time.
Mini Crochet Amigurumi Pumpkin Free Pattern For Halloween Displays
The pumpkin can be found in many beautiful colors—not just orange. Shades like white, green, or purple can be chosen to make each pumpkin special and different. Sizes can also vary, from tiny ones that fit in the palm of your hand to larger ones that serve as cushions or soft toys. This pumpkin can sit on a table, hang from a bag as a keychain, or be a charming gift for someone special.
The most important stitch used is the single crochet stitch, which helps shape the pumpkin’s round form by working in circles. Changing the number of stitches in each round helps to form the pumpkin’s smooth curves and its sections, similar to those found on a real pumpkin. A small green stem made with yarn is usually added on top to finish the look.
These little pumpkins are soft and safe, making them suitable to use or give to children. They brighten any room with their friendly appearance and add a touch of warmth and color. Having a crochet amigurumi pumpkin around shows skill and care, and adds a nice handmade detail to any space.
Whether used for decoration, a gift, or as a small toy, a crochet amigurumi pumpkin is a delightful object that brings softness and color into everyday life.
About the Pattern
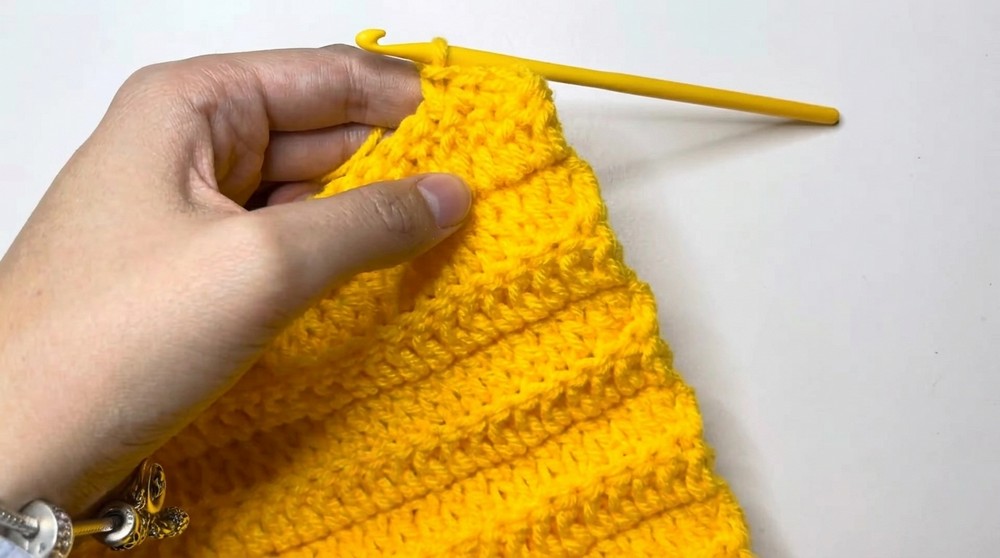
This crochet pumpkin project features a beautifully textured, ribbed body with distinct grooves and a separate crocheted stump. Using simple crochet stitches and construction techniques, the pattern is designed to be approachable for beginners while also providing a satisfying result for experienced crocheters. The process comprises creating a flat rectangular body, assembling it into a three-dimensional shape, and adding the signature pumpkin grooves before finishing with a magic ring-based stump.

Key Pattern Details
The completed pumpkin displays ribbed texture created by working in the back loops only, with defined shaping formed through strategic wrapping and gathering. The assembly method ensures a seamless finish, and the separate crocheted stump adds a realistic, whimsical touch. Customization options include adjusting the number of rows for different pumpkin sizes and varying the height of the stump.
Important Notes
- Gauge is not crucial, as this decorative item can vary in size according to personal preference.
- Using a smooth, tightly twisted yarn will help the pumpkin maintain its shape and show stitch definition.
- Fiberfill stuffing is recommended to achieve a plump, well-rounded pumpkin.
- Pay attention to single crochets when joining the pumpkin sides to ensure a secure seam.
- Pulling the yarn tightly during gathering is essential but do so gradually to avoid breakage.
Difficulty Level
Beginner-friendly. This project uses basic stitches such as the chain, double crochet, single crochet, and simple increases, making it accessible to those new to crochet.
Supplies Needed
- Worsted weight yarn (orange or desired pumpkin color for body; brown or green for stump)
- Crochet hook suitable for your yarn weight (commonly size H/5.0mm or I/5.5mm)
- Yarn needle for weaving and assembling
- Scissors
- Fiberfill or stuffing of choice
- Optional: hot glue for stump attachment
Size & Measurements
Size is customizable based on the number of chains and rows. The referenced sample was constructed with a 42-chain foundation and 34 rows. The diameter and height may be adjusted by varying these variables or substituting a different yarn weight.
Gauge & Stitch Details
- Gauge is not critical for this pattern.
- Stitches used:
- Chain (ch)
- Double Crochet (dc)
- Single Crochet (sc)
- Magic Ring (mr)
- Back Loop Only (BLO): Work the stitch into the back loop of the indicated stitch only, creating the ribbed texture.
Crochet Abbreviations
- ch = chain
- sc = single crochet
- dc = double crochet
- BLO = back loop only
- st = stitch
- inc = increase (2 stitches in the same stitch)
- mr = magic ring
Special Stitch Guide
Double Crochet in Back Loops Only (dc BLO):
Insert hook into back loop of indicated stitch, yarn over, pull up a loop, yarn over, pull through two loops, yarn over, pull through remaining two loops.
Magic Ring (mr):
Loop yarn to form an adjustable ring, work stitches into ring, pull tail to tighten center.
Complete Crochet Pattern
Pumpkin Body
Foundation:
- Chain 42 (40 foundation chains plus 2 extra).

Row 1:
- Work 1 double crochet (dc) in the 2nd chain from hook.
- Work 1 dc in each stitch across the row.

Row 2 to 34 (or until desired size):
- Chain 2, turn.
- Work 1 dc in the back loops only (BLO) of each stitch across.
- Repeat this row until you complete 34 rows or reach your desired height.
Assembly of the Body
Joining:
- With working yarn still attached, fold the rectangle so the short ends align.
- Single crochet (sc) across the two short edges, joining them together into a tube.
Closing the Ends:
- Thread a yarn needle with a long piece of yarn.
- Weave the needle in and out along one open edge of the tube, gathering the stitches.
- Pull the yarn gradually and firmly until the end closes tightly to form the pumpkin base.
- Secure the closure with a knot.
Stuffing:
- Turn the piece inside out so the seam is on the inside.
- Stuff generously with fiberfill or your preferred stuffing material.
Closing the Top:
- Thread the yarn needle again with a long tail.
- Weave in and out through the stitches around the remaining open edge.
- Pull tightly to close the top.
- Knot securely to hold the stuffing inside.
Shaping (Creating Grooves):
- Using a long piece of matching yarn, anchor at the top center.
- Wrap the yarn over the outside of the pumpkin, going over the side and bringing the yarn around the bottom and back up to the top.
- Pull the yarn to indent the side, forming the first "groove."
- Repeat for 5–8 grooves spaced evenly around the pumpkin, securing each time at the top.
- Knot at the top to secure all groove lines.
Crocheted Stump
Round 1: Magic Ring
- Create a magic ring.
- Work 6 single crochets (sc) into the magic ring and pull tight.
Round 2: Increase Round
- Work 2 sc into each stitch around (total: 12 sc).
Round 3: Transition Round
- (1 sc, 1 inc) repeat around.
- This creates slight shaping above the base.
Rounds 4 to 9: Height
- Work 1 sc into each stitch around (work for a total of 6 rounds for a medium stump or adjust for desired height).
Finishing:
- Cut the yarn with a long tail.
- Stuff the stump lightly with fiberfill.
- Sew stump closed at the top if needed, leaving the flat, wider base.
Attaching the Stump:
- Place the stump at the center top of the pumpkin.
- Use the yarn tail and needle to sew it to the pumpkin, stitching all around the base for security.
- Alternatively, hot glue can be used to attach the stump.

Joining & Final Size
Joining the body with single crochet ensures a durable seam hidden inside. Proper stuffing and careful gathering are essential for the authentic, plump pumpkin appearance. Smooth and even "groove" wrapping defines sections, enhancing realism. The completed pumpkin's size depends on initial chaining and number of rows, but the construction remains the same regardless of customization.

Final Words
This pumpkin project highlights beginner crochet skills while encouraging creativity and custom sizing. The textured ribbed body, clever construction techniques, and approachable stitches make this a rewarding project for autumn decor or festive gifts. Each step, from crocheting the body to shaping and attaching the stump, contributes to the overall handcrafted look and feel, making this pumpkin a charming addition to any home or seasonal display.