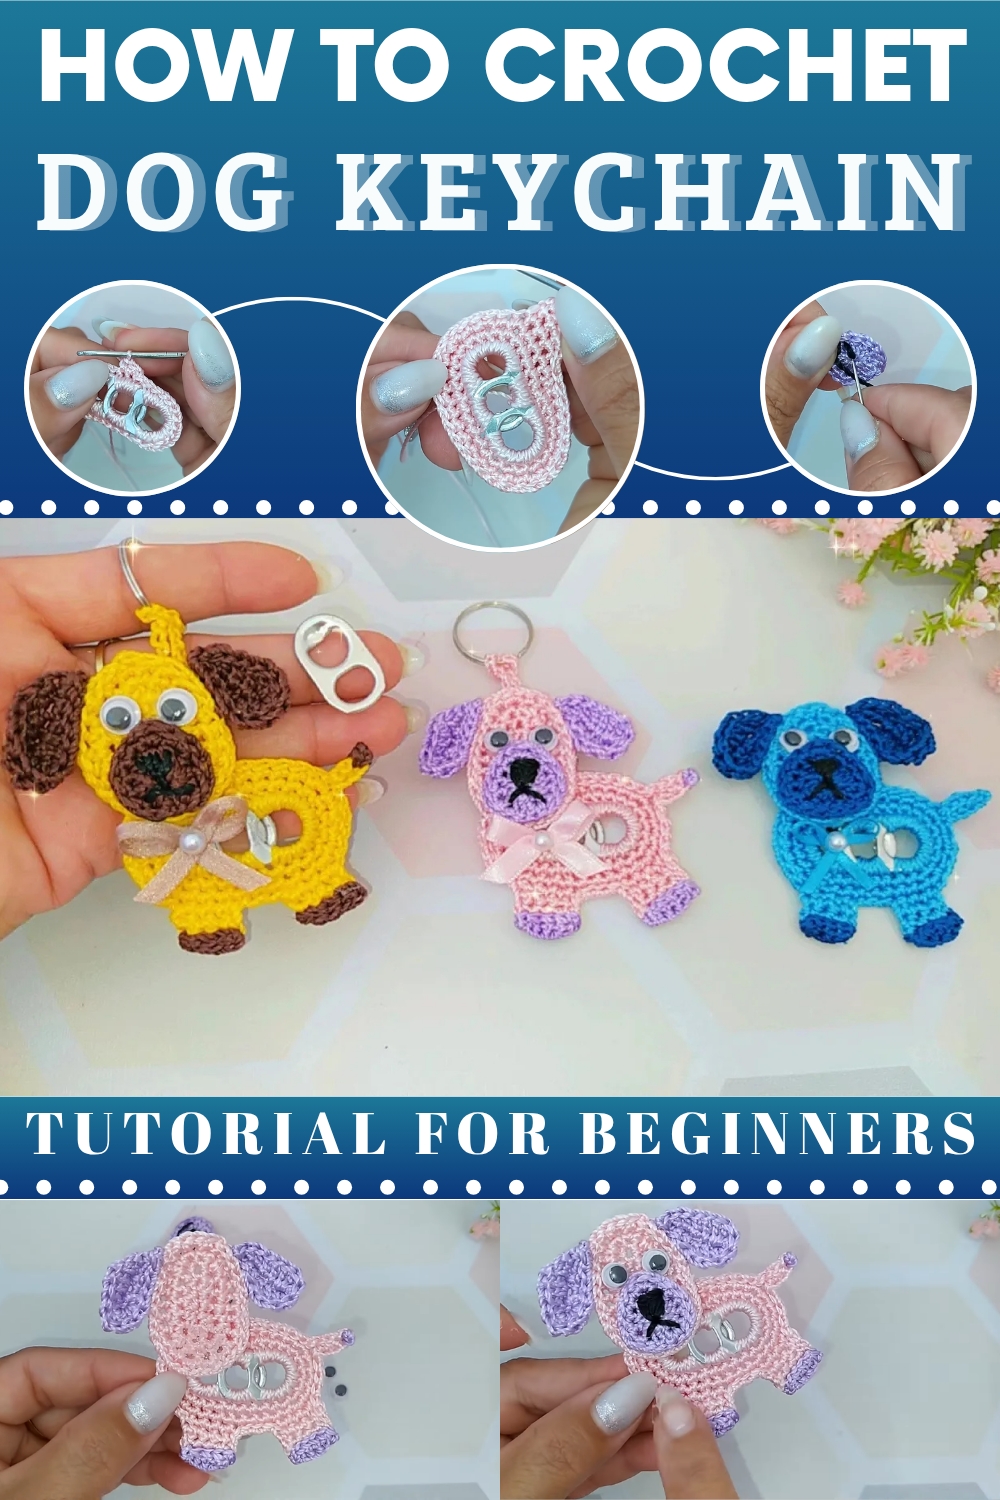
Free Crochet Dog Keychain Using Soda Can Tab That's Easy
Tiny adorable and upcycled this Crochet Dog Keychain Pattern with a soda can tab is a fun eco-friendly project perfect for gifts bags or daily use.
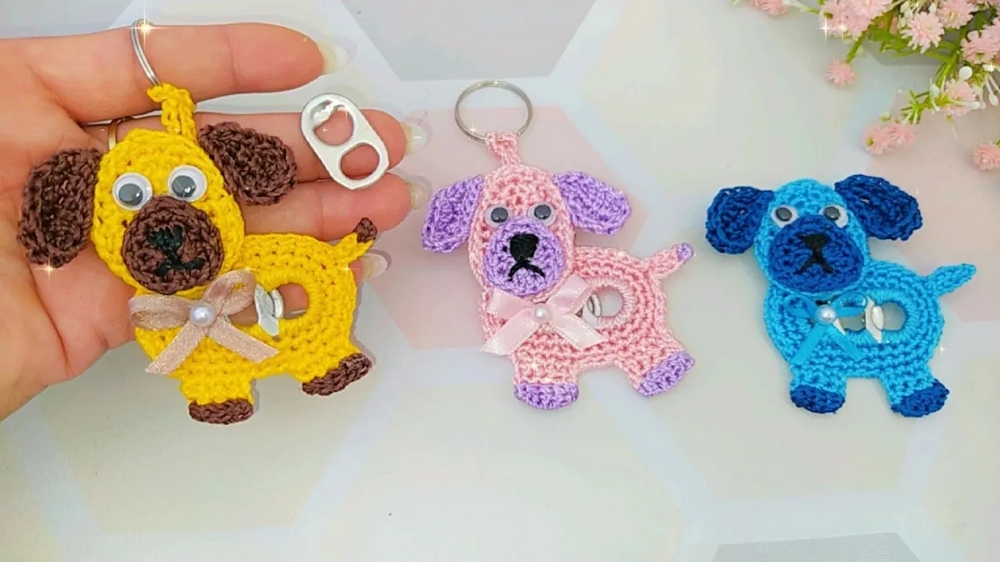
From a humble soda can tab emerges a delightful transformation that brings joy to daily life: a charming crochet dog keychain. This creative project is not just a fun pastime, but also a resourceful way to repurpose and turn an everyday object into something adorable and functional. At its core, the project involves skillfully combining traditional crochet techniques with a touch of ingenuity to produce a piece that’s perfect as a keychain, fridge magnet, or decorative accessory. The adorable puppy design adds a whimsical touch, making it a heartwarming choice for personal use or as a handmade gift.
How to Crochet Dog Keychain Pattern Using a Soda Can Tab
This crochet dog keychain isn’t just a visually appealing accessory; it also offers versatility and practical value. Whether adorning your keys, magnetizing your fridge, or serving as a heartfelt handmade gift, this piece is a perfect blend of creativity and functionality. Affordable and lightweight, this keychain are excellent items to make and sell while utilizing minimal resources. The enduring appeal of this delightful project lies in its blend of simplicity, resourcefulness, and charm.
FREE Crochet Dog Keychain Pattern
Finished Size:
- Approximately 5–6 cm (2–2.4 inches) tall, depending on the number of stitches and tension.
Materials
Yarn
- Thick Silk/Polypropylene Thread – Tex 288 or similar, 100% polypropylene.
- Primary Color: Use for the base (e.g., white, beige, or a puppy color of your choice).
- Accent Colors: Use for the ears, nose, tail, or decorative detailing (e.g., lilac, black, or pink).
Tools
- Crochet Hook: 1.75 mm.
- Soda Can Tabs: Two clean tabs, edges sanded or smoothed with pliers for safety.
- Tapestry Needle: Blunt-tip, for sewing and weaving ends.
- Scissors: For cutting yarn.
- Lighter or Heat Sealer: To seal the polypropylene thread and prevent fraying.
- Pliers (optional): For smoothing the soda tab.
Optional Materials
- Keychain loop or magnet for finishing the project.
- Craft glue for securing magnets or other attachments.
Skill Level:
Beginner to Intermediate.
This project uses basic crochet stitches, such as single crochet, slip stitches, increases, and half-double crochets.
Stitch Key (US Terminology):
- ch: Chain.
- sc: Single Crochet.
- hdc: Half Double Crochet.
- dc: Double Crochet.
- sl st: Slip Stitch.
- inc: Increase (2 stitches into the same stitch).
- dec: Decrease (crochet 2 stitches together).
Special Techniques and Tips
- Soda Tab Preparation:
- Use pliers to smooth away sharp edges to ensure safety.
- Turn the pliers over the edges to avoid scratching hands during crocheting. If handling or sanding the edges is not possible, use craft tape to cover them.
- Sealing Polypropylene Thread:
- Use a lighter or a heat sealer to gently seal the thread ends, preventing fraying and reinforcing durability.
- Invisible Join:
- Thread the yarn tail into a tapestry needle. Skip the last stitch, insert the needle under both loops of the first stitch, and bring it back into the last stitch. This creates a seamless finish.
Complete Crochet Pattern
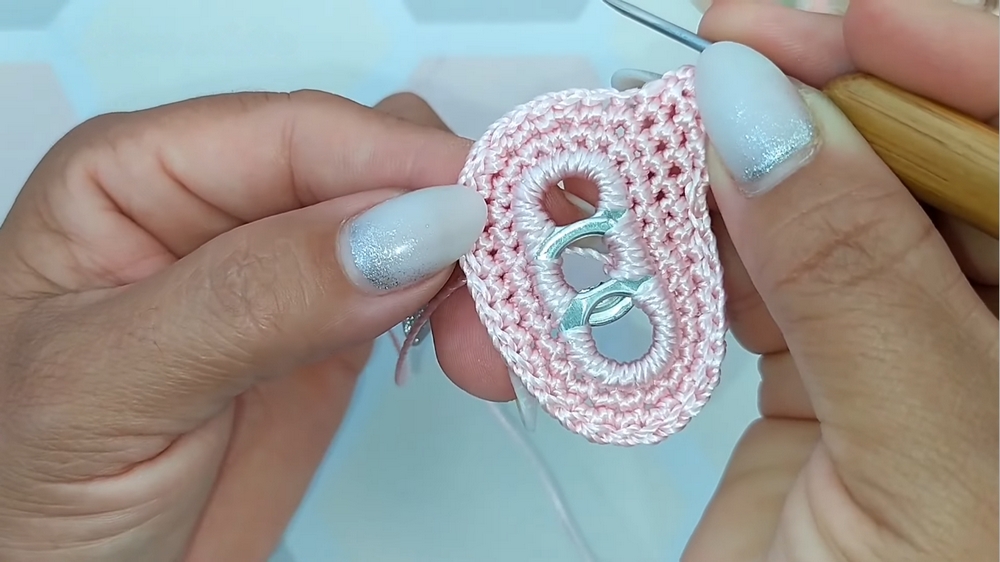
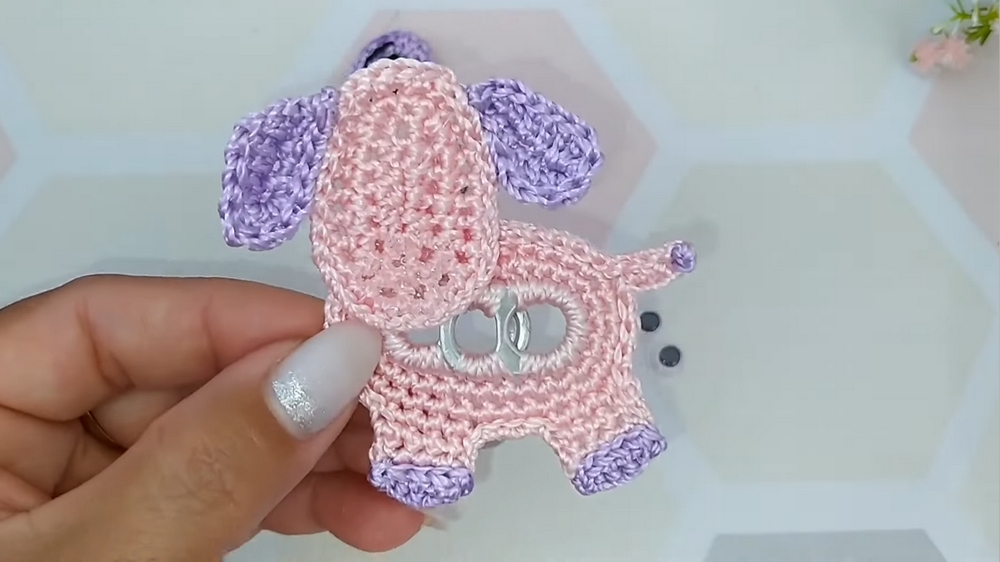
Step 1: Preparing the Soda Tabs
- Clean and Smooth the Tabs:
- Remove any sharp or rough edges of the tabs using pliers or sandpaper to smoothen them for safety.
- Align the Tabs:
- Place one tab over the other, ensuring they are perfectly aligned. Secure the placement by holding with your hands.
Step 2: Crocheting Around the Tabs
Foundation Round:
- With your 1.75 mm crochet hook, insert the hook into the middle of both tabs and loop your silk thread.
- Work 3 sc into the middle hole of the tabs.
- Move to the curved edge of one tab and work 12 sc around it, evenly spaced.
- Repeat 12 sc on the opposite curved edge of the second tab.
- Connect the round with a sl st at the first sc.

Round 2: Outer Base
- Ch 1. Work 1 sc in each stitch (around both tabs) until back at the starting point. Connect with a sl st.
Round 3: Building Texture
- Ch 1. Begin working 1 sc in each stitch until you reach the curved edge.
- In the curved area, add 3 evenly spaced increases (2 sc in the same stitch) to ensure smooth rounding.
- After completing the curve, continue working sc in each stitch along the remaining flat section until you reach the next curve.
- Add 3 evenly spaced increases on the opposite curve. Connect with a sl st.
Step 3: Adding the Puppy’s Legs
- First Leg (Front Left):
- With your working yarn still attached, work 5 sc into the next consecutive stitches.
- Ch 1, turn your work, and sc across all 5 stitches. Repeat for 2 rows.
- To transition to the middle and finish the leg, work sl st across excess stitches, creating a neat finish around the base.
- Second Leg (Front Right):
- Skip 4 stitches on the base.
- Reattach the yarn in the 5th stitch, and repeat the instructions for the first leg. Ensure both legs are similarly shaped.
Step 4: Adding the Tail
Attach the yarn to the back of the base, leaving equal space from both legs.
- Ch 4.
- Work into the chain with the following:
- Sl st in the first ch.
- 1 sc in the second chain from hook, 1 hdc in the next, and 1 dc in the last.
- Join to the base with a sl st.
Step 5: Puppy’s Ears
Each ear is made separately.
- Foundation: Ch 6.
- Work into the chain as follows:
- 1 hdc in 2nd ch from hook.
- 3 dc in the next 3 chains.
- In the last chain, work 5 dc to form the ear’s curve.
- Now crochet back along the other side:
- 1 dc in each of the next 3 chains.
- 1 hdc in the last chain.
- Leave a long tail for sewing onto the base.
Repeat for the second ear. Attach both ears using the tail.
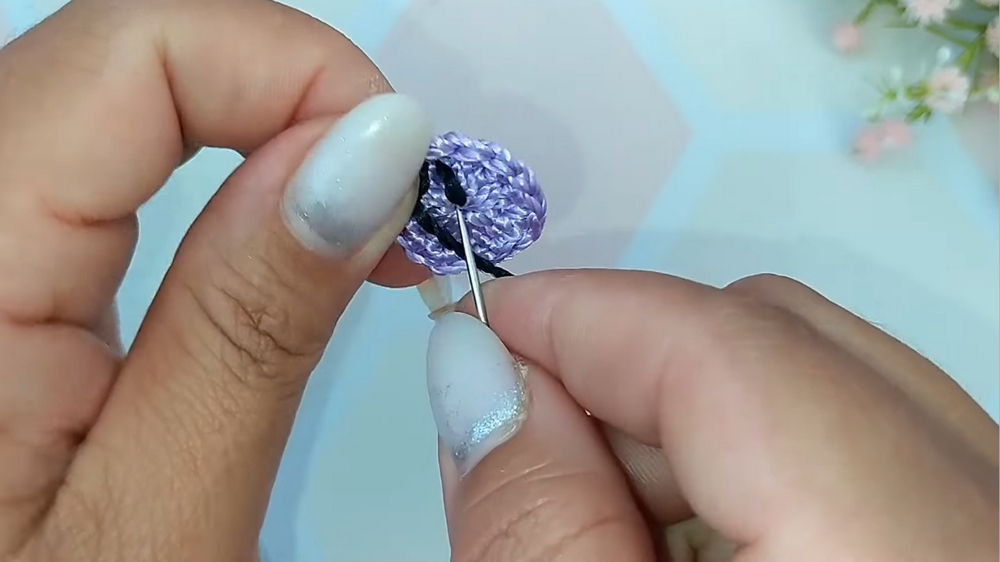
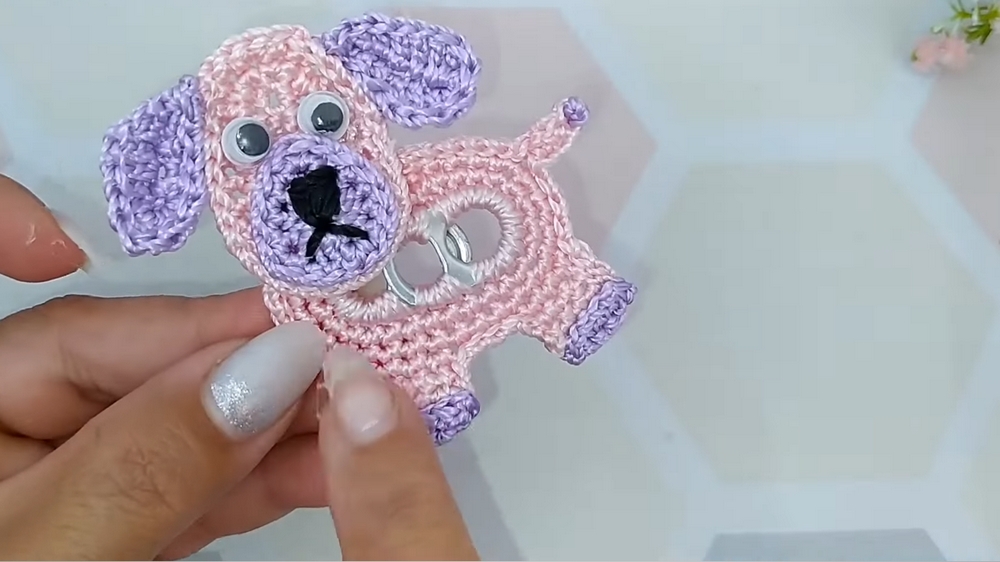
Step 6: Snout
- Create a magic ring.
- Work 4 hdc, 3 dc, and 4 hdc into the magic ring. Close the circle with a sl st.
- Start anew with “rounds” for texture: Work an additional increase round by doubling selected stitches (e.g., 2 sc into every 2nd stitch).
Step 7: Head
- Foundation: Ch 7.
- Work down one side of the chain and back around the other side to form an oval:
- Include 3 increases at the narrow curve and 6 increases at the wider curve.
- Continue shaping for 2–3 rounds, increasing proportionally at the top and bottom curves.
Finishing the Puppy
- Assembly: Attach all the parts (head, snout, ears) onto the soda tab base using the tapestry needle and yarn tails.
- Optional Features: Embroider eyes and the nose with black thread or felt for a playful expression.
- Finishing:
- Seal any loose threads with a heat sealer or lighter.
- Add a keychain loop or adhesive magnet to the back.
Final Words
This Puppy Keychain is a creative and eco-friendly crochet project that brings charm to everyday accessories. It’s both adorable and versatile—ideal for keychains, refrigerator magnets, or even small decorations.
Tips for Success:
- Safety First: Ensure all soda tabs and edges are smooth to avoid injury.
- Customization: Experiment with yarn colors to create different puppy designs.